Original Link: https://www.anandtech.com/show/1075
Xaser III Aluminum: ThermalTake drops Chenming
by Kristopher Kubicki on February 20, 2003 6:39 PM EST- Posted in
- Cases/Cooling/PSUs
Introduction
| Quick Look |
|
| ThermalTake Xaser III V2000A |
The Good |

Click to Enlarge |
+ 1.0mm Aluminum Chassis |
| The Bad |
|
| - Expensive |
|
Back in October, we saw ThermalTake’s Chenming case variant. There were some things we liked about that unit, but with any product, there was room for improvement. At COMDEX, in November, we were pleased to see ThermalTake was not sitting around but putting their research and development to good use.
Several months have passed since then, and it looks like ThermalTake is finally ready to show off their Xaser III. From COMDEX, we knew that the front panel was slightly redesigned, but we were in for quite a surprise when we got our sample unit. Even though the case carries a similar resemblance and design to the original Chenming variant, the entire case was redesigned from the inside out, and in a completely tool less fashion.
ThermalTake switched manufacturers of the case and loaded up on everything from fans to rhombuses to light strips. Although not cheap, ThermalTake put more enhancements in this case than any other we have seen to date. Get ready as we take a close extensive look at the Xaser III!
Special thanks to ENPC.com for providing us with a Xaser III sample.
Construction
Like the Xaser II we looked at, the Xaser III is based on an aluminum design. We have noted from other case reviews that aluminum seems to only provide minimal cooling advantages. However, the light weight and style of aluminum has secured its position in case manufacturing for some time to come.
Our Xaser III came in very impressive packaging. Typically, most of the cases we review do not come as extensively packaged, and the result sometimes leads to an unintentional knick or scratch. Unfortunately, it seems as though some components were not completely secure inside the case, and the result was a chipped molex connector.
Breakdown

Shrinkwrapped for Your Protection |
|
||||||||||||||||||||||||||||||||||||||||
Also like the Xaser II, our V2000A Xaser III did not come with a power supply. Since we have another power supply review coming up, we selected the TTGI 4 Fan 520W power supply to use for the benchmark and examination process.
The V2000A comes with very little acrylic. Unlike some other cases on the market, ThermalTake’s designs tend to carry a buffed or brushed aluminum construction. The V2000A is constructed of a brushed chassis, which The Kingwin 463-WM and Cooler Master ATC-201A both flaunted eye catching surfaces and colors. In fact, the only remotely reflective surface on the entire case is the ThermalTake light strip that runs down the front of the unit. We will get more into the light strip and other mod features later in this article.

Click to Enlarge
The Xaser III weighs in approximately 8.5Kg, which is about 3.5Kg heavier than the original Xaser II Aluminum. We found a large increase in weight in the front panel, where ThermalTake engineers replaced the grill with even more aluminum. Furthermore, the case has been stretched out an additional two inches deeper to accommodate more room inside the case. This small modification will come to haunt us later in the review, unfortunately.
Construction Continued

Click to Enlarge
We heavily criticize cases with sharp edges. Case manufacturer have gotten a little better over the last year, but many still incorporate lazy finishing methods or poor folding techniques which result in bloody knuckles. Usually if we try hard enough we can find an edge that is not folded enough or possibly unpolished. No where could we find even a slightly unpolished piece of metal on the V2000A. Places that traditionally can pinch a digit all were buffed or folded. We paid particular attention to the hard drive bays to make sure we there were no areas that would result in a pinch or stray cut.
Our first surprise came when we realized that the hard drive bays were not removable. Almost every high end case we have ever looked at incorporated some sort of removable hard drive bay. Closer inspection revealed many details about the new bay design with both advantages and disadvantages. On the pro side, the mounting has been replaced with a completely screw less design; definitely something other hard drive mounting techniques have lacked. Furthermore, the bay has also been rotated to face the side panel. We found that the rails have no problem accepting double sized hard drives, like the 10000RPM Seagate we use in our benchmark. Quite frankly, this new radical design works extremely well. Unfortunately, there exists a pitfall in the design of the new bay.

Click to Enlarge
When connecting a single double height SCSI hard drive for the benchmark of this review, we encountered no problems. Unfortunately, when we attempted to connect two drives on the same IDE cable, we realized that the standard 18” IDE cable would not reach from the motherboard to both hard drives. Apparently, when the design team extended the rear of the case, they pulled the motherboard two critical inches away from the drive bays. If the drive bay was not rotated on the side, we probably would have been able to stretch the 18” IDE cables to connect. The only apparent remedy for this problem is to buy longer IDE cables; 24” or longer should do it.
On the other side of the front panel, we found two 80mm ThermalTake 8025A intakes. It looks like as though the fans are positioned directly in front of the hard drives, and should result in ample cooling. We will explore this more when we get to the benchmark section of our review. With the tool less theme of this case, the filters can be removed and cleaned without using a screwdriver. ThermalTake used the same fans throughout the entire case, using the same 80mm fan for exhaust and input. With a theoretical max air flow of 37 cubic feet per minute, we are anxious to get our Xaser III fired up and running. However, we are worried that the 7 fans, each putting out 30dBA, would result in a very loud case.

Click to Enlarge
The upper portion of the chassis depends on a similar plastic rail system for the 5.25” bay. The only components that require tools to install are the 3.25” bay external devices (Zip drive, floppy drive, etc). Other mentionable construction components include an expandable power supply shim. We noted a similar feature in the Xaser II, where larger redundant power supplies could be adapted to fit in the case by removing the shim. Although we do not see an immediate need for such expansion, the expandable comfort is always welcomed.
Features
ThermalTake loaded this case with pretty much any feature or option they could get their hands on. To tour the case in a systematic approach, we started from the inside and worked our way out. We first would like to mention that the Xaser III has very clear, clean instructions on the inside of the cases. Since many of the features on the case are completely non-traditional, ThermalTake provides illustrations right on or next to the component in question. We could tell right away that this case was clearly oriented for the do-it-yourself type of person.

Click to Enlarge
Like the Xaser II, this unit did not have a removable motherboard tray. Typically we do not have kind things to say about cases without removable trays. However, since the Chenming chassis is so massive, there is plenty of room to work inside. While not a true Chenming variant, the structural internal remain similar. The crossbar inside the case was lowered and designed to house a swing panel that holds the side panel fans.
This extra swinging panel looks like another one of those radical designs. Although a lot of manufacturers have been putting fans on the side panel, typically they get caught in the panel when closing or the wires from the side fans produce an unfavorable mess. The extra swinging panel provides a brilliant solution to the problem by eliminating the matter entirely. Furthermore, since the top fan is positioned above the CPU, the fan exhausts heat straight from the CPU heatsink fan. Cooler Master and others have proven this technique works well with the ATC-201A. Our benchmark will prove if it works for ThermalTake.

Click to Enlarge
The expansion card slots grew on us as well. Employing another radical design, the tool less bay did not rely on thumbscrews or even a plate to lock cards in place. Instead, each slot relies on its own plastic locking device. A plastic pin with flat head flips up to unlock each component. The advantage to this method, as opposed to a single plate, is the entire bay does not have to be unlocked to add a single component. While the single plate method works well, it seems all too often that one card jumps out of place as soon as the plate is released.
More Features
Moving on to the underbelly of the case, we saw similar feet to the Xaser II and other Chenming variant cases. However, these feet mechanically differ from the feet we saw on other Chenming variants. Before jumping to conclusions about how little a foot can differ, consider that the Chenming feet slide open only 90 degrees. The difference with the Xaser III design appears to be that we can open the feet all the way, to mimic the stand of an existing Chenming variant, or flip them around to consume approximately an inch less footprint on each side. Whether ThermalTake intended this unmentioned feature, we are unsure. More importantly, if the center of gravity on the case is low enough, this method works. If you plan on loading your Xaser III up with hard drives and skimping by with one DVD drive, the mentioned base modification may work great for you.

Click to Enlarge
As long as ThermalTake keeps adding features we have never seen before, why not add one more. The top of the case has recently become an ideal place for a lot of manufacturers to place additional exhaust fans. The idea remains that warm air rises, so an additional exhaust on the top will pull warm rising air out of the case and increase circulation inside the chassis.


ThermalTake goes one step farther and places the USB2, headphone, line in and 1394 inputs on the top as well, right next to the top exhaust. This makes a lot of sense as most people typically do not place a case with a 205mm x 520mm footprint on their desk. A small plastic cover will keep dust out of the ports if you intend not to use them. Additionally, the connectors for the unit all connect on the motherboard/sound card. Unlike the Kingwin 463-WM case, no connectors need to be fed out the back and plugged in. We were very pleased to see ThermalTake upgrade their connectors to USB2. (The connectors on the Xaser II only provided provisions for USB1).
Front Panel
While we consider many of
the changes on the Xaser III, none of them compare to the changes made on
the front panel. Most notably, the new front panel contains two doors rather
than one. This is achieved by a two step locking mechanism. The first door
can be opened when the key turns 90 degrees clockwise. This bay door covers
the external components, DVD/CD drives, 3.25” drives, etc. Power and reset
are also accessible here.

Click to Enlarge
We thought the second bay door was actually much more interesting. Turning the key all the way around to 180 degrees from the origin, the upper bay door becomes locked again but the second bay door swings open. From here we can remove and clean the intake filters (or just replace the fans if desired). Also, the side panel door that we introduced on the previous page can be locked and unlocked from here.

Click to Enlarge
For all its greatness, the front panel door does have some flaws. Like the Xaser II, the bay door is constructed of a solid aluminum slab. Getting your finger stuck behind this bulletproof door feels only slightly less painful than inserting your finger in a car door and slamming it. The larger, second door, hurts a lot more and will make you wish you had your finger squished by a car door. The first bay door has a small groove along the edge to prevent a finger from getting pinched, but the larger door has a small 5mm ledge that really only proves useful when prying the door open. Since we can usually use the torque from the key to open the second door, the 5mm flap does not have a lot of functionality.


Furthermore, since the weight of the front panel consists of almost half the weight of the unit, we noticed that the second door jam will bend if the door is slammed or forced open a little too hard.
While on the issue of keys, we should also note that you do not want to loose the key for this case. We somewhat jokingly mentioned that the all metal chassis on the Xaser II housed a puny 3mm plastic ring to hold the lock in place. We possibly had a hand in our own demise. Locking the front bay and locking the side panel door essentially immobilizes any attempt to access the internals of the case. If you can get enough leverage, you may be able to bend the side panel to a point where you can bend it off the locking pin inside the case. Our recommendation: place one of the two keys you receive with this case in a very safe place.
Rheobus
The Xaser II had a rudimentary fan controller with an LCD temperature gauge. We had some problems with the original design including a short CPU fan molex wire, but we think ThermalTake went the extra mile with this new rheobus. For those of your not familiar with the terminology, allow us to briefly go over the technology.

Click to Enlarge
Essentially, rheobus is a fancy way of saying fan controller. Most simply offer a turn dial that varies the voltage of the attached device between 7V and 12V. The market has literally exploded with these units since COMDEX. Vantec put out one of the first fan controllers with the Nexus 101 and 201 series controllers, but dozens have also popped up. For a long time, people have associated ThermalTake with fan controllers with their HardCano line.
Until now, most rheobuses offer turn dials to increase and decrease fan voltage, but do not offer LCD readouts of the temperature. On the opposite side, others offer LCD readouts but use dipswitches to control fan voltage. Surprisingly, the best thermal control device we have seen was the Ahanix dBox front panel control from several months ago.

Click to Enlarge
The ThermalTake rheobus comes close, but cannot quite match the dBox front panel display/control. Even though the fan controls are turn dials, they are placed one atop another, in pairs. Furthermore, the rheobus bay is inset about one half of an inch inside the front panel. It prevents one from accidentally turning one of the dials, but at the same time poses somewhat of a challenge to just turn the dials normally. We found that the dials have to be turned about a quarter of a rotation each time in order to freely spin the knob without any obstruction from the case or other knobs.
Also we found the placement slightly unusual. The USB and microphone jacks clearly intended for the user to sit above the case and look down on the unit. However, since there the rheobus on the Xaser III faces forward with a half inch overhang above the display, it becomes impossible to read unless you keep the LCD readout at eye level. Since the dBox has a backlit LCD that can be read from very extreme angles, we think ThermalTake has some work to do if they want to become the leader in LCD case readouts.
Benchmark
We have a few heat and sound intensive tests lined up for the ThermalTake Xaser III. The Heatsink reading is actually the temperature inside the heatsink. CPU temperature is recorded as a separate measurement. All temperature is recorded in degrees Celsius. The heat tests were each performed inside the closed case with the external temperature of 23.0 degrees Celsius, during a full system load. The fan speeds on the rheobus were all placed on high. Our test bed consists of:
|
|
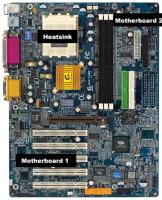
The thermal readings for the different components during operation were as followed:
Xaser III
| CPU |
Video |
Heatsink |
Mobo 1 |
Mobo 2 |
HD |
|
| After 10 minutes |
52.2 |
34.8 |
36.4 |
25.1 |
24.1 |
29.1 |
| After 30 minutes |
52.7 |
36.9 |
37.7 |
25.6 |
24.7 |
30.4 |
Kingwin KT-436-WM
| CPU |
Video |
Heatsink |
Mobo 1 |
Mobo 2 |
HD |
|
| After 10 minutes |
54.0 |
32.5 |
38.0 |
25.0 |
28.5 |
27.2 |
| After 30 minutes |
54.5 |
33.3 |
38.9 |
26.1 |
29.0 |
28.6 |
Xaser II
| CPU |
Video |
Heatsink |
Mobo 1 |
Mobo 2 |
HD |
|
| After 10 minutes |
55.0 |
37.2 |
37.2 |
25.3 |
30.2 |
37.0 |
| After 30 minutes |
56.0 |
37.7 |
42.4 |
27.4 |
32.1 |
40.3 |
Sound is recorded in decibels from 12” away from the closed case to most accurately replicate a production system.
| dBA |
|
| ThermalTake Xaser III Aluminum Fan High |
56 |
| ThermalTake Xaser III Aluminum Fan Low |
53 |
| Cooler Master ATC-201A Aluminum |
53 |
| Kingwin KT-436-BK-WM Aluminum |
50 |
| ThermalTake Xaser II Aluminum Fan Low |
54 |
Our cooling tests determined that there was in fact a significant improvement over both CPU and ambient case temperature. Unfortunately, both the hard drive and video card temperatures proved higher than that of the reigning champion Kingwin 463-WM. Clearly, the side mounted exhaust fans decreased temperature where the Kingwin could not, the lower rear corners of the case, and the heatsink / CPU positions. Even though the intake fans are rated at 37CFM, we believe they are not pulling their full potential since the front panel is not configured as openly as the Kingwin 463.
Sound tests put the Xaser III right about where we expected. The Xaser II, which had 2 less fans, actually produced slightly more noise. The Kingwin 463 produced a quieter sound, and uses two less fans. However, keep in mind that the Kingwin could not cool the CPU or ambient temperature as well as the Xaser III.
Final Thoughts
Performance proved to be on par with what we expected. Aside from the side panel enhancements, there were only a few changes made to the thermal dynamics of the case. Although the case performed well, it did not completely blow away the competition.
It is not very often that we see a complete product turnaround inside of a revision. Typically, we usually see a manufacturer add an additional fan to a chassis and call it “Version 2.0”. Even though there are elements of the Chenming design still persistent in the V2000A, we can see that ThermalTake clearly spent a lot of time in the research and development department. Several of the features on this case were simply spectacular. We would classify this case as a truly tool less case; the only time we picked up a screwdriver during the entire review was to mount a floppy drive. The additional side swinging panel and top mounted USB2 also proved themselves as near invaluable.
Unfortunately, it seems as though all this product development and a new manufacturer come at a price. The model we reviewed today costs approximately 199USD (CompuHQ) and is only available in limited quantities.
For many of us, that seems slightly expensive. Many resellers offer two or three traditional first generation Chenming chassis for the price of one Xaser III aluminum. The Japanese steel units are considerably cheaper, around 150-160USD. Keep in mind though, many of the features found on the Xaser III will not show up on any other case available on the market. Furthermore, all 7 fans are bundled in the case, although you will have to invest in an additional power supply.
ThermalTake is playing the same card as Cooler Master and Lian Li right now: high end, no holds barred. The Xaser III easily competes with any Lian Li and Cooler Master unit on the market right now, even with the 200USD price tag. We would like the price tag to come down a little on this unit, but just as the Xaser II had a high debut price, the Xaser III will come down in price eventually. Buyers beware, however, you will need 24” IDE cables if you plan on connecting more than one drive per bus on this unit.
Enermax has a similar unit they are working on very hard to get to market, although it seems like ThermalTake has beat them to the punch. ThermalTake has demonstrated they can stand tall with the big players in the case business, but will they emerge ahead of their world class competition? Time will tell; stay tuned for more case reviews as we have new products from Enermax and Lian Li on the way!
Update: Directron has informed us that Casetek is the OEM manufacturer of both the Enermax and ThermalTake cases. Unfortunately, they seem unavailable for consumer purchase at this time.
Special thanks to ENPC.com for providing us with a sample Xaser III for this review


