Original Link: https://www.anandtech.com/show/4323/p67-190-part-2-msi-asrock-and-ecs
P67 $190 Part 2: MSI P67A-GD65, ASRock P67 Extreme6 and ECS P67H2-A2
by Ian Cutress on May 10, 2011 1:36 AM EST- Posted in
- MSI
- ASRock
- Motherboards
- P67
- ECS
- Cougar Point
P67 $190 Part 2: MSI, ASRock and ECS
Our first look at $190 P67 boards started with ASUS and Gigabyte. Within hours of posting the review, I was commandeered by several other companies to look at their $190 motherboards. This is still one of the best selling P67 price points, even with Z68 around the corner. Here, we look at the MSI P67A-GD65, the ASRock P67 Extreme6 and the ECS P67H2-A2, and come up with some interesting results.
Does P67 Have A Future?
P67 has received a lot of criticism since its inception. With all the Sandy Bridge CPUs containing an integrated GPU in the form of Intel’s HD graphics, we’d expect each chipset to have some form of graphical output. But for some reason, it wasn’t included in P67—this may be part of Intel’s divine strategy of separating different features in different chipsets, or that Z68, the successor to P67 which will include video outputs, just wasn’t ready. With the lack of access to the iGPU, we also lose access to QuickSync, and end up with silicon real-estate we can’t use. One other sticking point was that Cougar Point does not natively support USB 3.0, whereas it seems that AMD will for their next generation of chipsets.
We expect Z68 to command a premium, this much is certain. With the recent news regarding NVIDIA bringing Optimus to desktops, and we’ve known Virtu will also be available for a little while now, we can expect lower 2D power usage, as well as use of QuickSync. Both the CPU and iGPU can be overclocked, which will also mean that manufacturers will have to put more testing into CPU power delivery, leading to higher board cost. So where does this leave P67, exactly? A lower priced alternative to overclocker the CPU while using discrete GPUs?
Let’s not forget the Intel recall of all Cougar Point chipsets with the mild manufacturing issue. P67 is painted with the stigma of this issue, and the only way to ensure a B3 stepping of the PCH is to buy a board with B3 in the name, or from a reputable retailer that would have replaced all their stock. Z68 isn’t scarred with this issue, adding more credence to P67 potentially disappearing.
So here I am, ranting about P67 and Z68. Why should we review these P67 boards if they might disappear? The importance of future sales of P67 will depend exactly on the price premium over Z68. It could be argued that P67 is to be squeezed out of the market, and the rest of the P67 product will be sold with discounts, but it’s currently here, and people are still buying, wanting the best deal, and it may still stay with us for a long while yet.
With that in mind, today we’re looking at three P67 boards, all initially released around the $190 price point (though some have changed since). First is the MSI P67A-GD65 ($180) offering more bells and whistles than a county fair. Then the ASRock P67 Extreme6 ($210), which is the model above the P67 Extreme4, which we liked very much in terms of price/performance/add-ons—it will be interesting to see what has changed between the two models. Finally we test the ECS P67H2-A2 ($195), offering simplicity and functionality. Let the games begin!

MSI P67A-GD65: Overview
On the face of it, the MSI P67A-GD65 is aimed at a variety of markets—for system builders and sellers, we have the OC Genie button which implements a very quick overclock setting; for sub-zero overclockers we get a series of voltage read points; and for the general enthusiast, we have a nice PCIe slot layout, and the standard array of P67 internals. After a run through with the MSI board, I can totally see it as a capable daily machine with that OC button, but beware with the software that comes with the board—there is a mountain if you want to look through it (and we cover it here), and some of it isn't even applicable.
MSI have a history of producing fine boards, but often with a few niggles. It is similar here with the P67A-GD65, predominantly in terms of the lack of USB performance against its competitors from a variety of price points, and the fact that MSI offer games (??!) in the UEFI! I'm being serious—read on to find out more.
MSI P67A-GD65: Visual Inspection
When you first look at the MSI P67A-GD65, you'll notice that the power delivery chokes are not what we've seen on our previous Cougar Point motherboards—here we have 'Super Ferrite Chokes', which supposedly result in a reduced power loss from the power delivery to the components, and are part of the MSI DrMOS topology.
Around the CPU socket, the VRM heatsinks are smaller than what we see on other P67 boards, and are connected by a heatpipe to cover the 6+2 phase power delivery. Along the top of the board are six LEDs which light up when various CPU phases are active—for the most part, we only observed either one or all six of them on at a time. In terms of fan headers around the CPU socket, we have one 3-pin at the bottom left of the socket and a 4-pin CPU fan header at the top right. Two others are on the right hand side of the board above the 24-pin ATX power connector and another header below this—meaning any dual fan all-in-one CPU water cooling (such as the Corsair H50) should be catered for if the pump is plugged into a fan header on the far right of the board.
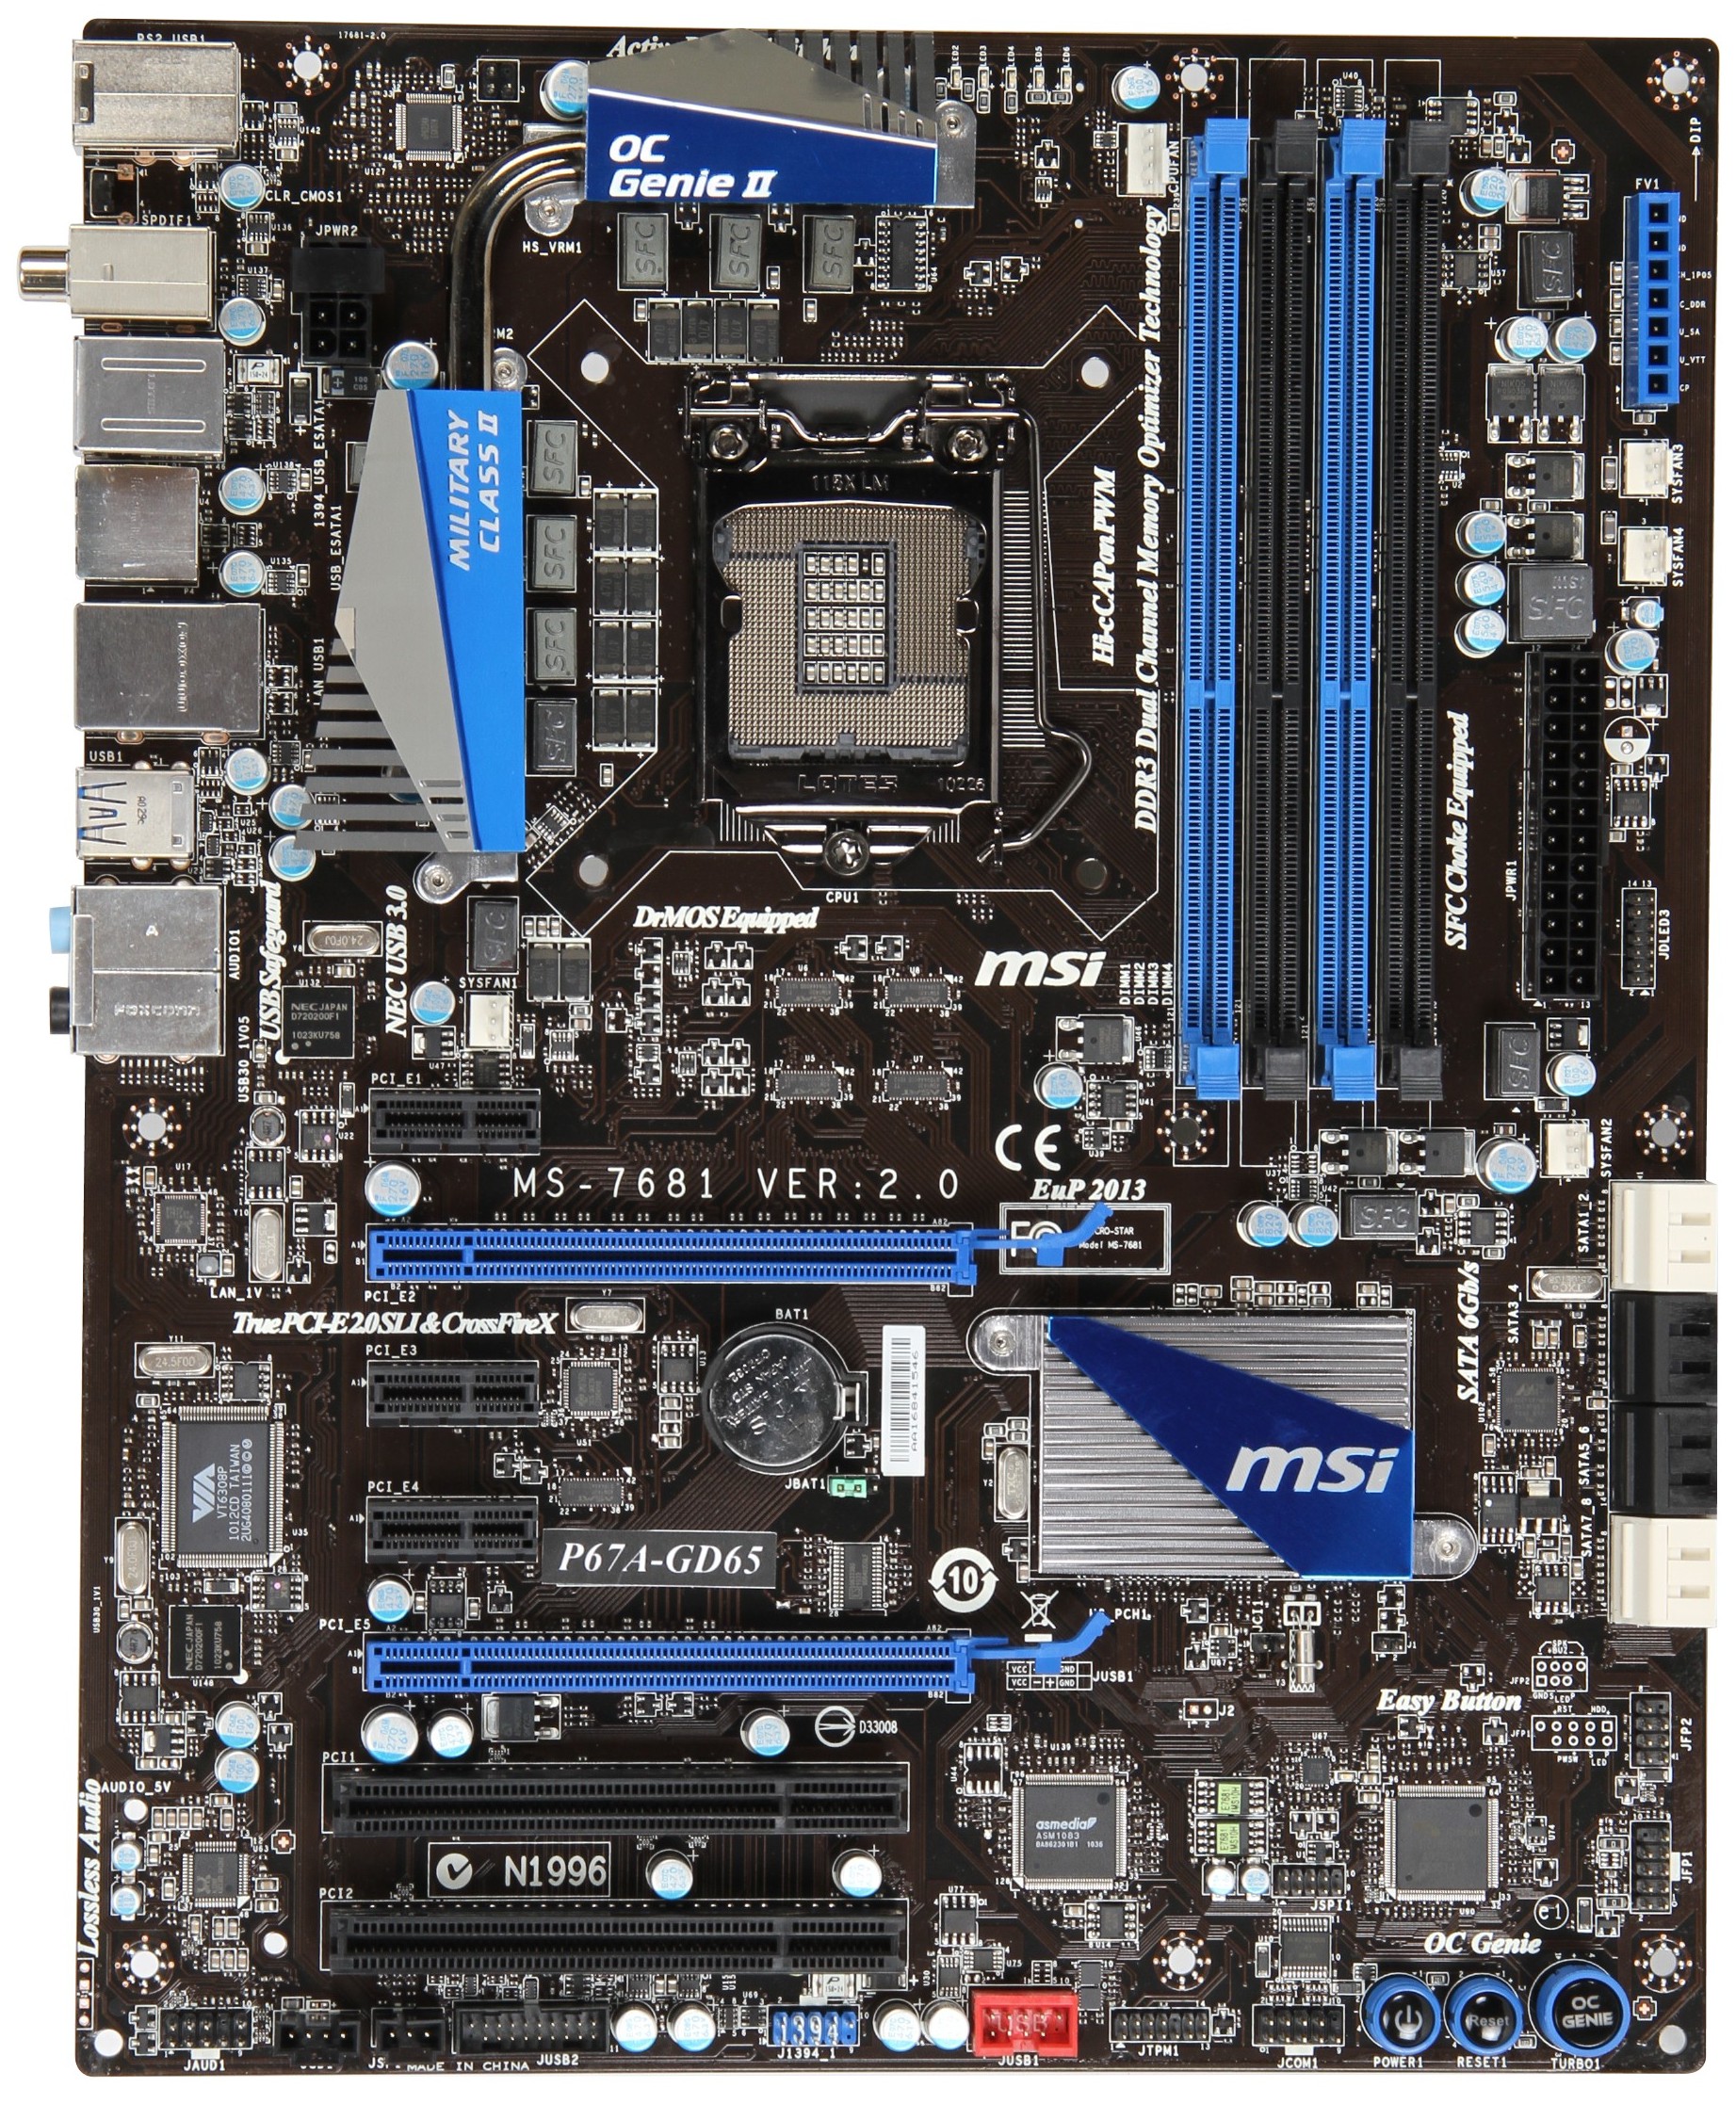
On the other side of the memory slots, we have our voltage read points, where two GND points are alongside the PCH, VCC_DDR, CPU_SA, CPU_VTT and VCCP pins. MSI include these on several boards in their P67 range, and of real use only to a sub-zero overclocker pushing the limits of the board.
The SATA ports could possibly be better color coded, as the white ports are the SATA 6 Gbps, however the top are from the PCH, and the bottom are from the Marvell SE9128 controller. The black ones in the middle are the standard SATA 3 Gbps ports. On the bottom right of the board are the Power/Reset buttons, alongside the MSI OC Genie. We cover the operation of the OC Genie switch in our overclocking section. We don't see a debug LED here on the MSI board—you could consider that as it is technically the cheapest in this round-up that it is less likely to have one, and that our previous $190 round-up the ASUS and Gigabyte didn't have them either, but the ASRock P67 Extreme4 at $160 had one, as well as the ECS P67H2-A2 in this roundup.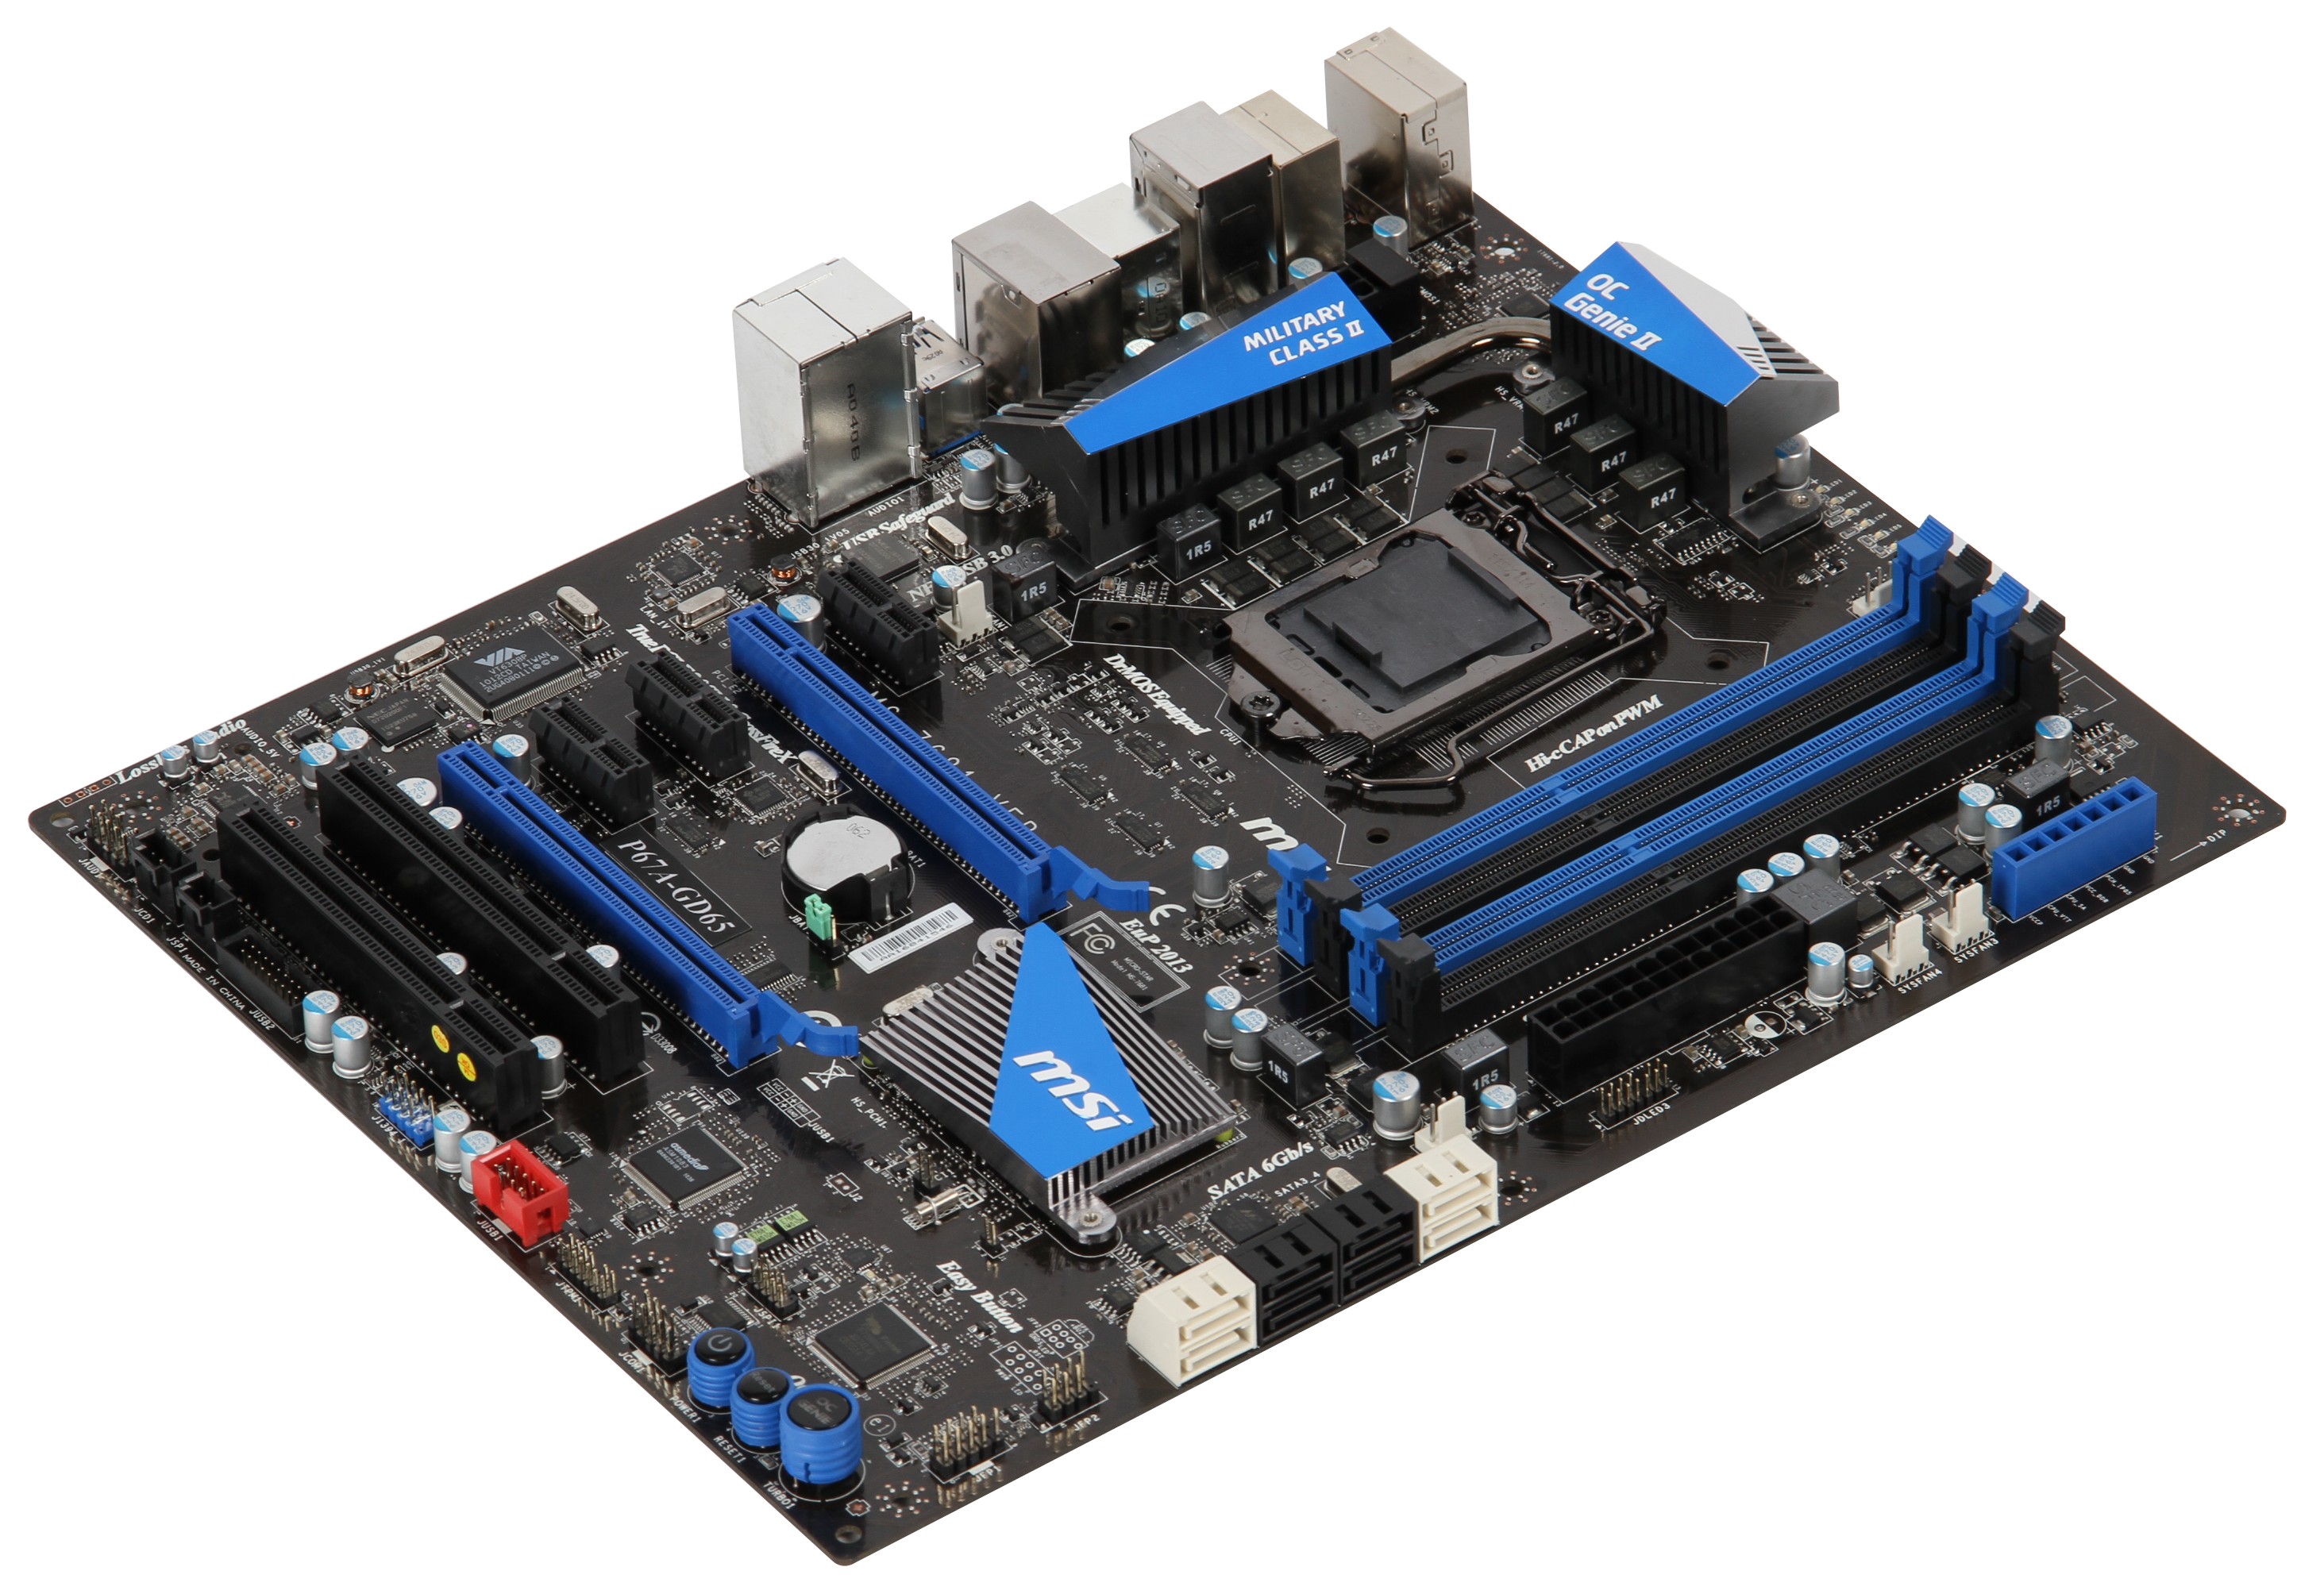
The PCH heatsink is small and flat, and complementary with the blue-black livery of the board, which is quite aesthetically pleasing in my view—even if the white SATA ports and red power USB header stick out like a sore thumb. The PCIe slot layout is fairly good, with an unrestricted PCIe 1x at the top, a triple slot gap between the PCIe 16x slots (run at 8x/8x when two GPUs are present), and when the two PCIe 16x slots are populated with dual slot cards, a PCIe 1x is available between the cards and a PCI slot is available at the bottom.

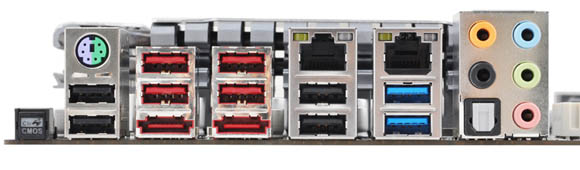
The IO back panel is fairly standard—one PS/2 mouse/keyboard port, optical and coaxial S/PDIF out connectors, a clear CMOS button, two eSATA 3 Gbps ports via a JMicron JMB362 controller, eight USB 2.0 ports, two USB 3.0 ports in blue via a NEC uPD720200F1 controller, a single gigabit Ethernet port from a Realtek 8111E controller, a Firewire port, and the standard Realtek rear 8-channel HD audio with THX TruStudio Pro support.
MSI P67A-GD65: Board Features
| MSI P67A-GD65 | |
| Market Segment | Performance |
| CPU Interface | LGA 1155 |
| CPU Support | i3/i5/i7 Sandy Bridge |
| Chipset | P67 |
| Base Clock Frequency | 38.0 MHz to 400.0 MHz in 0.1 MHz intervals |
| DDR3 Memory Speed | 1333 MHz by default, 800-2133 MHz supported |
| Core Voltage | Auto, offset or fixed modes, 0.800 V to 1.800 V in 0.015 V intervals |
| CPU Clock Multiplier | Dependent on CPU |
| DRAM Voltage | Auto, 1.108 V to 2.464 V in 0.007V intervals |
| DRAM Command Rate | Auto, 1T-3T |
| Memory Slots |
Four 240-pin DDR3 DIMM slots in dual-channel Regular unbuffered DDR3 memory Up to 32GB total supported |
| Expansion Slots |
2 x PCI Express 2.0 x16 slots (x16/x0 or x8/x8) 3 x PCI Express 2.0 x1 slot 2 x PCI slots Supports ATI Crossfire Supports NVIDIA SLI |
| Onboard SATA/RAID |
2 x SATA 6.0 Gb/s ports (top white) supporting RAID 0/1/5/10 4 x SATA 3.0 Gb/s ports (blue) supporting RAID 0/1/5/10 2 x SATA 6.0 Gb/s ports (white) from Marvell 9120 supporting RAID 0/1 2 x eSATA 3.0 Gb/s ports from JMicron JMB362 |
| Onboard |
4 x SATA 3Gb/s connectors 4 x SATA 6Gb/s connectors 5 x Fan Headers (1x4-pin, 4x3-pin) 1 x USB 2.0 headers support additional 2 USB 2.0 Ports 1 x USB 3.0 header supports additional 2 USB 3.0 Ports 1 x Power on button 1 x Reset button 1 x Front panel switch/LED header 1 x TPM module connector 1 x Serial port connector 1 x Voltage Check Point 1 x COM port header 1 x SPDIF out connector 1 x Firewire/IEEE 1394 header 1 x Front panel audio header OC Genie Button |
| Onboard LAN | Realtek® RTL8111E Gigabit Fast Ethernet |
| Onboard Audio | Realtek® ALC892 8-Channel HD Audio |
| Power Connectors |
24-pin EATX Power connector 8-pin EATX 12V Power connector |
| Fan Headers |
1 x CPU Fan (4-pin) 4 x SYS Fan (3-pin) |
| IO Panel |
1 x PS/2 keyboard/mouse connectors 1 x RJ45 LAN connectors 1 x Audio port (Line-in, Line-out, Mic-in) 1 x Optical S/PDIF Out connector 1 x Coaxial S/PDIF Out connector 1 x Clear_CMOS button 1 x IEEE 1394 port 2 x USB 3.0 ports compatible to both USB 3.0/2.0 devices (blue) 2 x eSATA 6.0Gb/s ports 8 x USB 2.0 ports |
| BIOS Version | 1.B |
| Warranty Period | 3 Years |
Interesting points to note are that the SATA 6 Gbps support RAID (0/1 on all, 5/10 on PCH ports), and the warranty is for three years, which is longer than that of the other boards in this roundup.
MSI P67A-GD65: In The Box
- 4 locking SATA cables (2 of these are right angled at one end)
- IO shield
- 3-slot SLI connector
- USB 3.0 rear panel
- 4-pin Molex to SATA power cable
- MSI M-connectors
- V-check cables
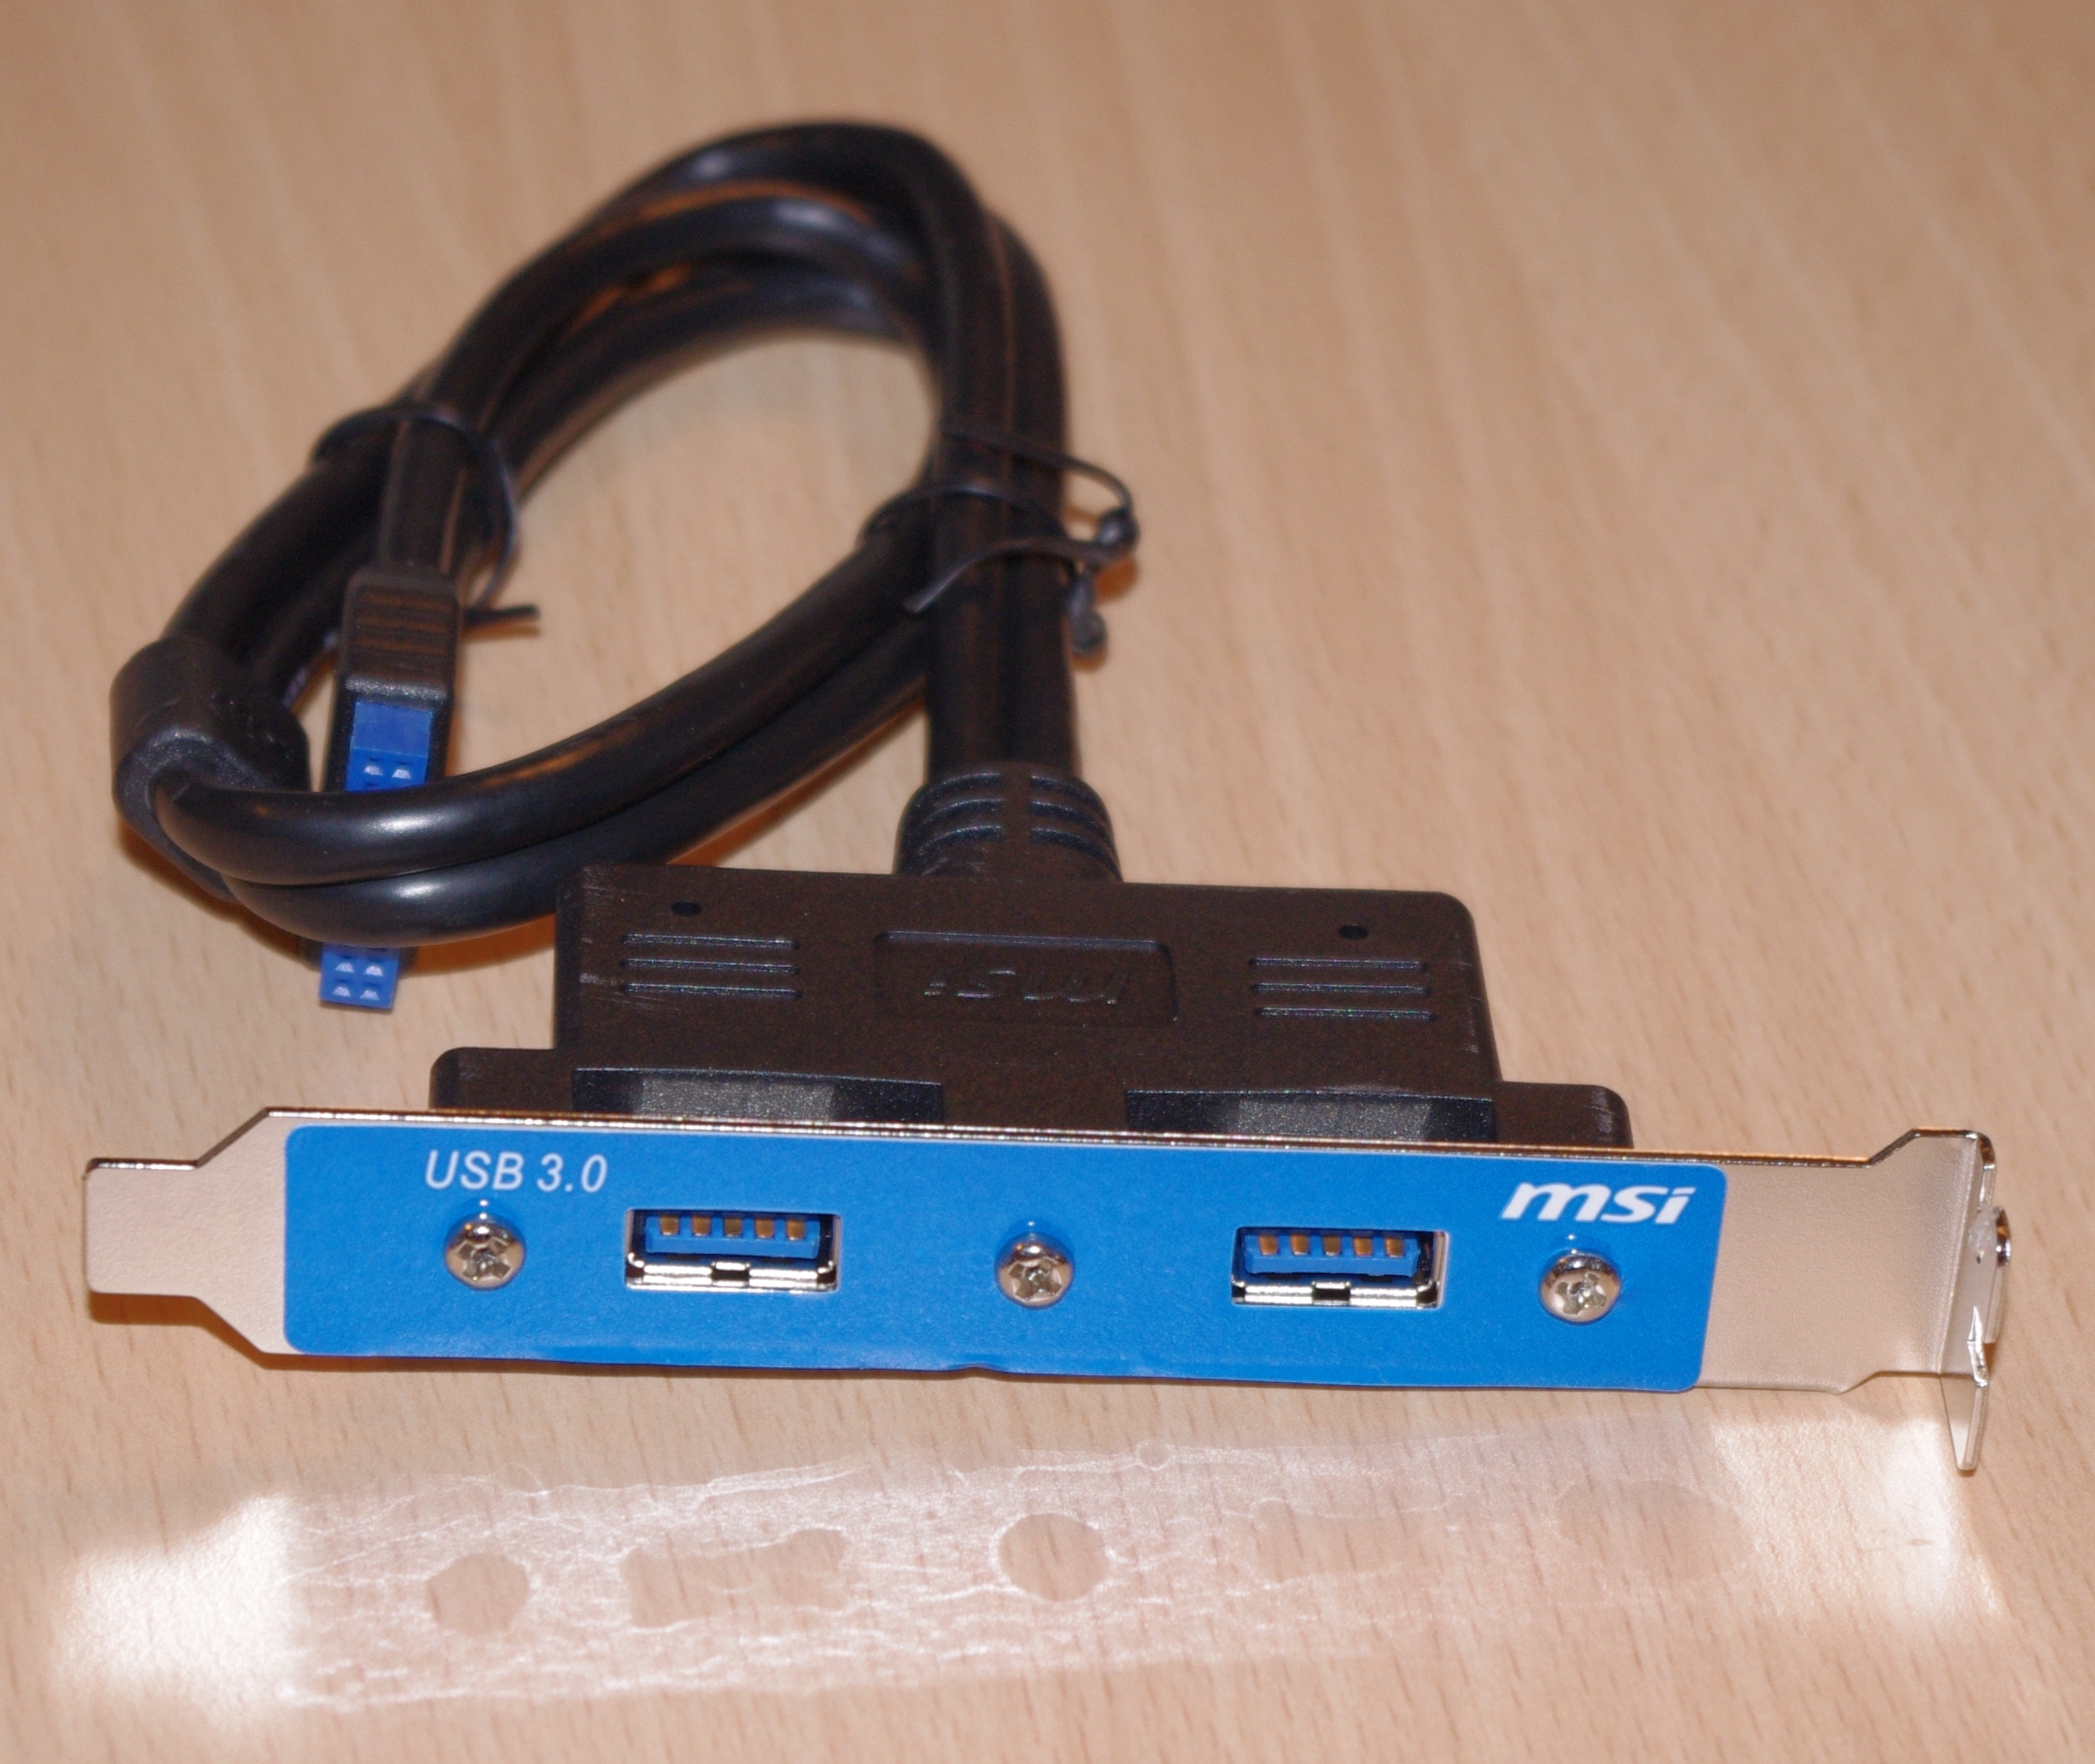
The USB 3.0 rear panel connector is of a reasonable length, but personally I feel it is not as good as the option we’ve seen from ASRock.
MSI P67A-GD65: Software
To say the MSI P67A-GD65 comes with a lot of software as standard is an understatement. As a way of raising value of a product, a manufacturer can include a series of software which promotes and increases the functionality of the product—MSI have done this to an extent, but then have thrown everything else at it as well into one package to the extreme. We'll have a look at the software supplied on the CD, in no particular order:
Install Disc
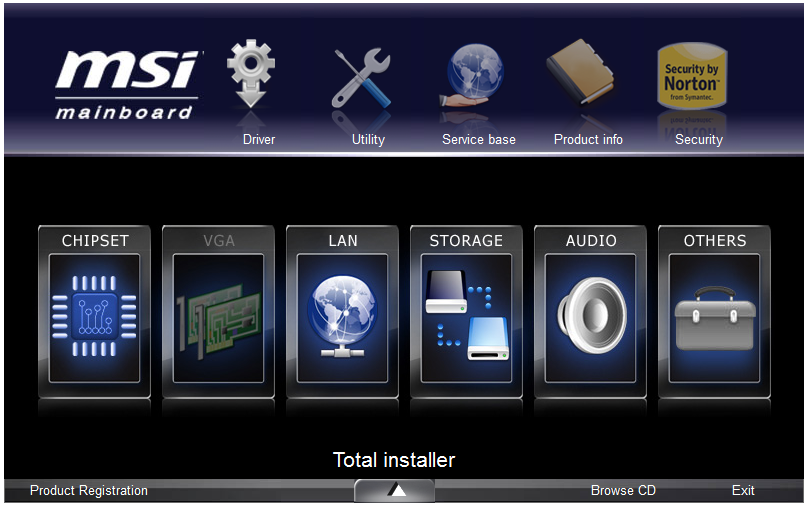
The installer on the CD that comes with the board is fairly straightforward—load it in, click 'Total Installer', and the menu below appears in case a user wants to select/deselect certain drivers. The same thing goes with the software too.

MSI Control Center II
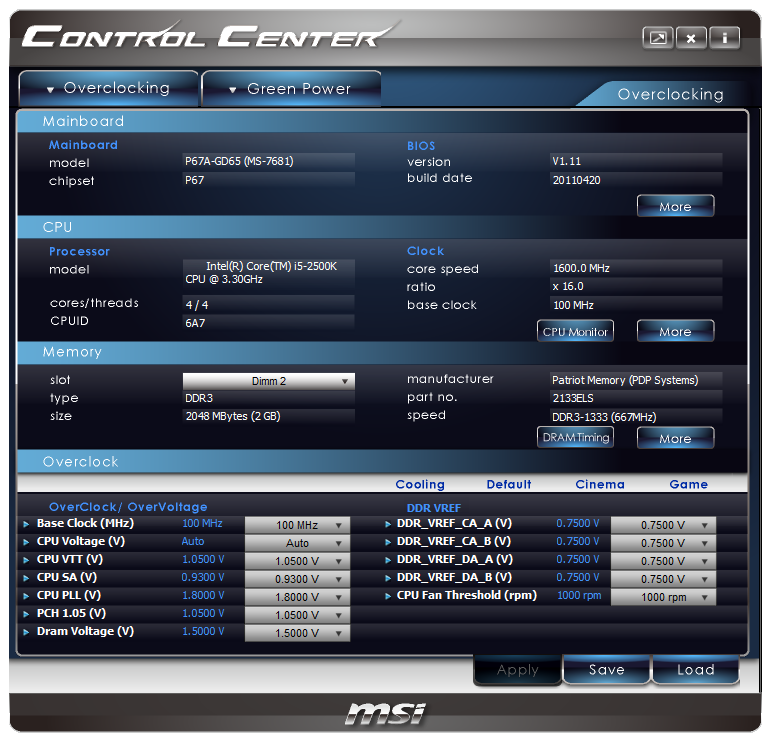
The MSI Control Center II is your main focus for overclocking, power saving and fan controls. Everything is fairly accessible and reasonably set out—though not as user friendly as other software we have seen from other manufacturers that have a similar role.
The overclock options are limited to BCLK, as seen on other P67 boards, but rather than sliders we have a simple drop down menu. The drop down menu is odd—when we use the mouse wheel to scroll through BCLK or voltages, the options that are visible don't change, but when you select one, it selects what you would have scrolled to. This is an error that needs addressing, even if it is a minor one—I use the mouse wheel quite a lot in these situations. If I didn't, I'd be typing in the values, but that option isn't available either.
Above the overclock options are a variety of presets—'Cooling', 'Default', 'Cinema', 'Game'. These change the voltages and BCLK accordingly—the software itself, if the BCLK change is large, will slowly increase/decrease the BCLK in 0.5 MHz jumps (even if the BCLK options are only available to the nearest MHz). Under the 'Game' setting, we saw 103 MHz and a small voltage increase. We can also change the RAM sub-timings—this option works quite well.
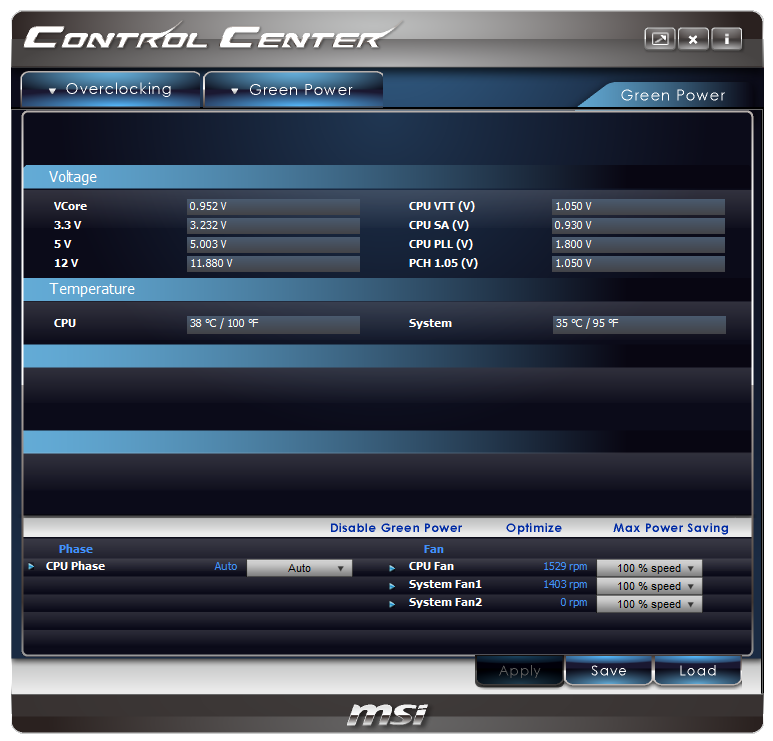
This software also allows you to turn off the CPU phase LEDs, which is useful if your computer has a non-blue color scheme. The fan controls are very bland; only the CPU and two SYS fans are controllable, and only the % speed is changeable—no ramps are settable.
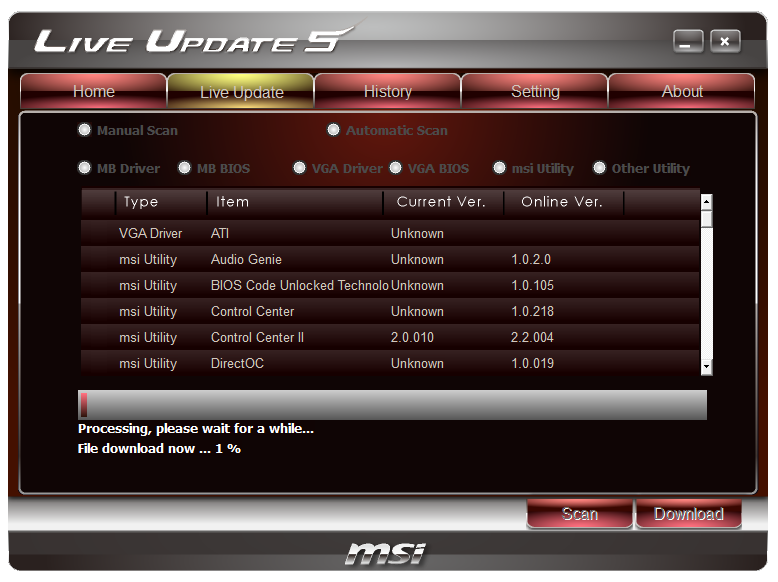
MSI Live Update 5
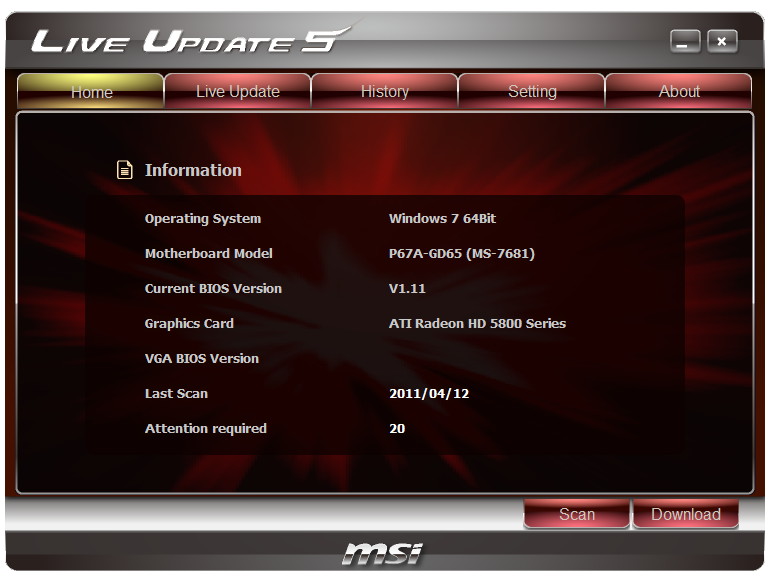
The Live Update software is a nice addition, which automatically checks the system in terms of drivers and software, and the MSI website for updates. The software downloads them and lets you install them—however, I came across a few glitches.
When I first installed the software, I was on BIOS 1.5. On the version of Live Update that came with the CD, it could not find a newer version of the BIOS available, even though 1.9 was available at the time through the website. I had to update Live Update itself first to find a newer BIOS on the MSI servers through Live Update.
I had the 1.B BIOS installed, and this utility said BIOS 1.B0 was available—I was unsure if this was a beta BIOS, as the B0 was not available on the MSI website. I downloaded and updated the BIOS, and the software stated I still had the 1.B BIOS—which leads me to think the B0 BIOS doesn't really exist, or is actually the 1.B BIOS but not renamed properly.
Another issue is that the Live Update software offers downloads which may not be compatible with the motherboard. I was offered the DirectOC software to download and install, which I did, only to find that my motherboard wasn't compatible with it. Perhaps some refinements in this area are needed.
The last issue is that Live Update demands your attention. I had the program installed, didn't use it yet, and was running the 3D benchmarks—Live Update kept minimizing the game until I paid attention to it, or turned it off. I get easily irritated by software that does this (I have in the past changed virus scanners because of it).
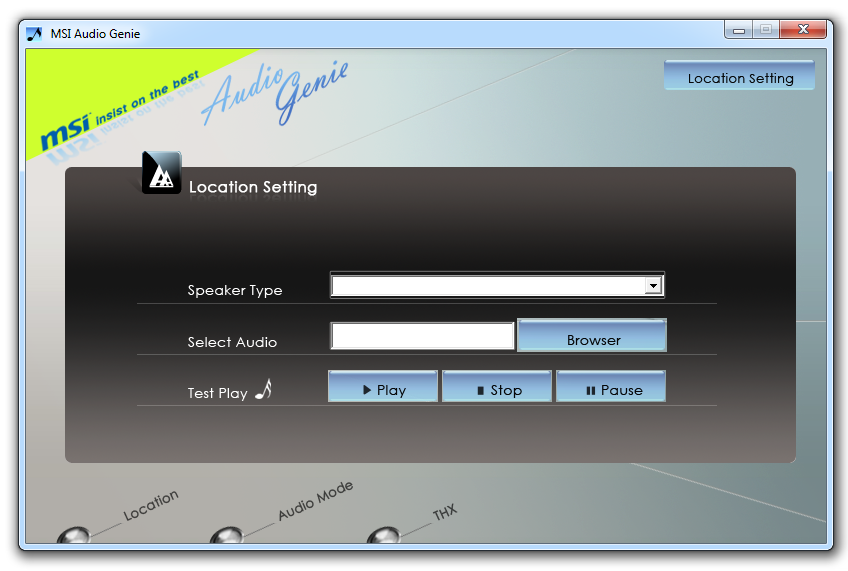
MSI Audio Genie
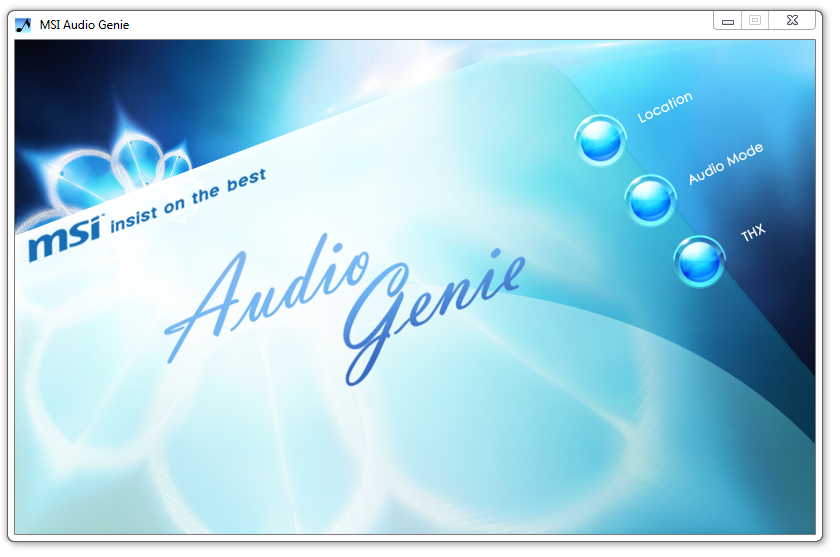
The MSI Audio Genie is a package designed to optimize the audio experience from the onboard audio. The speaker setup can be changed alongside a series of preset functions for films, games etc. In order to use proper equalizer settings, the THX TruStudio Pro needs to be installed as well.
MSI Video Genie
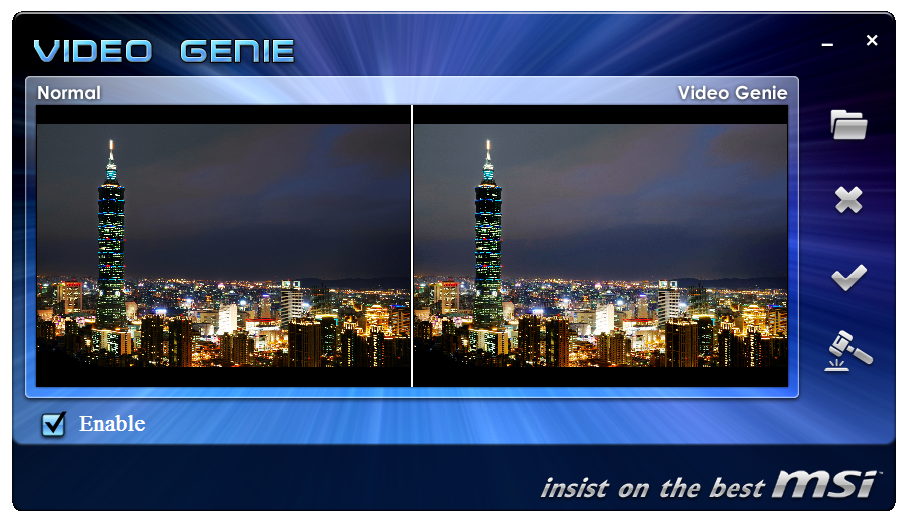
The MSI Video Genie software is an automatic modifier for the monitor in an attempt to optimize low brightness areas in videos/films. It does make an obvious difference in general when you first run the software, though whether it is applicable in a majority of cases is debatable—especially if what you are watching is intended to be dark.
MSI Super Charger
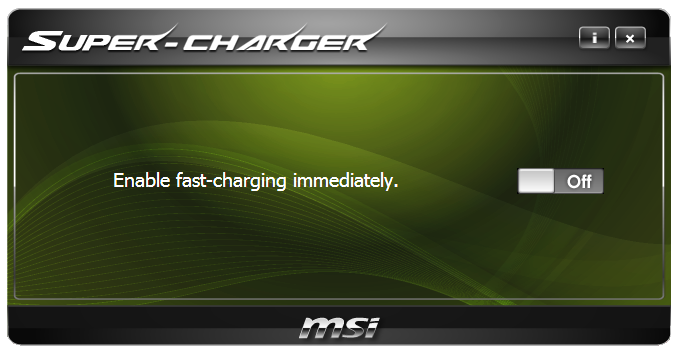
The Super Charger software enables and disables the increased power delivery of the USB header on the board which supplies more power than the standard USB header. We are starting to see this technology on a variety of boards, in terms of Quick Charge or under similar names.
MSI Teaming Genie
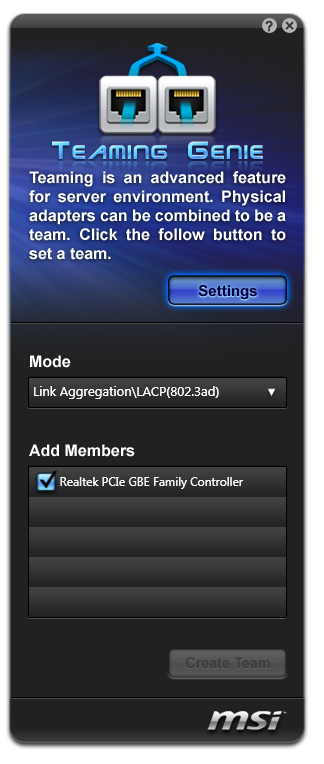
The Teaming Genie software is a very odd addition to the GD65. The idea behind this software is to pair up capable Ethernet ports into one connection—this is useful if transferring data to and from a source with a higher throughput (i.e. a 10 Gigabit server). The reason why this is an odd addition is that the motherboard only has one gigabit Ethernet port! Unfortunately I don't have an Ethernet PCI/PCIe card in order to test if this software detects other cards in the system.
Chicken Shake

MSI have included Chicken Shake—a rather poor game based on movements through the webcam, similar to the Xbox 360s first attempt at webcam games before the Kinect was released. The game itself won't actually start unless a webcam is detected, and then the settings can be changed for keyboard input. Under webcam mode, the chicken on screen moves when you move your face—however there is a large lag between moving your head and moving the chicken. The gameplay is minimal—just stop the chicken from touching the spikes.

MSI Q-Face
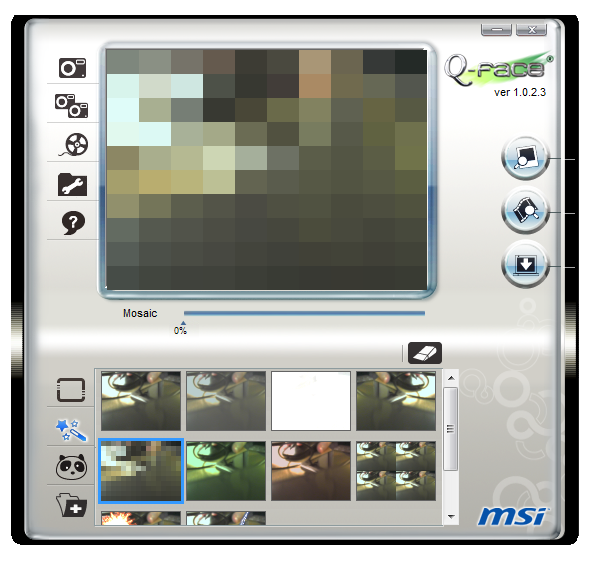
The other webcam software is the MSI Q-Face application. This mimics software in some commercial webcam packages, whereby the face movements are monitored and forms of augmented reality are applied—i.e. hats and special effects. Move your head, the effect moves with you.
Additional Software
MSI includes other non-MSI programs—eSobi 2 (90 day trial), MAGIX Video Easy SE (7 day trial) and mufin player 1.5 (full program). eSobi 2 is a news feed reader, Video Easy is a simple video editor, and mufin player is a fully functioning media player.


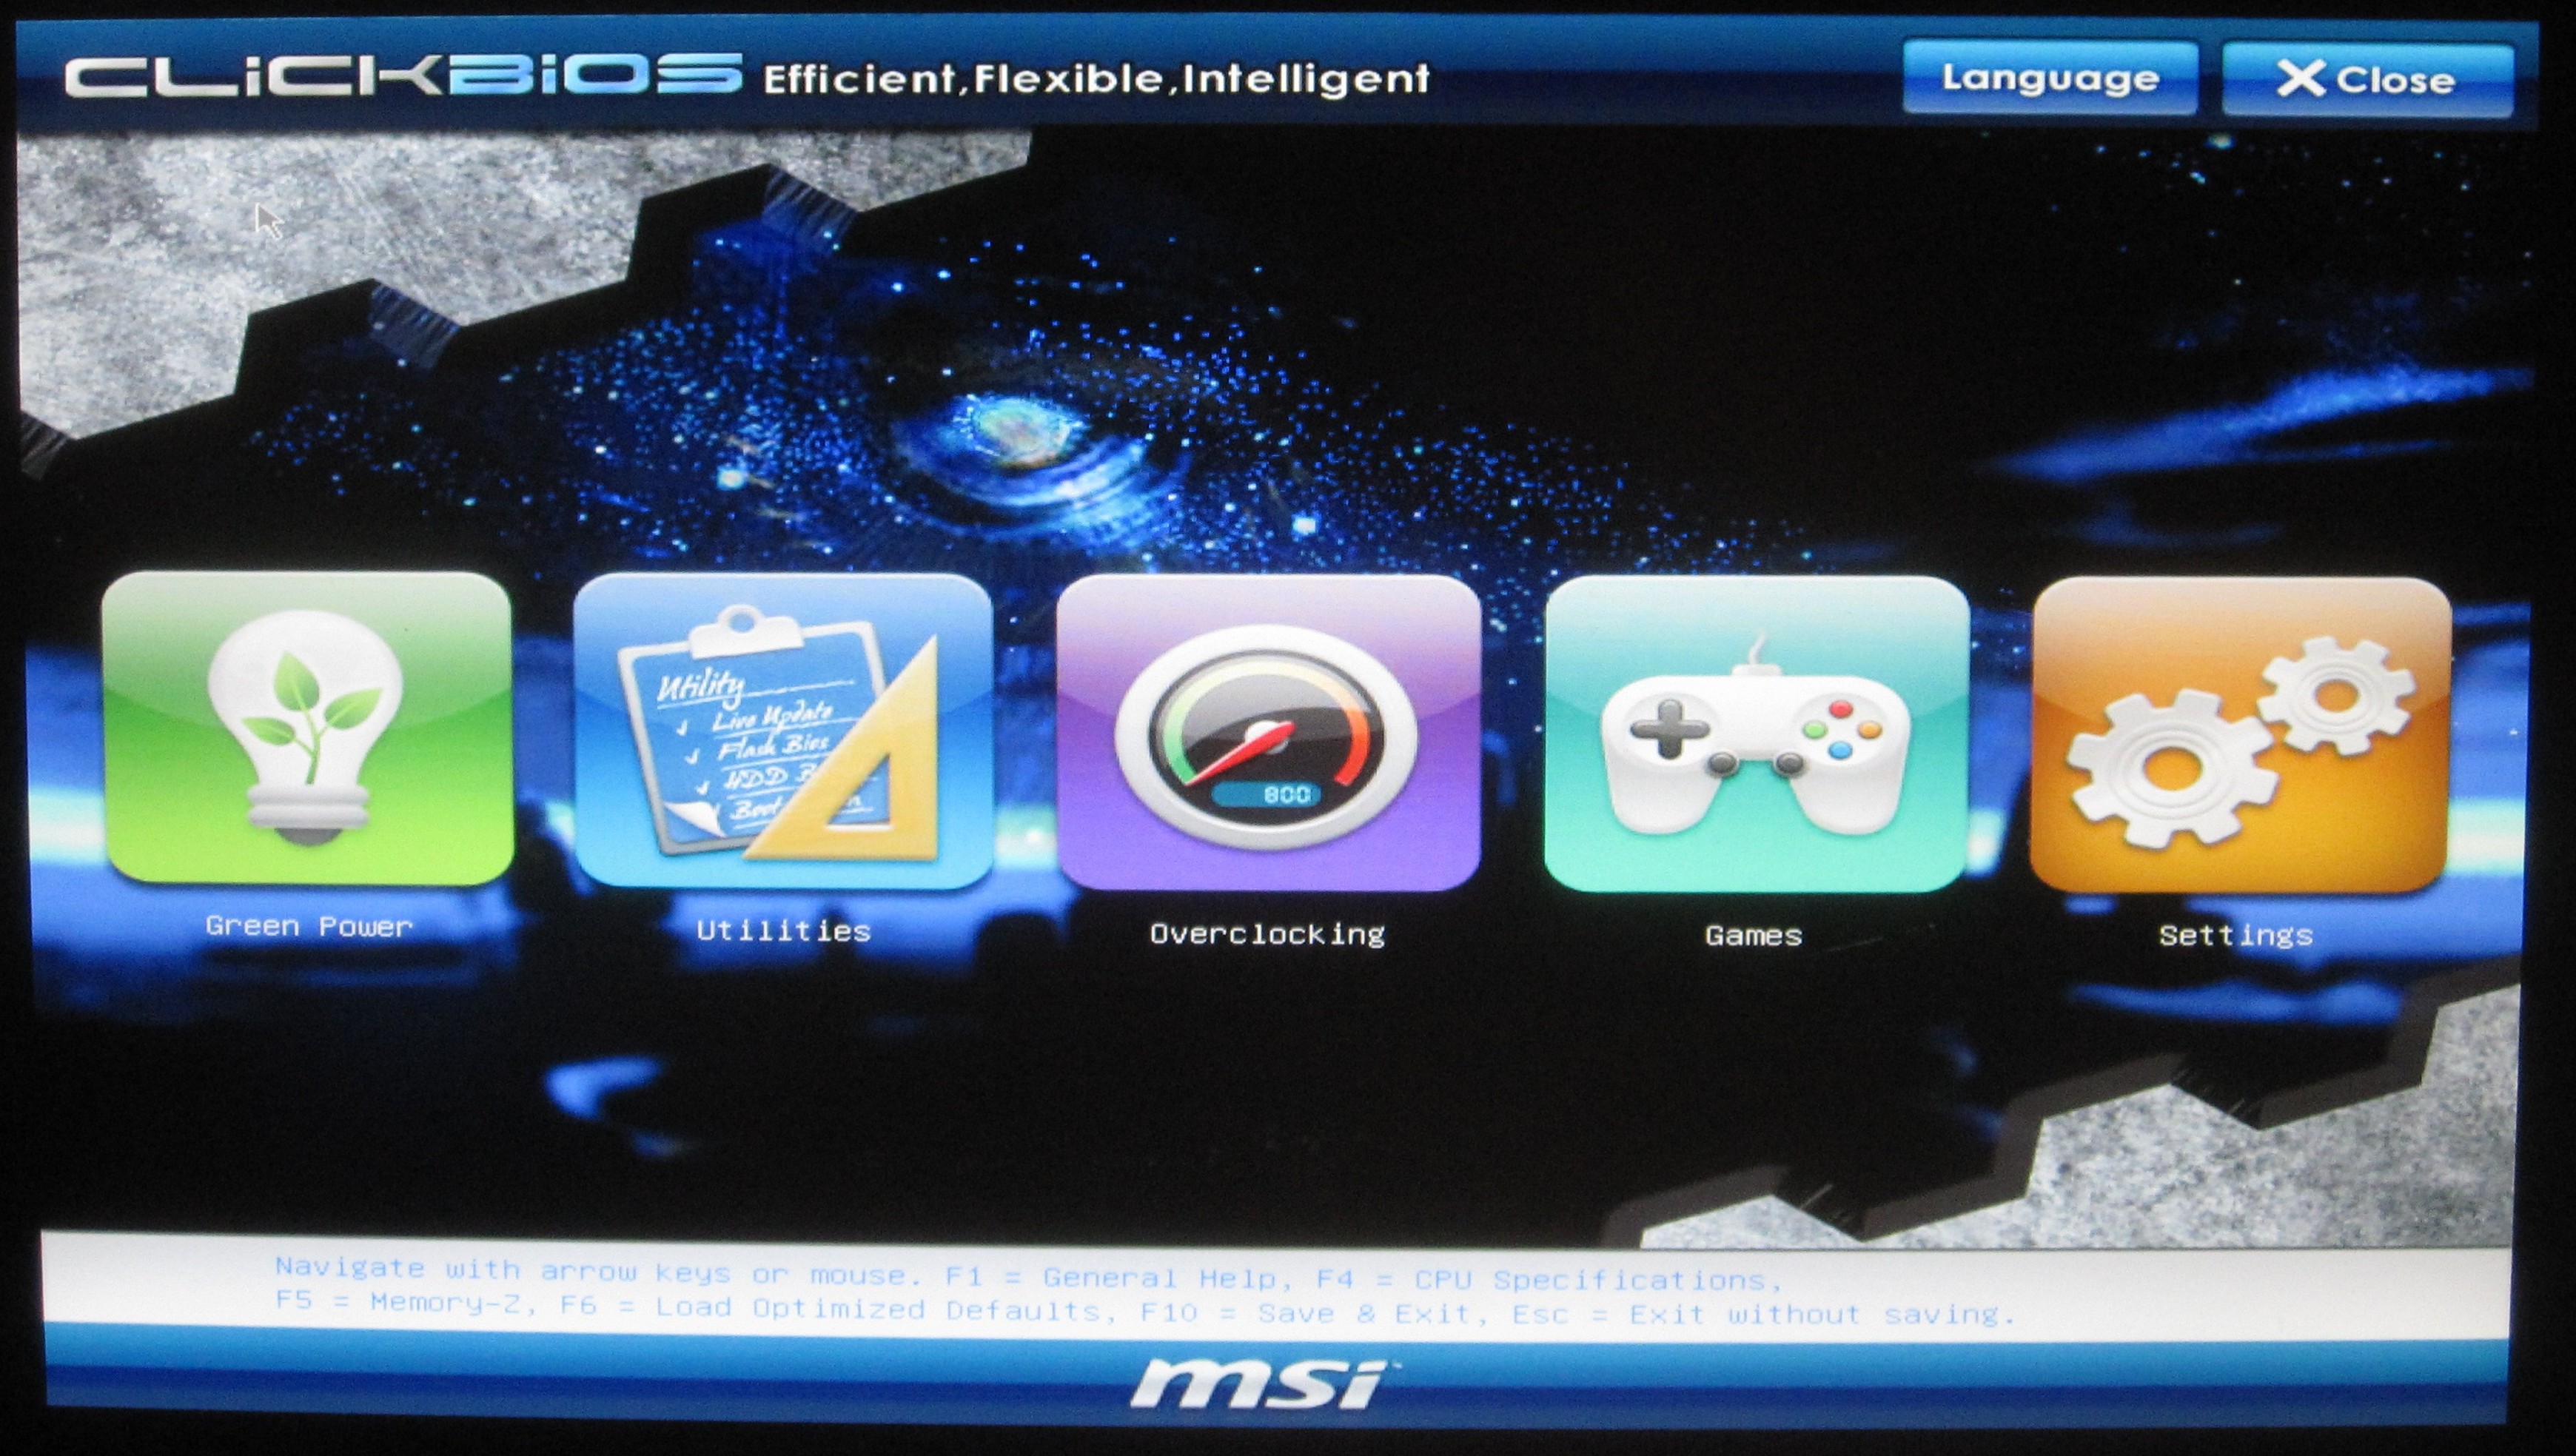
MSI P67A-GD65: UEFI
After looking through the UEFI iterations from other manufacturers, I have to say that MSI's implementation is one of the best. The 'Click BIOS' system fully utilizes the mouse for the UEFI, though everything can also be controlled through the keyboard. On the front menu alone, we have big animated buttons available.
A small note about versions—the UEFI that shipped with the board was version 1.5. This version was VERY SLOW in terms of using keys to select which options, and for options to be implemented. This was fixed by version 1.9—so if you're planning on changing the UEFI a lot, I recommend updating. Another aspect worth mentioning is that the M-Flash updating utility in the UEFI does not accept USB sticks with NTFS file formats—you require a FAT based system to update direct from USB.
Back to the UEFI, the weirdest option on the front page is that we have a UEFI with games. You read that correctly—games. I'm amazed at this—no-one buys a motherboard because of the games it offers. These games (Puppy Run, Pair Match and BreakOut) are very basic, younger child type games with no serious graphics and poor reaction mechanics—they honestly look as if (especially BreakOut) one of the bosses at MSI employed a family member as an intern one summer and had to shoe-in the software they produced. It's pretty dismal, to be honest—if you let your children play these games, they could exit out and go around changing other settings, like deciding to put 1.8V through your CPU (which is a bad idea). They also require the driver CD to be in the drive at boot-time.

After contacting MSI regarding the games in the UEFI, the response was that the games are more of a demo/showcase to represent what is capable in the UEFI. Personally, I hope this leads to more interactive and informative options in the future, if that is where MSI are heading with this.
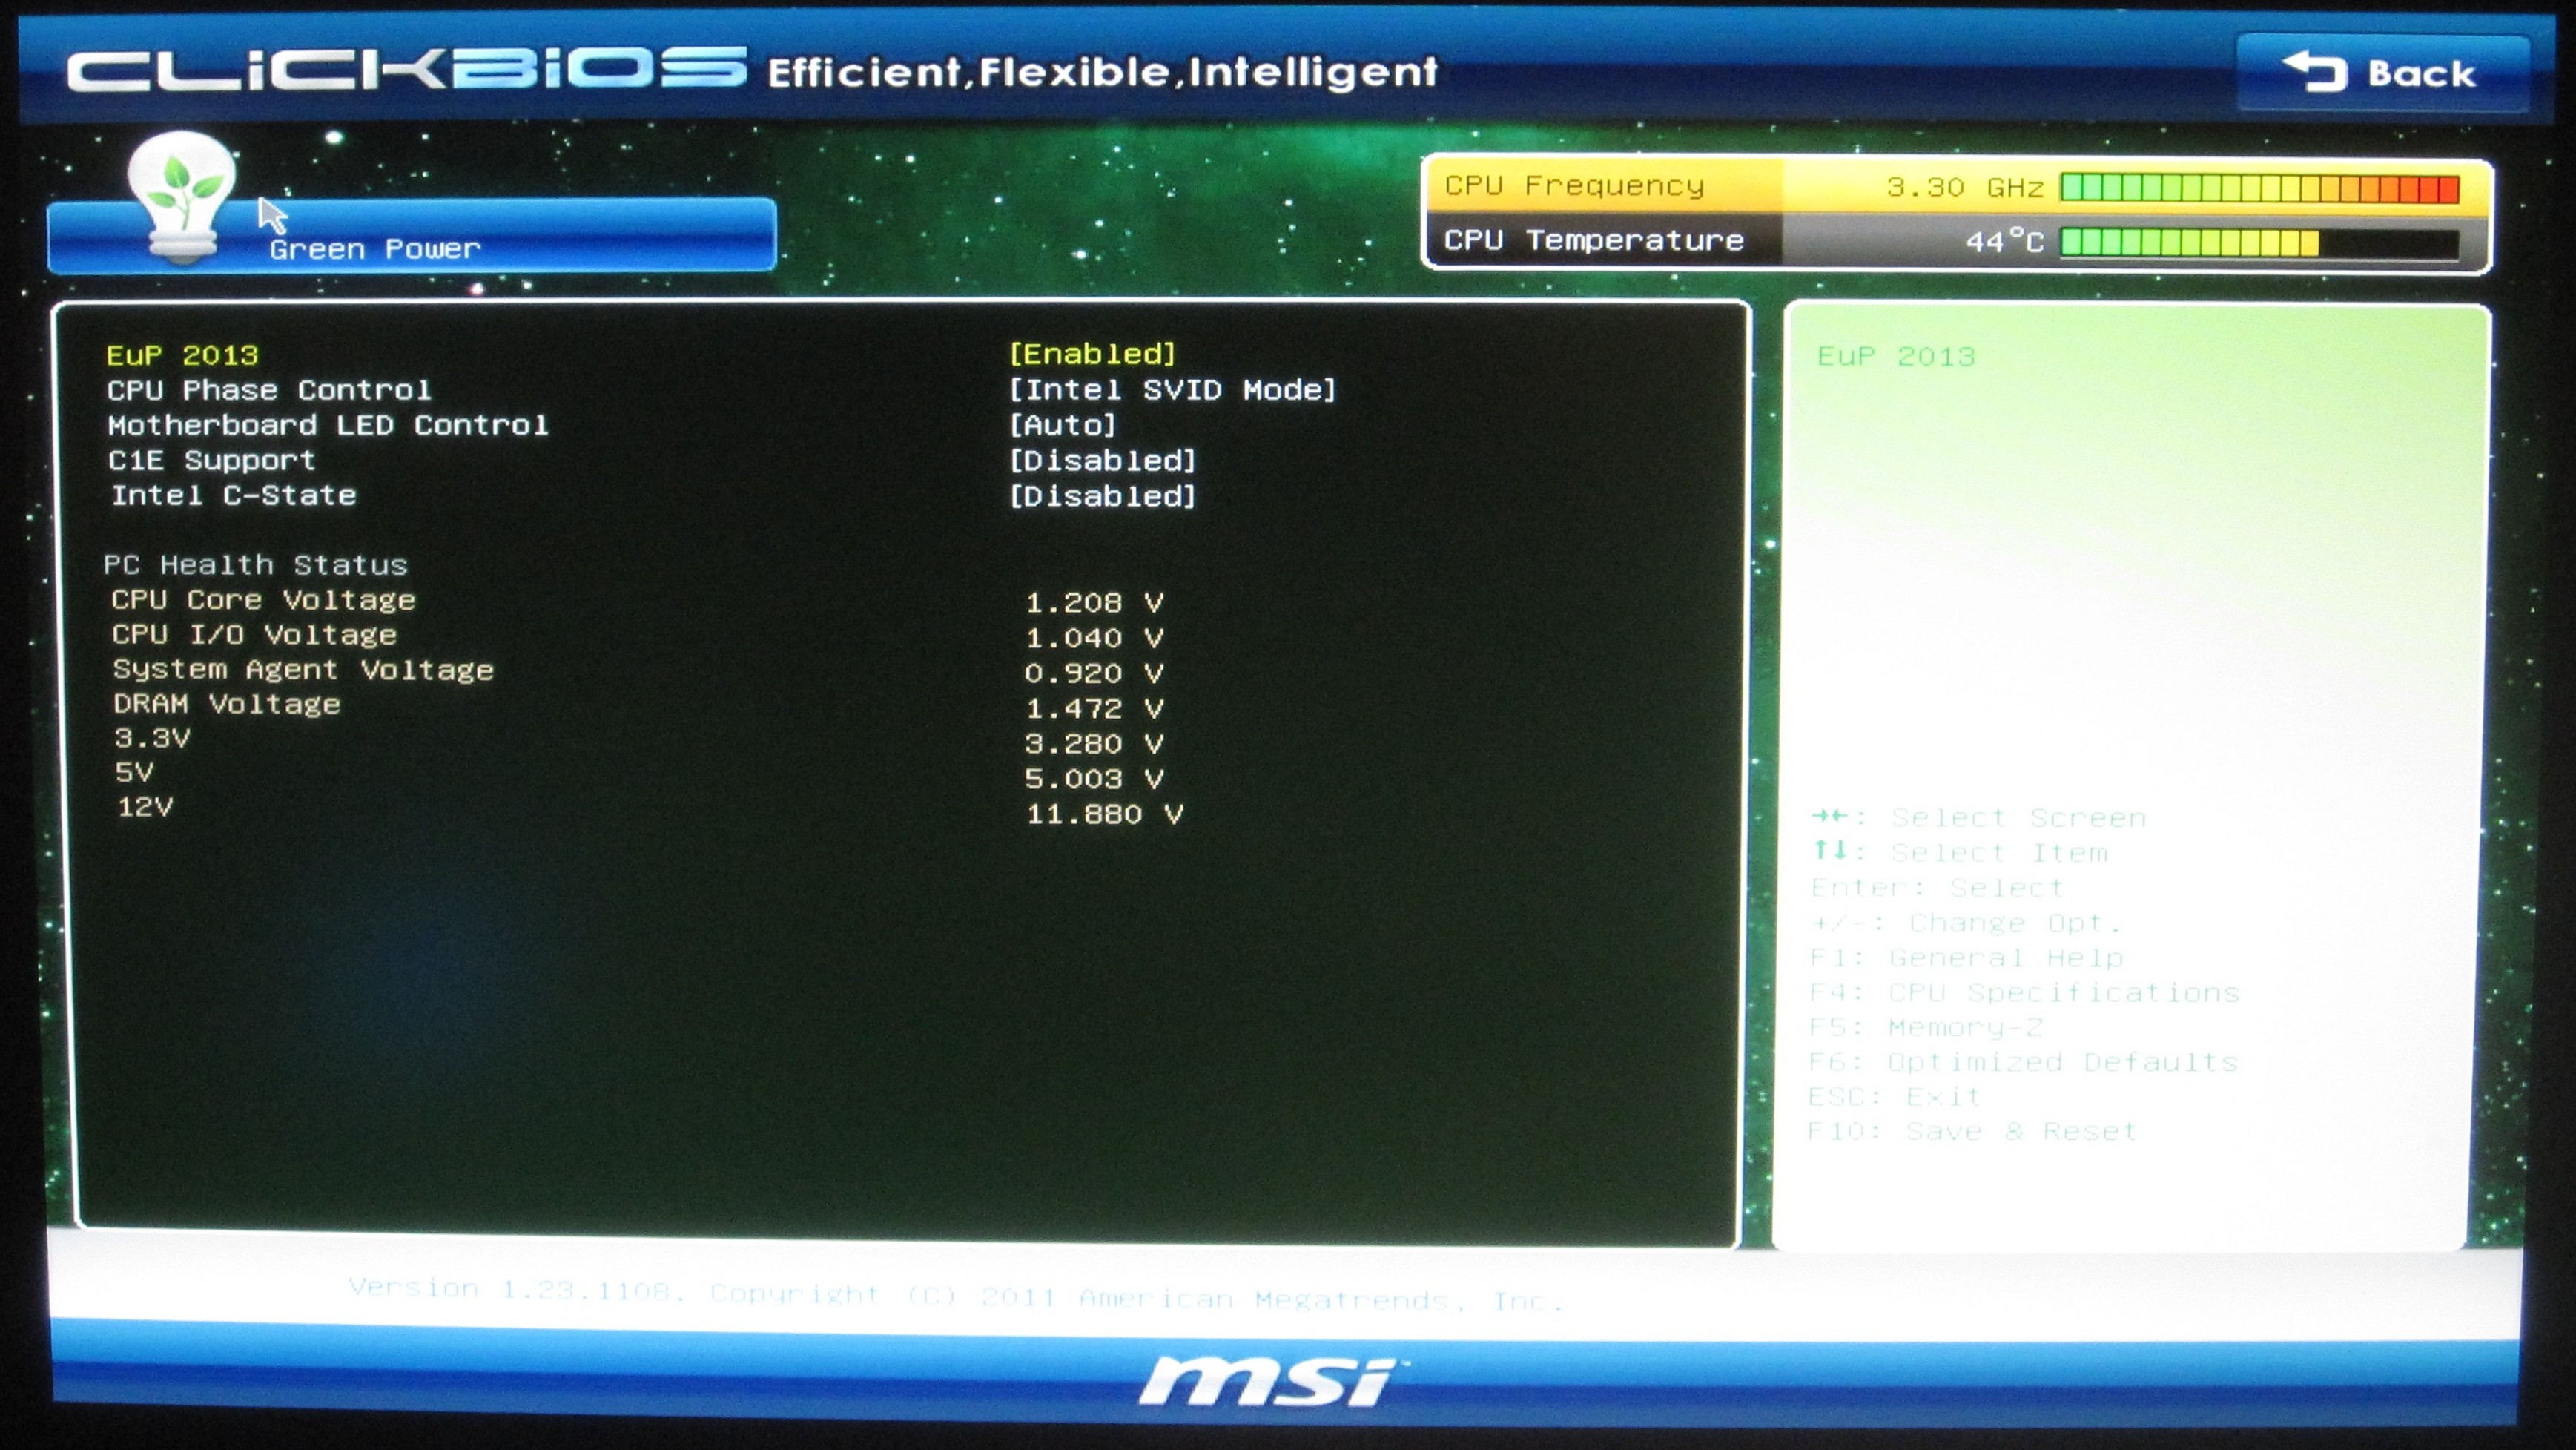
Back to the real meat of the UEFI, and we have the Green Power mode. This shows the voltages currently going through the major parts of the board, as well as a variety of sleep state options on the motherboard, which are normally found under the 'Advanced' menu in other manufacturer offerings.
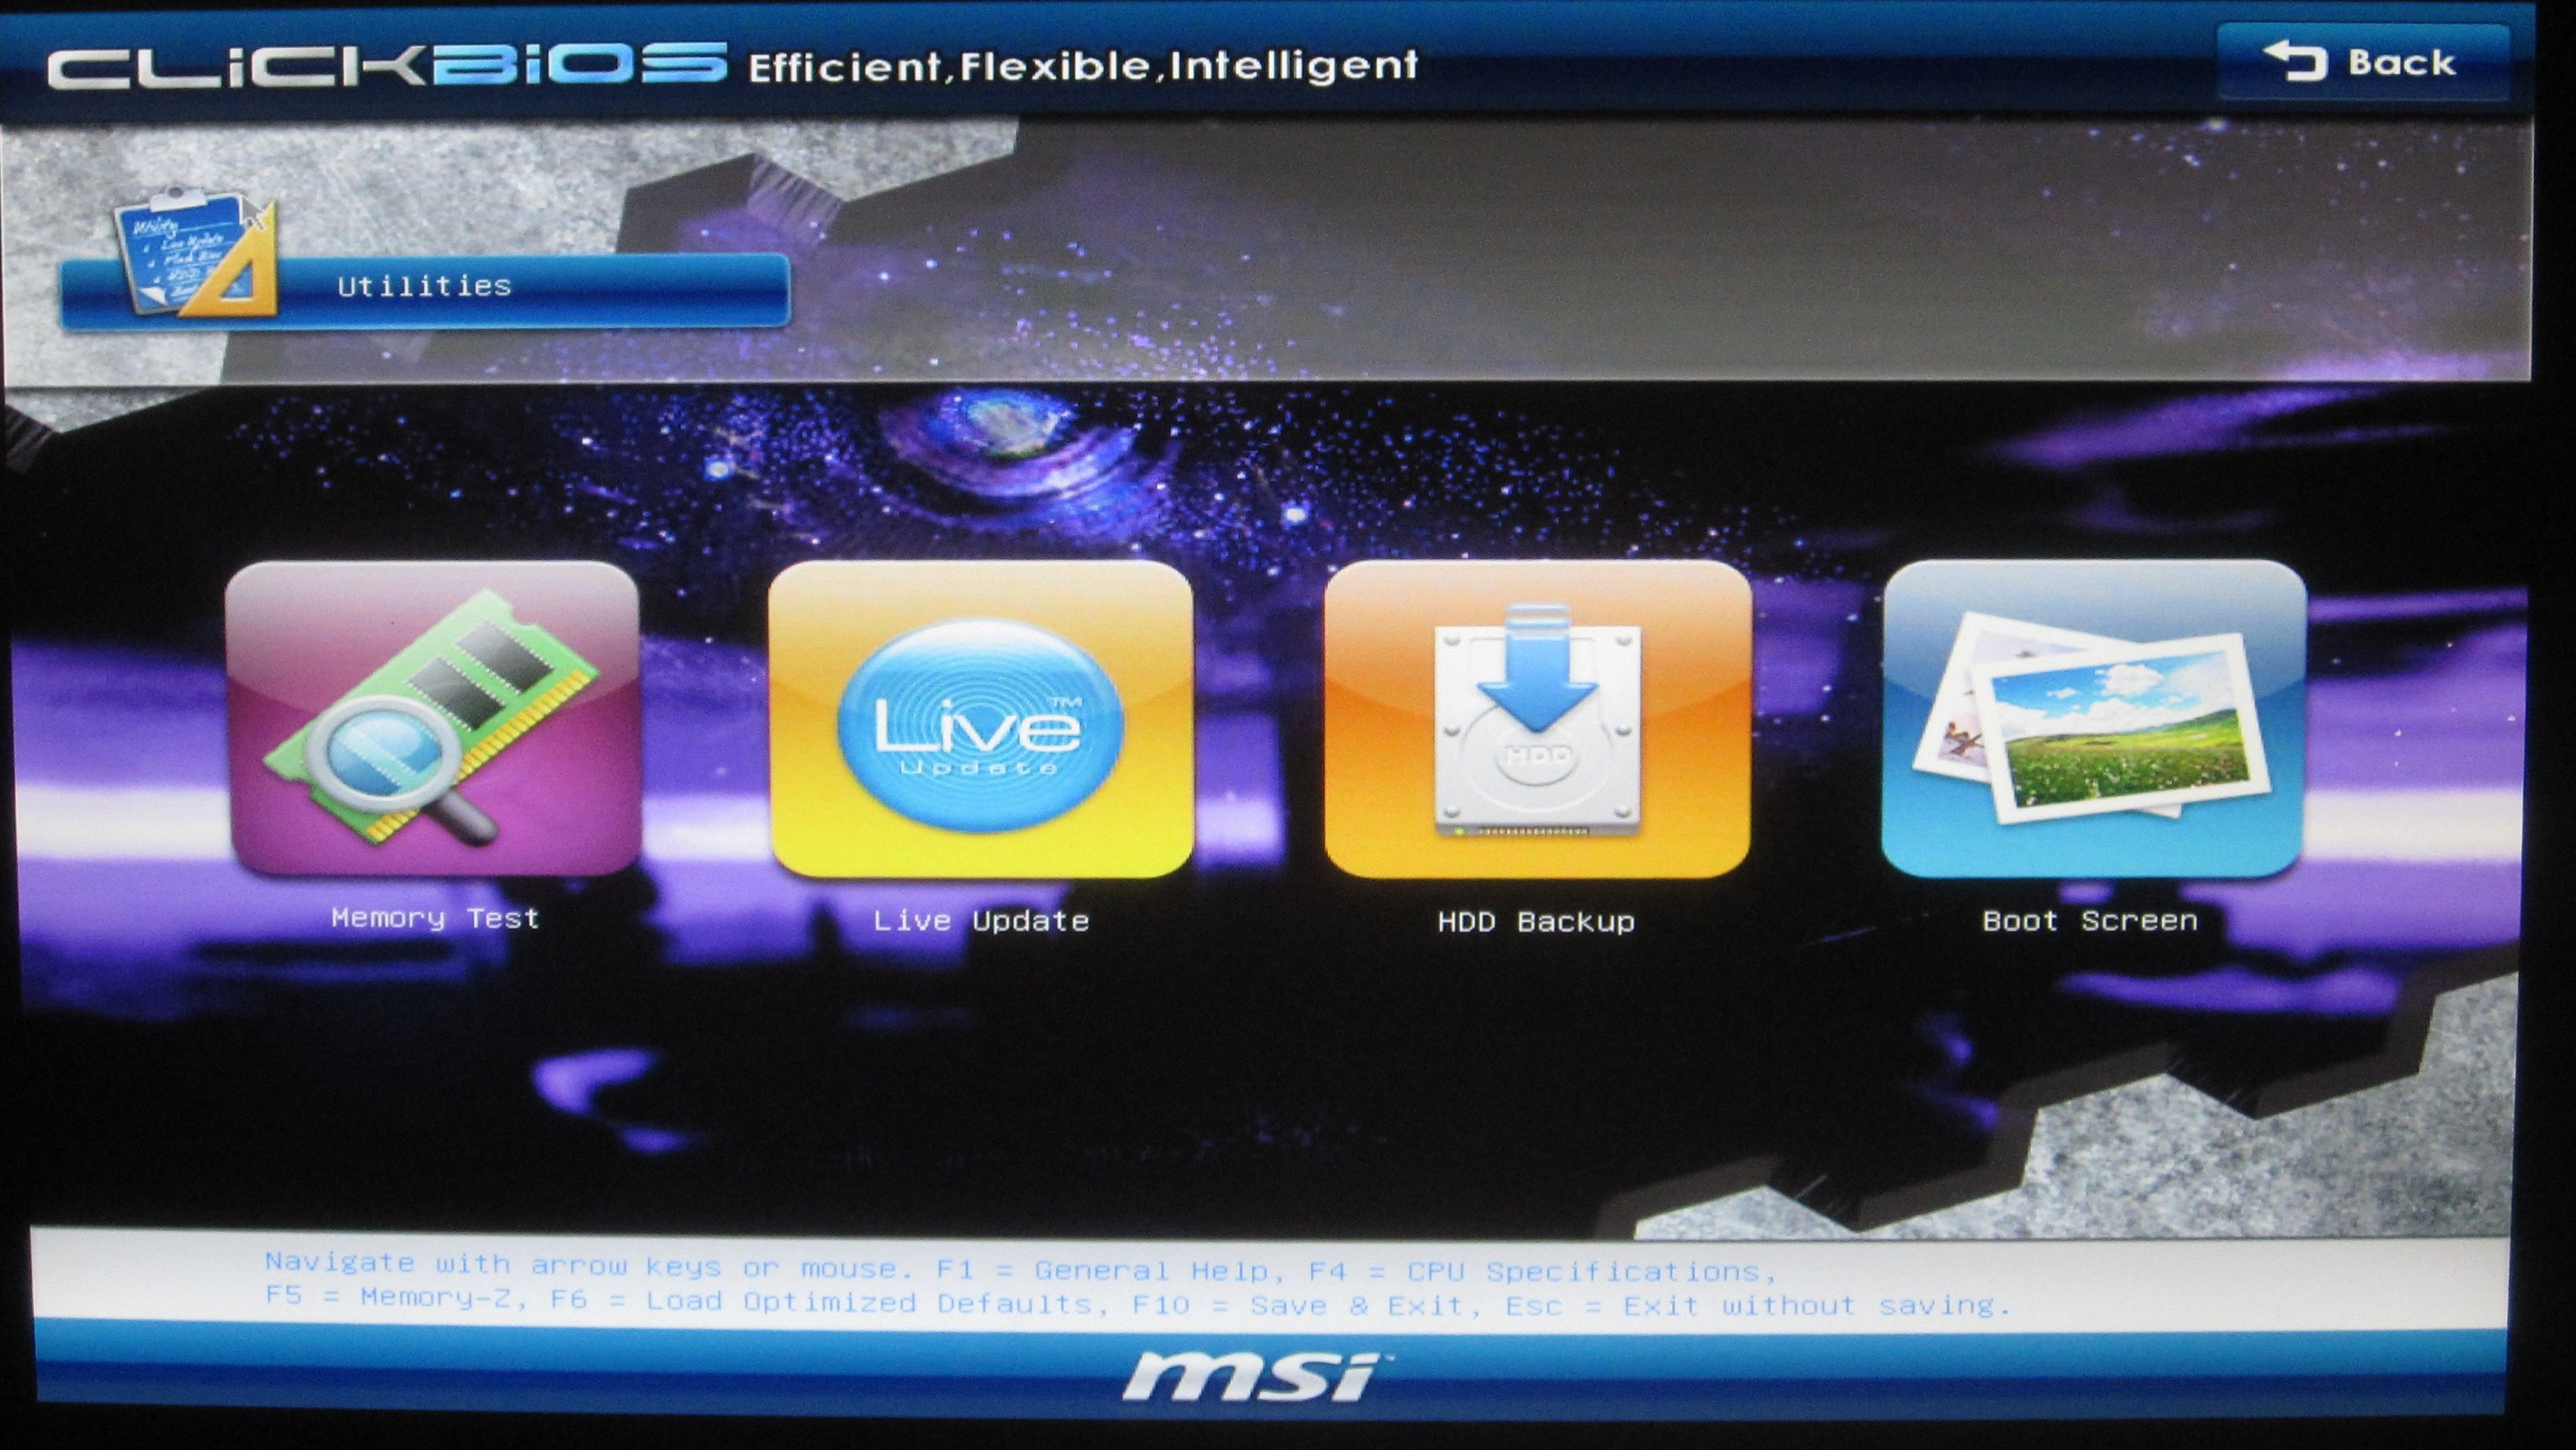
Under the utilities sub-menu, we have a few hit and miss applications worth looking at. The 'Memory Test' does what it says, even if it doesn't tell you what it exactly does. (MSI state that this function is a work in progress, as all it does is check that there are not any read errors—it is expected to be updated in their next UEFI generation update.) The Live Update tool loads a version of Linux called Winki, which then proceeds to scan for updates—I had trouble with this tool, as it could not find anything, and the screen to tell me it found nothing was dull white text on a grey background which I couldn't see properly. The HDD backup allows you to create a ghost image of a partition on another partition, and the boot screen option allows you to change the image at boot time—even though with the UEFI and an SSD, it's available for less than 0.5 seconds at boot. Both the Live Update and the HDD backup require the driver CD to be in the CD drive at boot-time to run.

In the Overclocking sub-menu, we come back to options we've seen before and can relate to—simple selections of CPU frequency (BCLK in 10 kHz increments) and CPU ratio are options I like. Memory sub-timings are changeable, as well as all the major voltages, and up to six OC profiles can be stored. There are not any preset auto-OC options, unfortunately, and the CPU power limits are under the 'CPU Features' sub-menu at the bottom. Read below for my OC experience with this board.
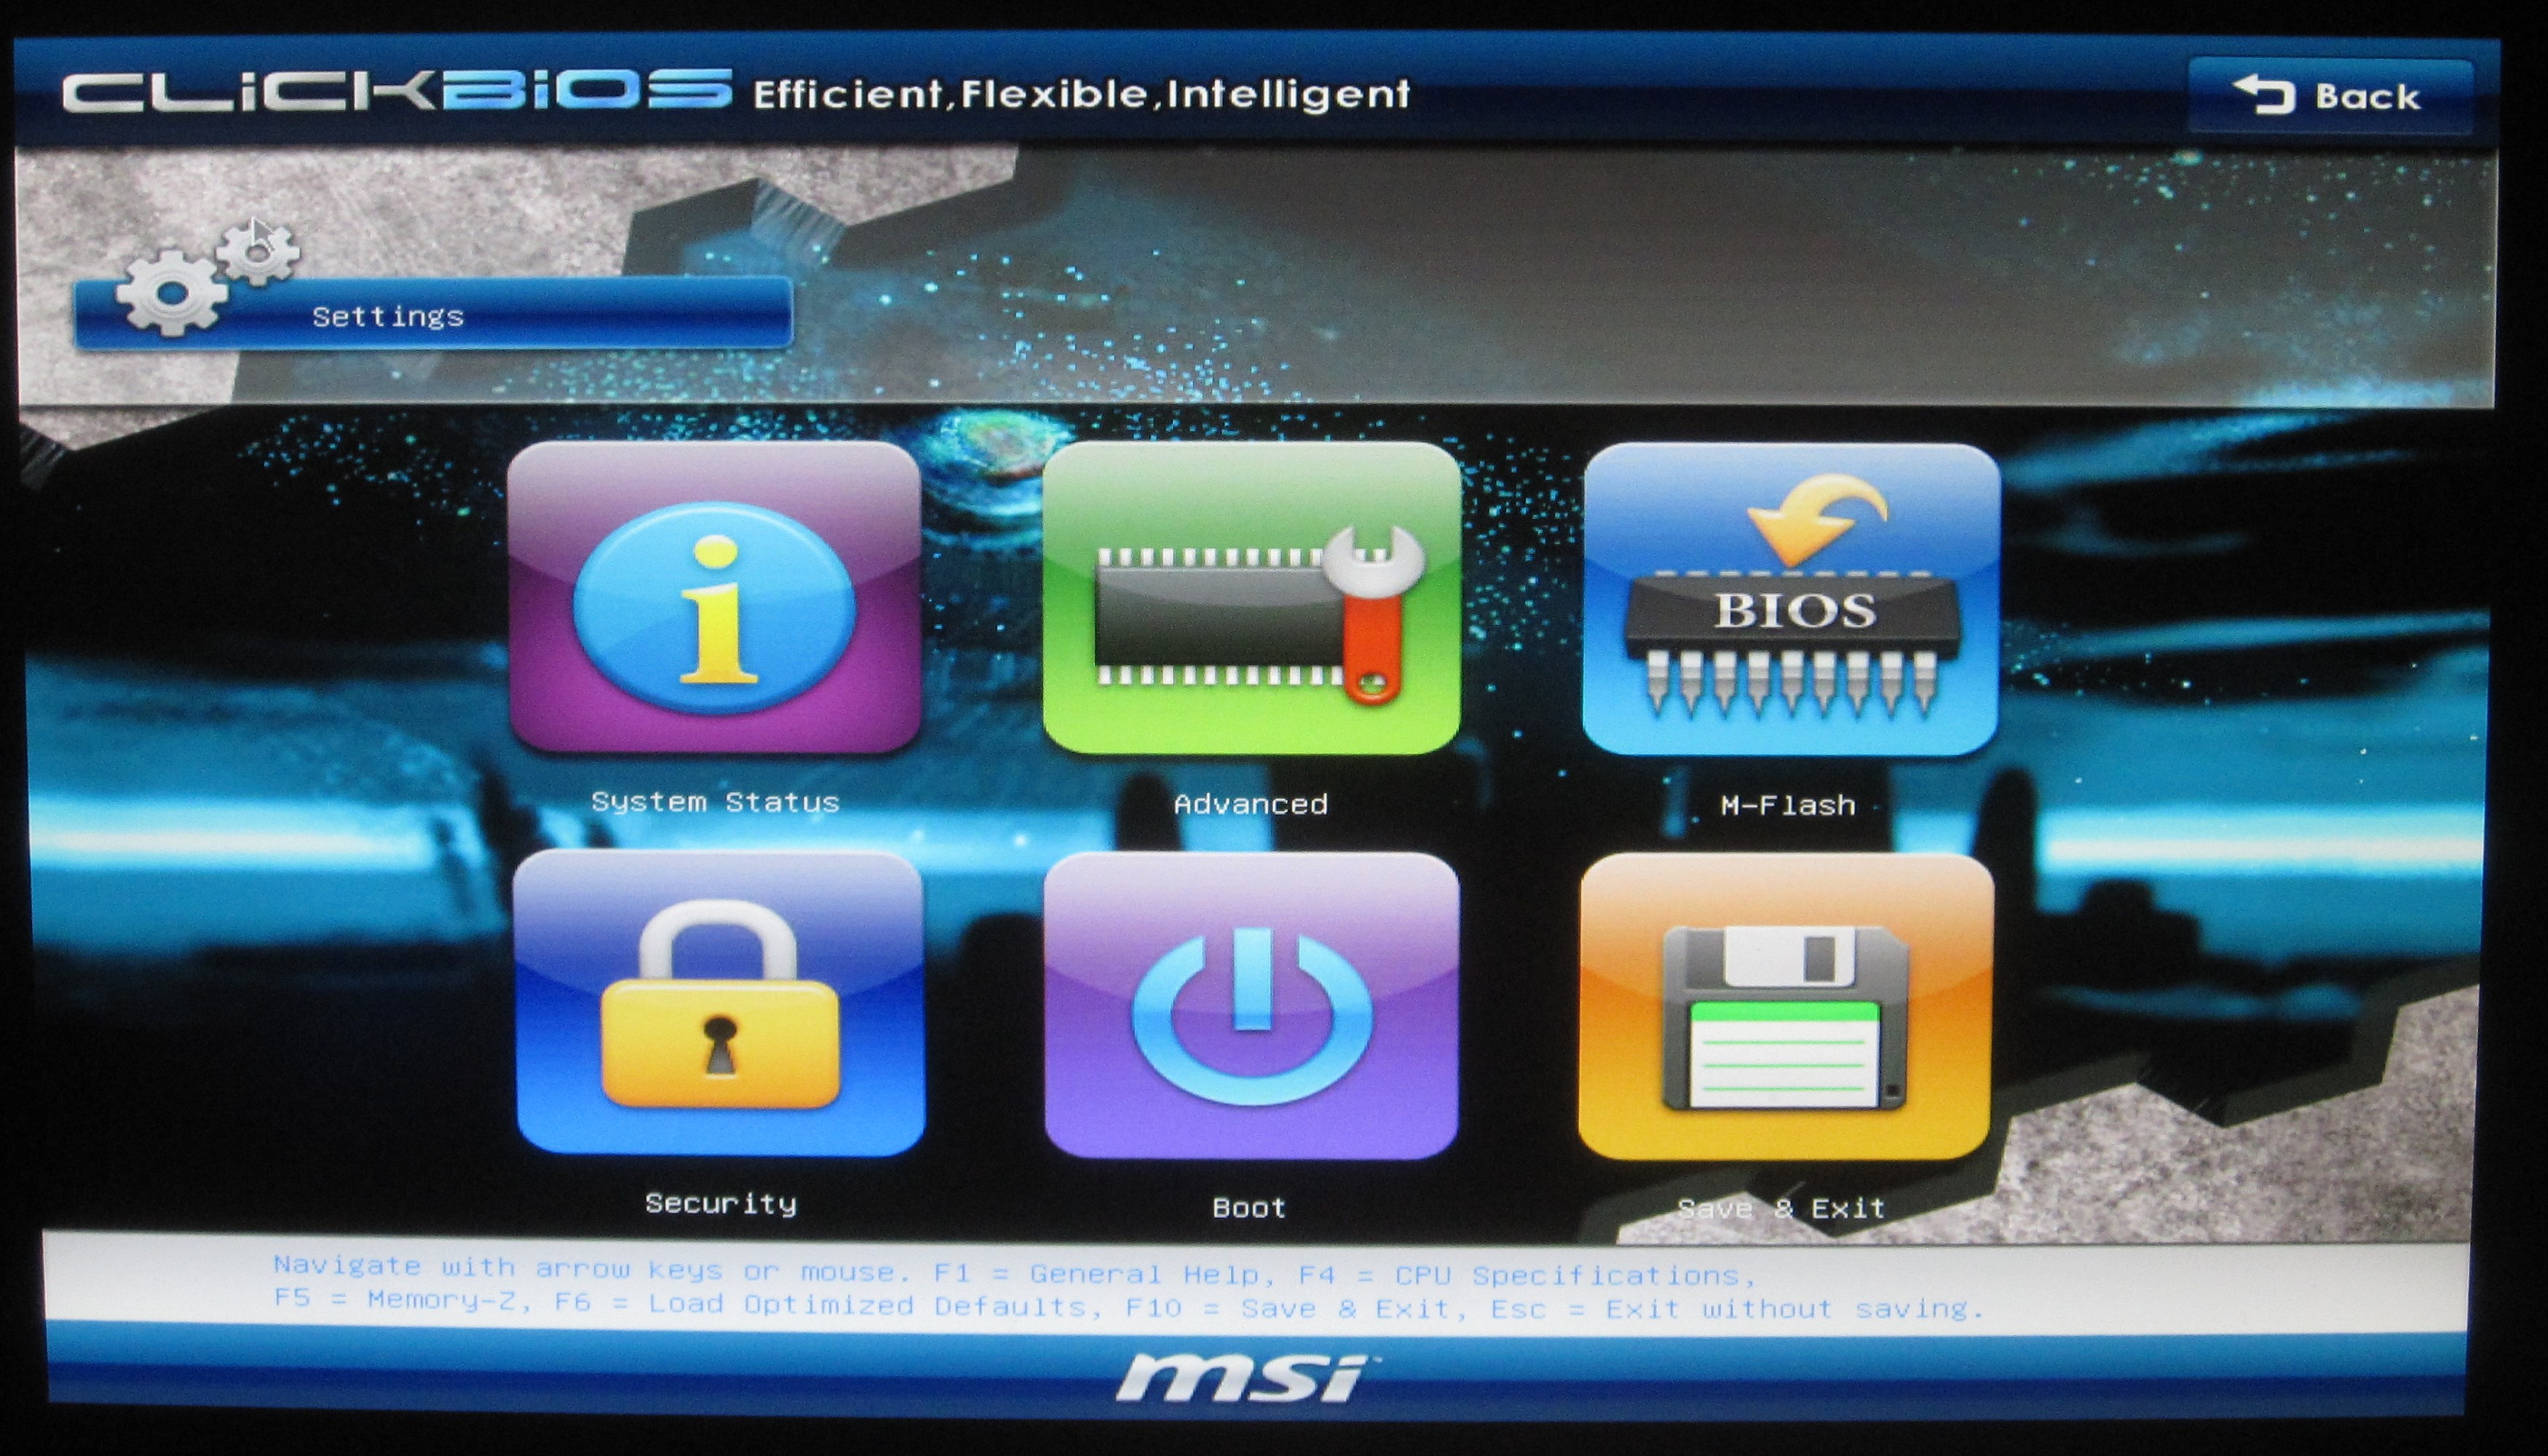
In the settings sub-menu, we enter another array of options. Under 'System Status', we get the normal screen we'd associate with the first option of a BIOS system, by offering date/time and what drives are in each SATA port. Advanced contains the standard array of enable/disable the various add-on chips on the board, including USB and SATA. The fan controls for the UEFI are also in there, under the 'Hardware Monitor', but again only the CPU fan and two SYS fan headers are controllable in terms of a percentage of maximum rather than a ramp. The M-Flash is the UEFI update tool—you need a non-NTFS USB stick with the latest BIOS on to use this feature. The other options are as standard here, and the 'Save & Exit' menu has the Boot Override feature, so you do not need to continually change the order of boot devices to boot from USB or DVD instead of a hard drive.


MSI P67A-GD65: Overclocking
There are a few ways to overclock the MSI P67A-GD65—the easiest to apply is the OC Genie, an auto-OC setting available as a button on the motherboard. When you press it (if the board is on or off), the button lights up, and the next time the motherboard boots, it will attempt to apply a 42x multiplier overclock on the board, and apply any memory XMP profiles. When I used it, I got a yellow message on boot up telling me not to edit any BIOS options related to OC, and in the OS I saw a constant 42x multiplier applied, with no SpeedStep down to 16x which is what we’ve seen on other boards. The voltage was set to 1.38V on full load, and the idle power was up to 126 W, an increase in 33 W from pre-OC settings. I quite like this OC button—it's quick, it does the job. The only thing wrong is that, in order to disable it, you have to open up your PC case—there's no BIOS option to turn it off whether it is depressed or not. Nevertheless, this button will please system builders.
In terms of trying to use my own wits for overclocking, I went into the UEFI and upped the multiplier to 44x without changing anything else, and the motherboard booted, giving 1.320V at load. In order to apply a 46x multiplier, the voltage had to be changed manually, to 1.380V. At 48x however, a voltage increase of 1.440 V was required—which is slightly more than what we've seen on other P67 boards. This level gave 61ºC on the H50 water cooler.
However, in these OC sections, I like to limit the CPU voltage to 1.420V as a fair marker, as it gives a balance between temperatures (especially on air) and a decent 24/7 overclock. At 1.42V, the 47x multiplier booted fine. I then started to play around with BCLK—at the default multiplier, I could get 105 MHz on BCLK, but at 47x I could only manage 101.0 MHz to be stable under heavy load, giving a total CPU speed of 4747 MHz. This is a tiny bit below other boards we've seen.
For the 4.747 GHz OC results using the 3D Movement benchmark,
- In single threaded mode, for a 28.3% OC (from 3700 MHz to 4747 MHz), a 29.3% increase in the score was observed (113.29 to 146.51).
- In multi threaded mode, for a 39.6% OC (from 3300 MHz to 4747 MHz), a 39.2% increase in the score was observed (346.07 to 481.56).
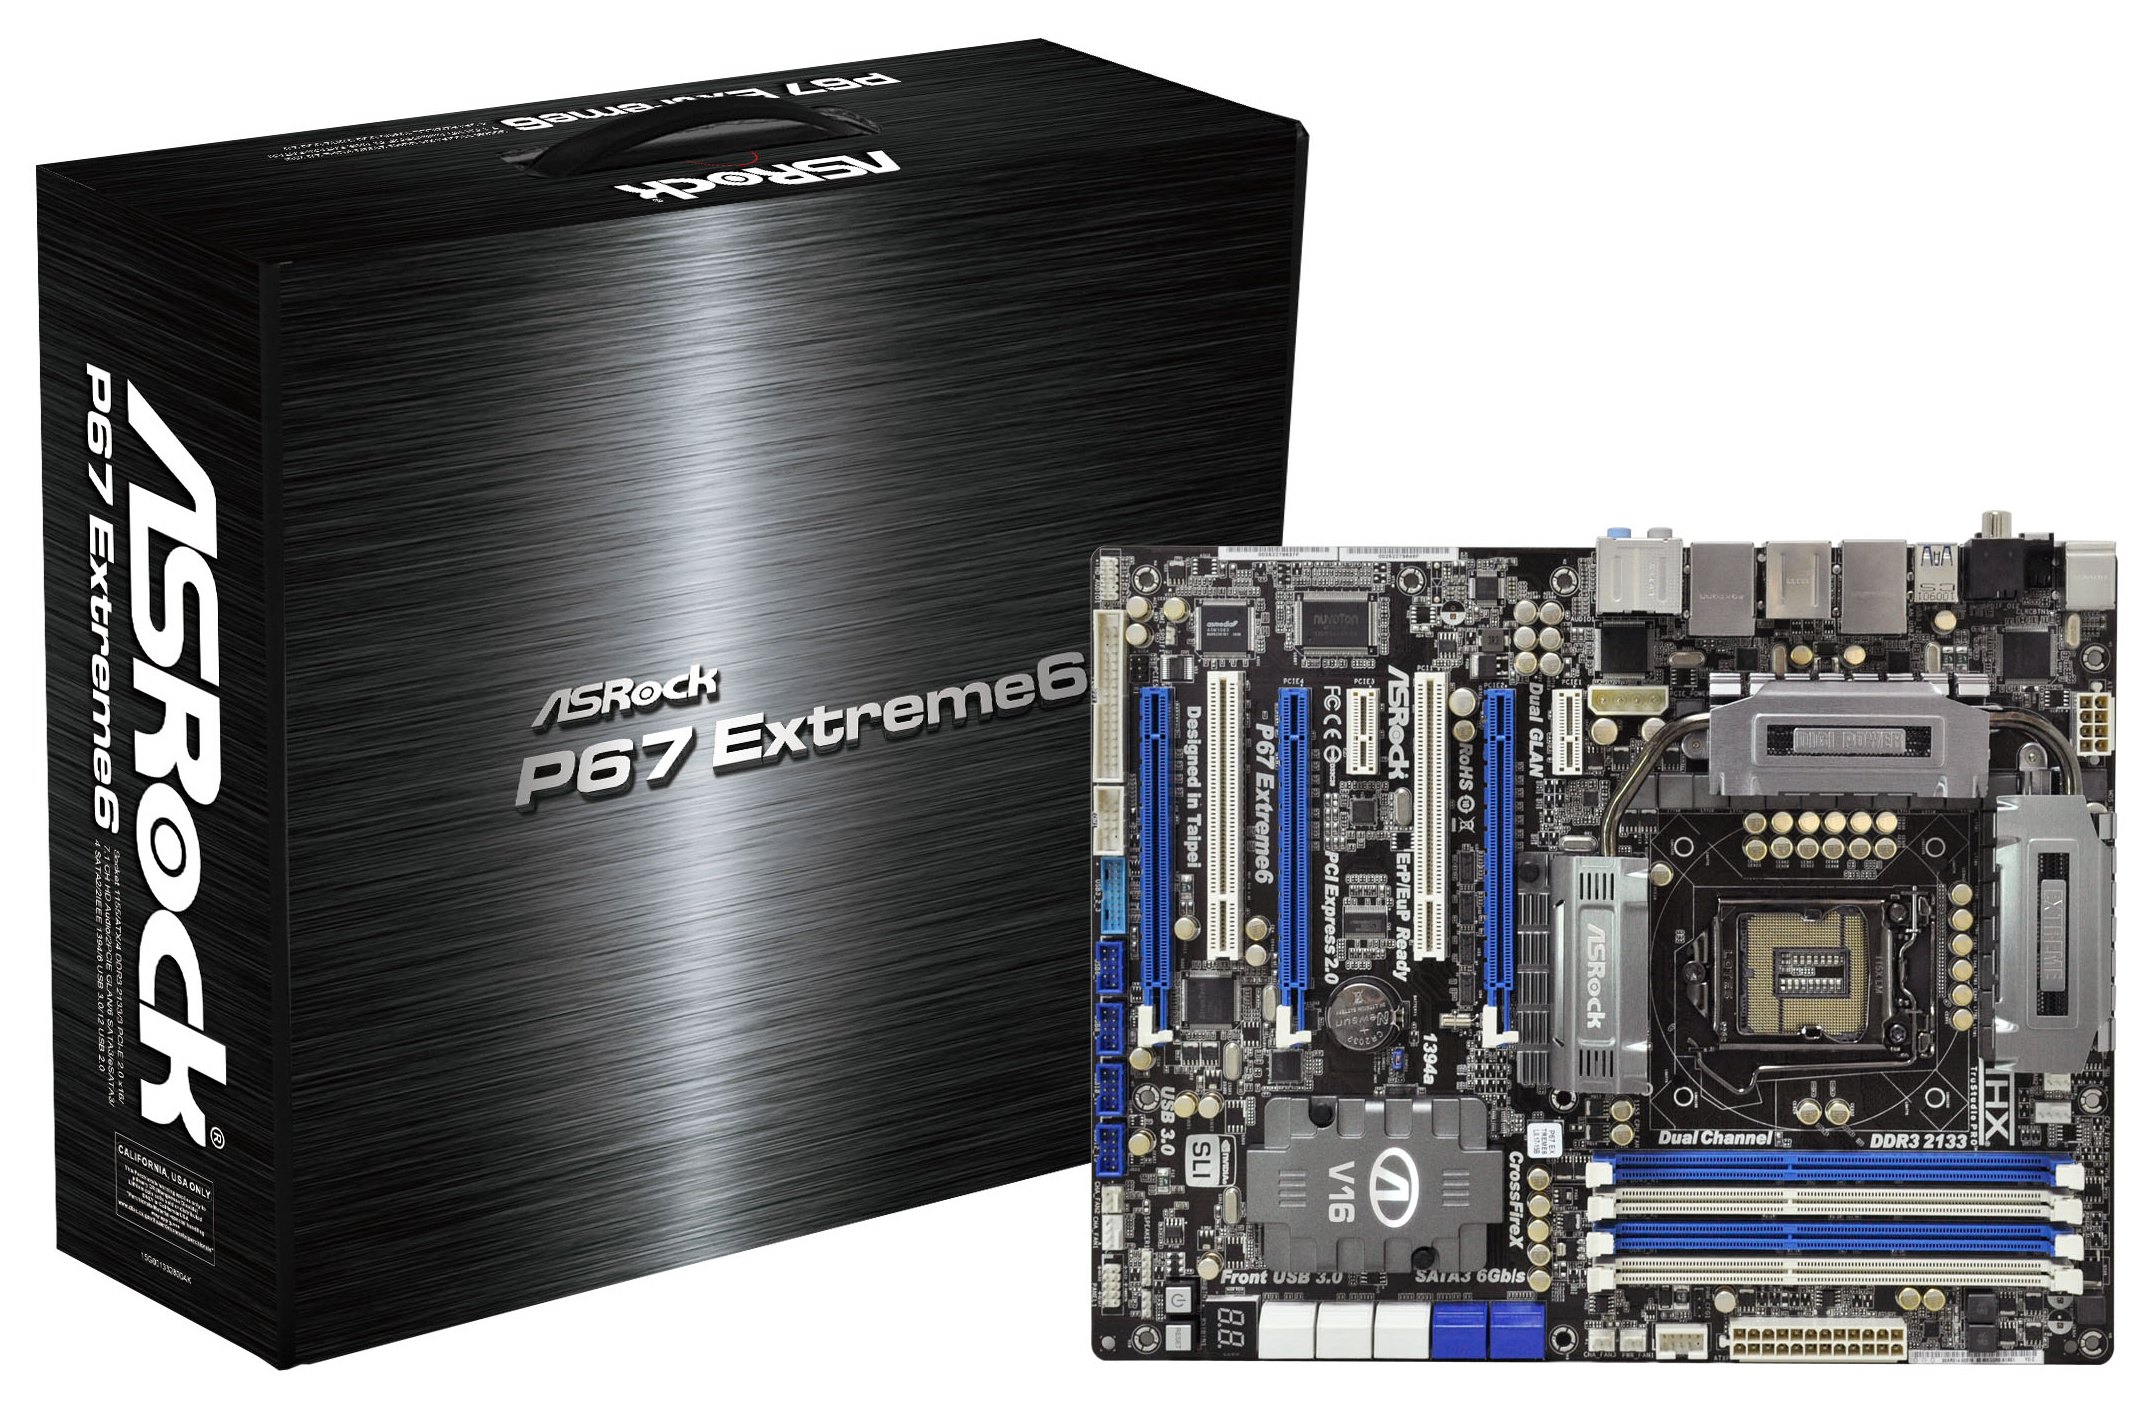
ASRock P67 Extreme6: Overview
I’m writing this after I’ve tested this board, and my overall impression is that ASRock are hitting the nail on the head with regards to ease of use and options on their products. ASUS are ASRock’s parent company, and we can definitely see the essence of one transferring into the other—a stark change from ASRock’s initial prerogative as a contender in the commodity OEM market. The P67 Extreme6, which is currently retailing at $210 (above the original $190 RRP) offered a great overclock as well as the ASRock plethora of extras that come with the board, including that USB 3.0 bracket which doubles as an SSD holder. The main criticism with ASRock boards, as it always usually is, comes with the one year warranty, and also whether this board is worth the $50 more than the P67 Extreme4, which we reviewed in our first look at P67.
ASRock P67 Extreme6: Visual Inspection
A few things glare out the minute you look at the board and the CPU socket area—to start, we have a large combined heatsink setup, designed to conduct heat around the 16+2 phase VRM power solution as well as the PCH contained underneath the bottom heatsink. In the CPU socket, we find ASRock’s Combo Cooler Option, allowing users to utilize their old socket 775 cooling, as well as a series of gold based capacitors. Previous ASRock chipset boards (think the X58 Extreme3) required fan support on the VRM heatsink, but this one does its job without one.
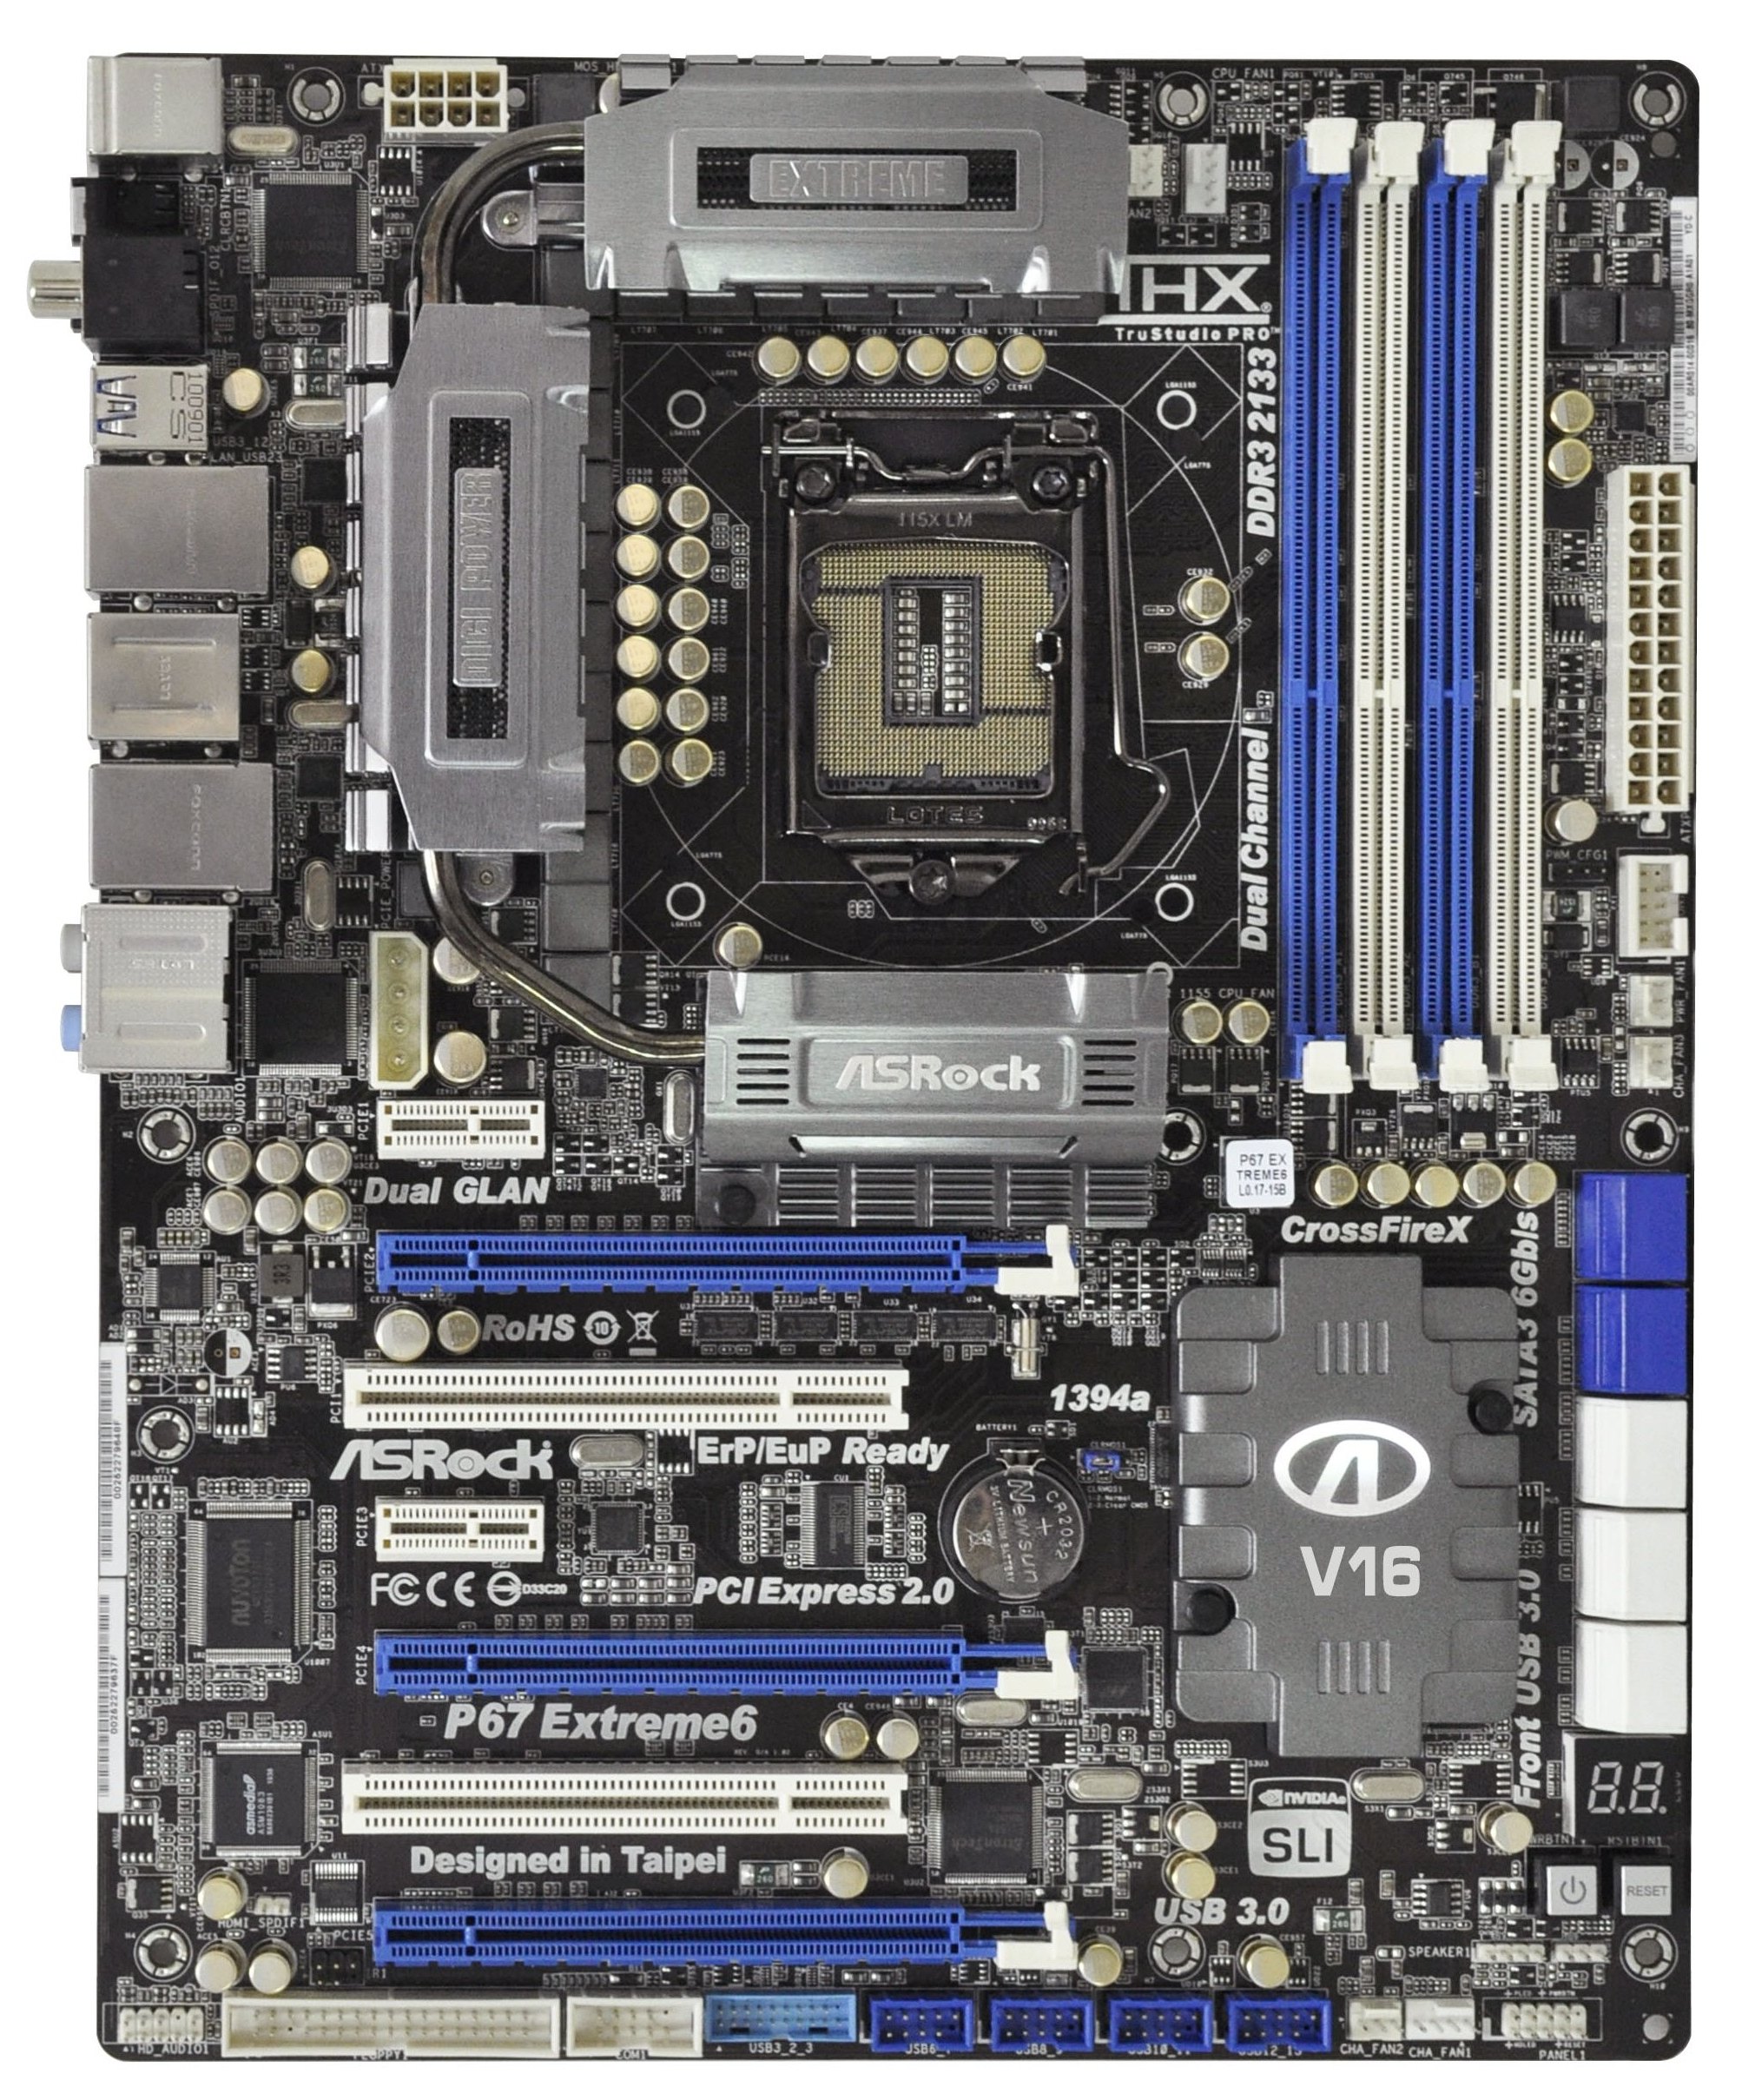
There is an abundance of fan headers on this motherboard—above the CPU socket there are two CPU fan headers, one 4-pin and one 3-pin; below the 24-pin ATX power connector there is another couple labeled CHA and PWR, and finally another two are found at the bottom right, both chassis fans. In the BIOS there are fan controls for all of these except the PWR header.
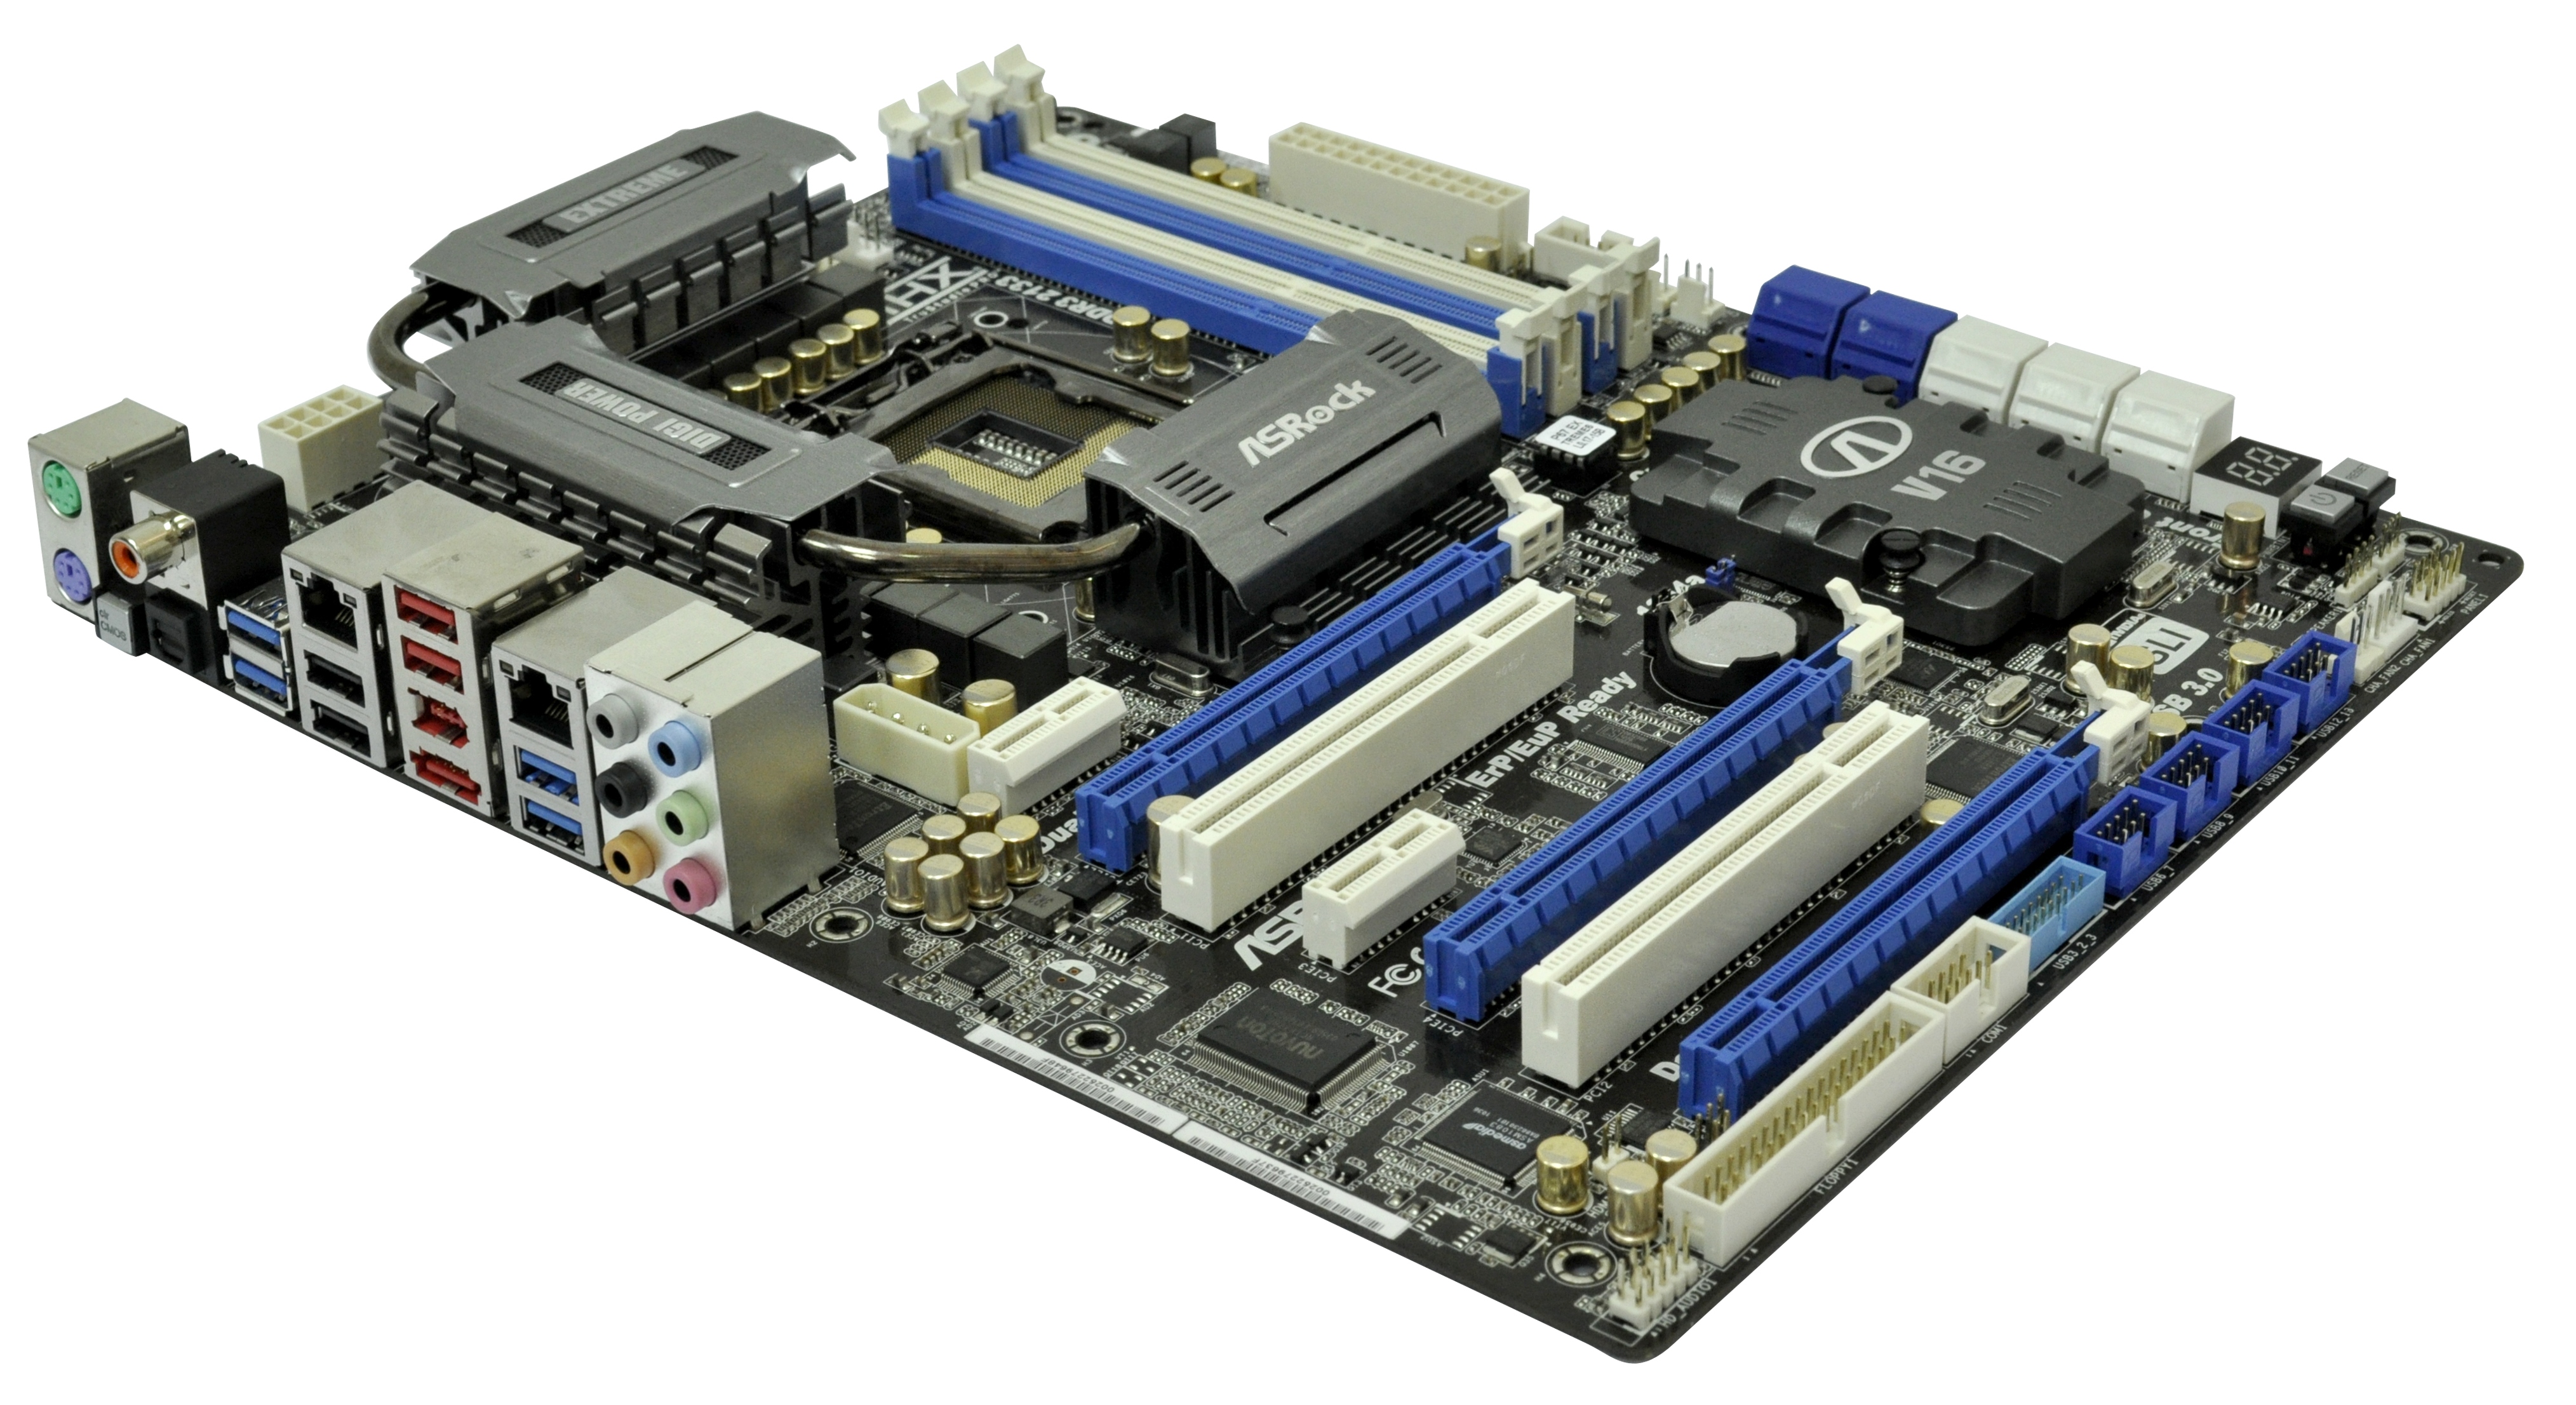
Continuing down the right hand side of the board is a FireWire connector for a front panel Firewire connector, and 10(!) SATA ports. The four blue are SATA 3 Gbps ports from the PCH, and six white SATA 6 Gbps ports—two from the PCH, and two sets of two powered by Marvell SE9120 controllers. One of these Marvell controllers also controls the eSATA 6 Gbps port, so both cannot be used at the same time. Unfortunately, only the SATA 3 Gbps support RAID.
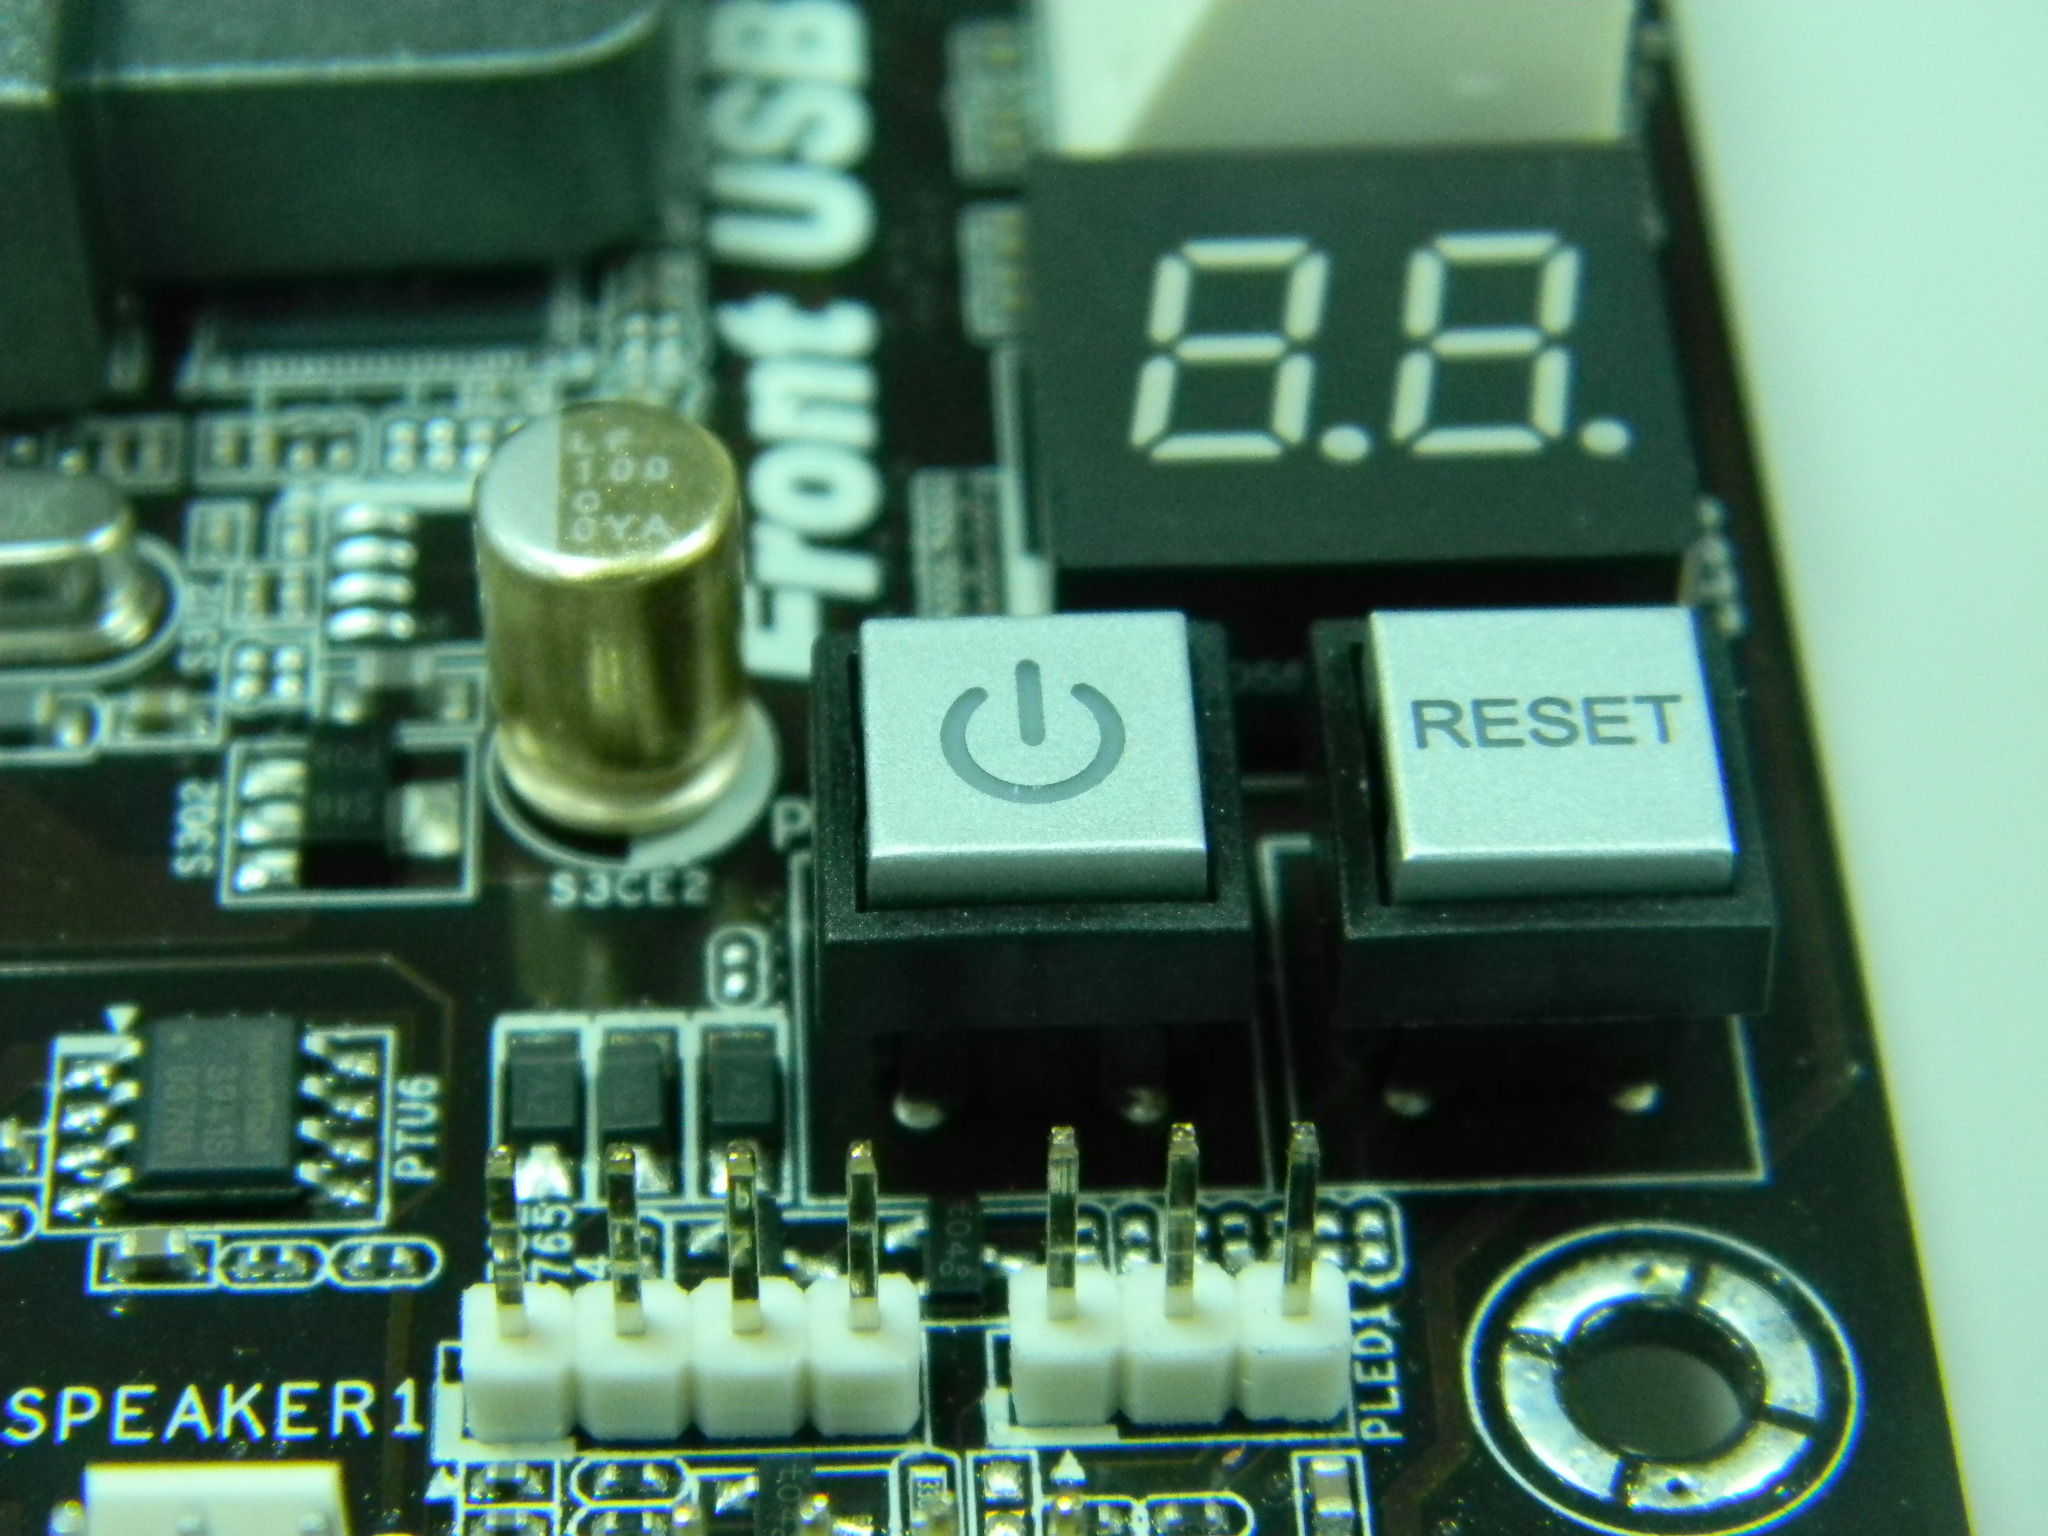
Thankfully we see the power/reset/debug LED we’d expect with a board at this price, and above this is a heatsink labeled ‘V16’ housing a PLX PEX8608 chip to supply extra PCI-E lanes for 3+ GPU setups at the expense of board power consumption. The PCIe layout gives a PCIe 1x limited in width by the PCH heatsink, and the standard array of PCIe x16, PCIe x1 and PCI slots. By giving enough space for a triple slot cooler to the first PCIe x16, this offers space between a dual two-slot cooler PCIe setup, but in here is also a PCIe x1 without width restrictions. If all PCIe slots are populated with dual slot GPUs, apart from running at x8/x8/x4, a lot of the connectors at the bottom of the board are compromised, such as the legacy floppy port. More importantly though, the Front Panel connector would easily be obscured by anything bigger than a 4850, thus limiting tri-GPU setups to single slot cards or people using this board for overclocking on an open test bed.
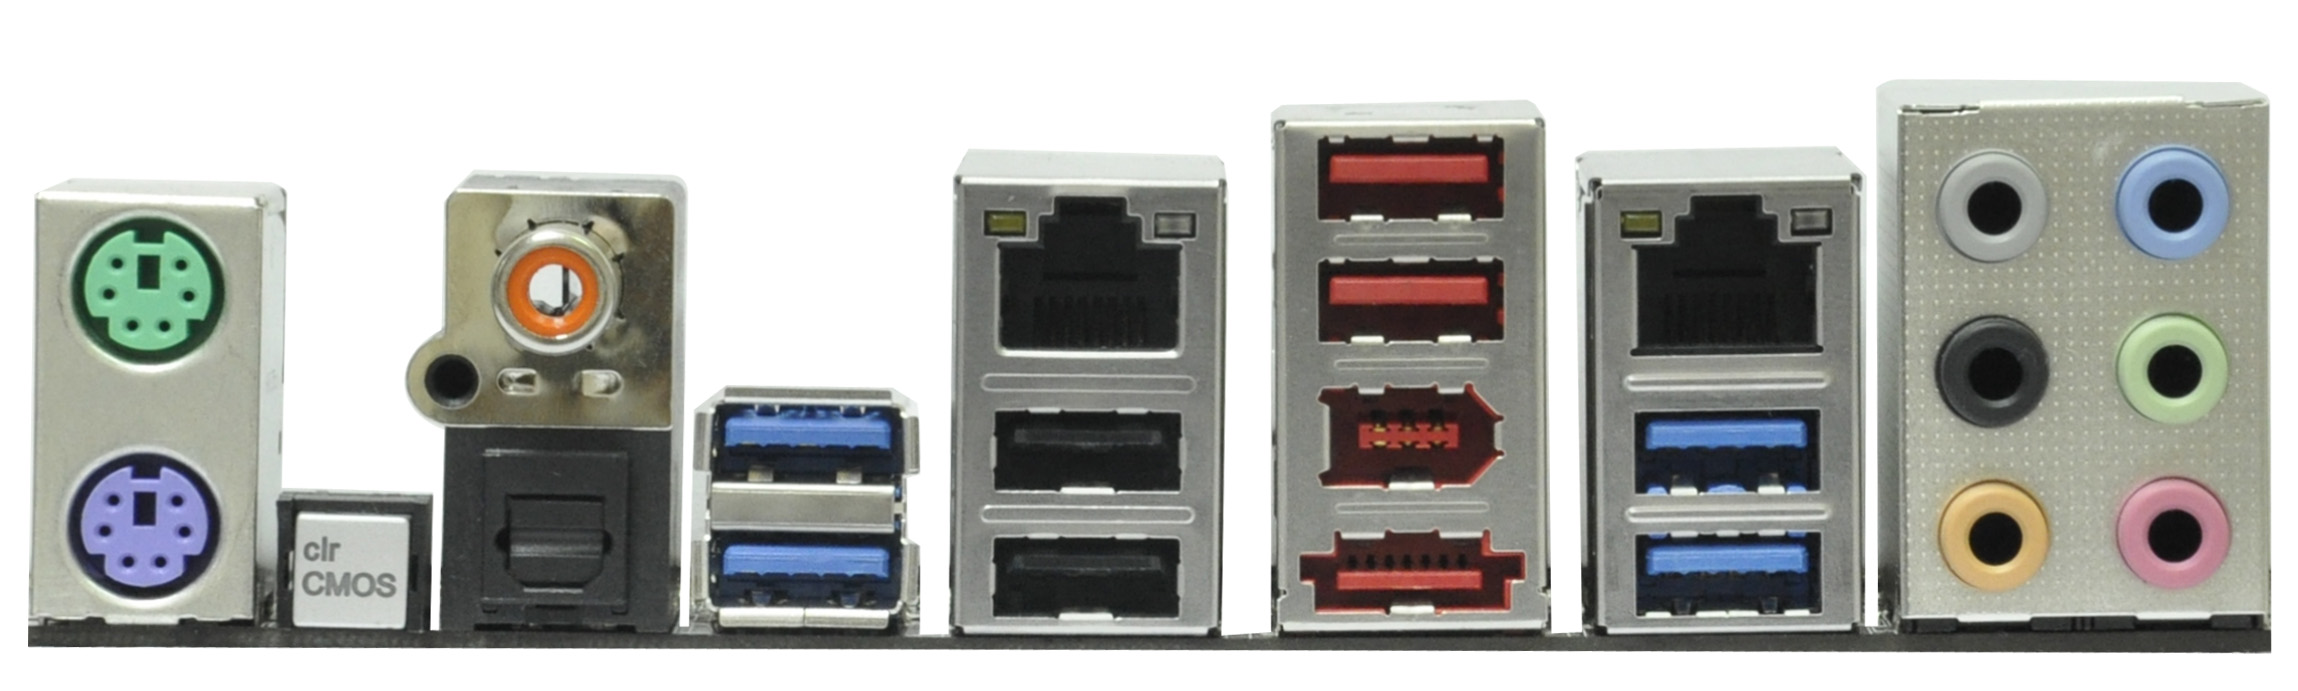
The I/O panel offer dual PS/2 connectors, the ubiquitous clear CMOS button we like to see, optical and coaxial S/PDIF outputs, dual gigabit Ethernet ports powered by Realtek NICs, a Firewire port, that eSATA 6 Gbps port, four USB 2.0 ports, four USB 3.0 ports powered by an Etron controllers, and the standard Realtek audio setup supporting THX TruStudio Pro.
ASRock P67 Extreme6: Board Features
| ASRock P67 Extreme6 | |
| Market Segment | Performance |
| CPU Interface | LGA 1155 |
| CPU Support | i3/i5/i7 Sandy Bridge |
| Chipset | P67 |
| Base Clock Frequency | 95.0 MHz to 110.0 MHz in 0.1 MHz intervals |
| DDR3 Memory Speed | 1333 MHz by default, 1067-2133 MHz supported |
| Core Voltage | Auto, offset or fixed modes, 0.600 V to 1.700 V in 0.005 V intervals |
| CPU Clock Multiplier | Dependent on CPU |
| DRAM Voltage | Auto, 1.200 V to 1.800 V in 0.015V intervals |
| DRAM Command Rate | Auto, 1T or 2T |
| Memory Slots |
Four 240-pin DDR3 DIMM slots in dual-channel Regular unbuffered DDR3 memory Up to 32GB total supported |
| Expansion Slots |
3 x PCI Express 2.0 x16 slots (x16/x0/x4 or x8/x8/x4) 2 x PCI Express 2.0 x1 slot 2 x PCI slots Supports ATI Crossfire Supports NVIDIA SLI |
| Onboard SATA/RAID |
2 x SATA 6.0 Gb/s ports (white) 4 x SATA 3.0 Gb/s ports (blue) supporting RAID 0/1/5/10 4 x SATA 6.0 Gb/s ports (white) from Marvell 9120 1 x eSATA 6.0 Gb/s ports from shared Marvell 9120 |
| Onboard |
4 x SATA 3Gb/s connectors 6 x SATA 6Gb/s connectors 6 x Fan Headers (2x4-pin, 4x3-pin) 4 x USB 2.0 headers support additional 8 USB 2.0 Ports 1 x USB 3.0 header supports additional 2 USB 3.0 Ports 1 x Power on button 1 x Reset button 1 x Front panel switch/LED header 1 x Floppy connector 1 x IR header 1 x COM port header 1 x HDMI_SPDIF header 1 x Firewire/IEEE 1394 header 1 x Front panel audio header 1 x Debug LED Display |
| Onboard LAN | Dual Realtek® RTL8111E Gigabit Fast Ethernet Controllers with Teaming |
| Onboard Audio | Realtek® ALC892 8-Channel HD Audio |
| Power Connectors |
24-pin EATX Power connector 8-pin EATX 12V Power connector |
| Fan Headers |
2 x CPU Fan (4-pin, 3-pin) 3 x CHA Fan (4-pin, 2x3-pin) 1 x PWR Fan (3-pin) |
| IO Panel |
2 x PS/2 keyboard & PS/2 mouse connectors 2 x RJ45 LAN connectors 1 x Audio port (Line-in, Line-out, Mic-in) 1 x Optical S/PDIF Out connector 1 x Coaxial S/PDIF Out connector 1 x Clear_CMOS button 1 x IEEE 1394 port 4 x USB 3.0 ports compatible to both USB 3.0/2.0 devices (blue) 1 x eSATA 6.0Gb/s ports 4 x USB 2.0 ports |
| BIOS Version | 1.6 |
| Warranty Period | 2 Years |
Nothing ultimately stands out here, apart from the 10 SATA ports total with six SATA 6 Gbps ports on offer, as well as six fan headers.
ASRock P67 Extreme6: In The Box
- 2-slot SLI Bridge
- I/O Shield
- Floppy Cable
- 6 x locking SATA Cables (3 x right-angled)
- 4-pin molex to SATA power cable
- Front USB 3.0 Panel w/ SSD holder with rear USB 3.0 bracket
The ASRock USB 3.0 panel that holds an SSD that would retail at $15+ makes an appearance here, as well as plenty of locking SATA cables.
ASRock P67 Extreme6: Software
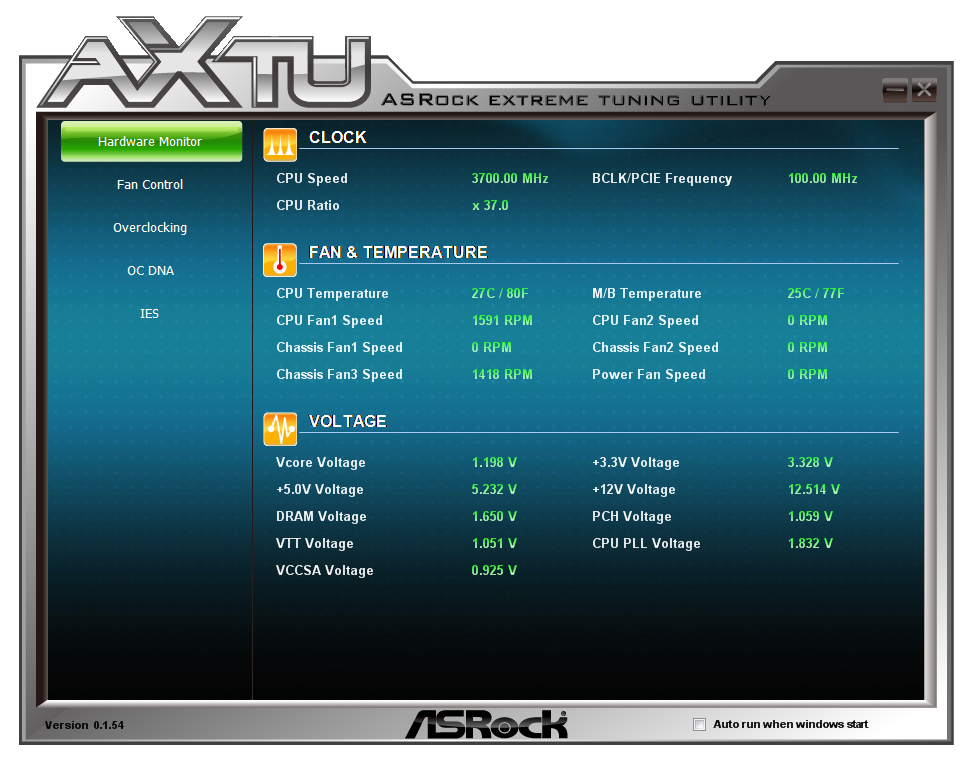
The software on offer here is identical to that seen on the Extreme4, with XFast USB, Instant Boot and the Extreme Tuning Utility. Check out the software in our Extreme4 review here.


ASRock P67 Extreme6: UEFI
After looking at a variety of Cougar Point boards sporting the graphical version of the UEFI interface, ASRock’s implementation is simple but effective. It varies little from the Extreme4, except for various UEFI updates since January which have been applied across the ASRock product range.
One point that bugged me with the UEFI is that when attempting to update the UEFI version via a USB stick, it can only access FAT12/FAT16/FAT32 file systems. This required me to reformat a stick to the FAT32 file system—it would be helpful if NTFS was supported in this regard.
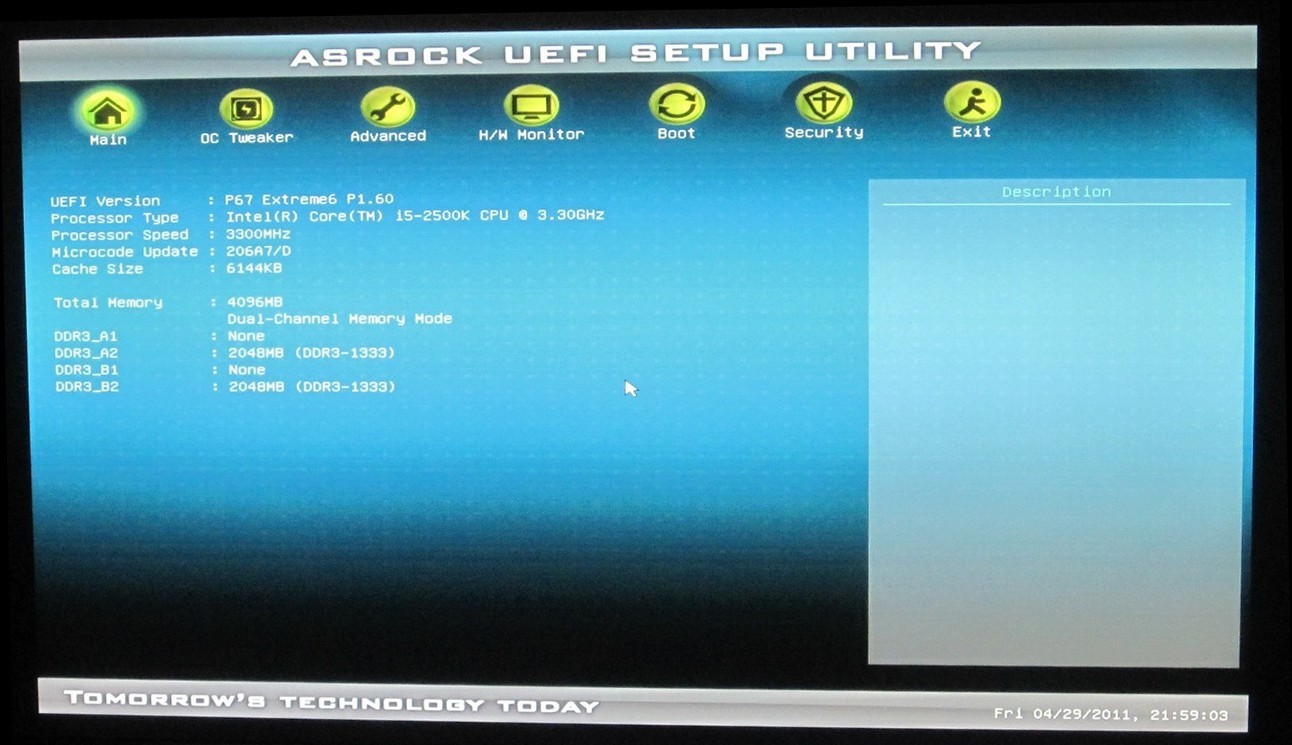
Thankfully the first screen tells us some information—UEFI version, processor, processor speed and the memory in the memory slots (you will see the ECS BIOS doesn’t offer this on the front screen). In terms of OC options, these are all contained in the OC Tweaker menu.

One option that has appeared since the P67 release is the ‘Internal PLL Overvoltage’. The reason this is present in some UEFI now is that during initial release and testing, various overclockers that were armed with an Intel board noticed that selecting the option allowed a significantly larger maximum overclock. Some manufacturers then started to release public BIOSes/UEFIs with this option available—other manufacturers are releasing beta BIOSes/UEFIs with this option only. In my own testing, I can get an extra 200-300 MHz peak on a 2600K using water cooling, but I wouldn’t necessarily be pushing it that far for daily usage.
The other options are similar to the P67 Extreme4, including the optimized CPU OC settings, offering 4.0 GHz to 4.8 GHz in 0.2 GHz intervals. These all bump up the multiplier and the power limits of the CPU, and results of these options are given in the overclocking section below, but overall these work quite well.
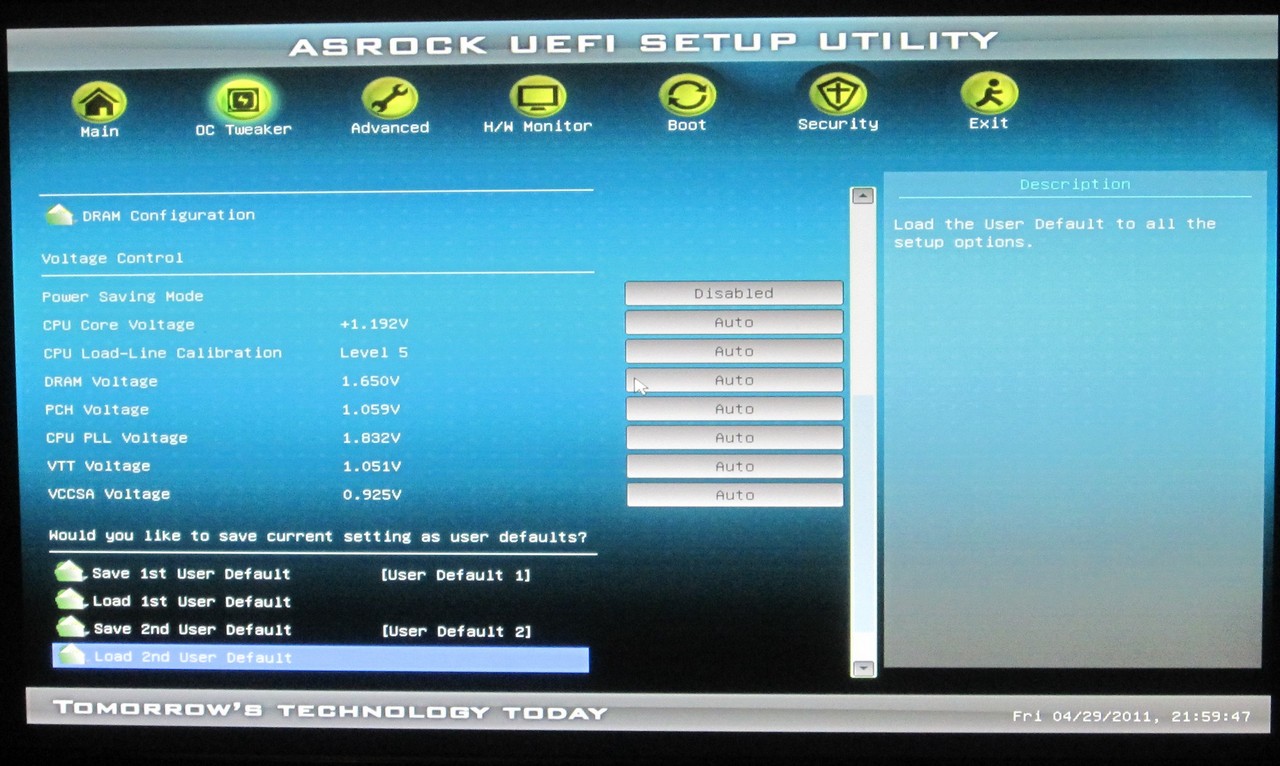
Voltage options here are menu based—there are no options to input voltages manually with number buttons. This may be me being picky, but it’s an option that could be easily implemented to appease everyone. Alongside this, ASRock allow you to save three UEFI profiles.
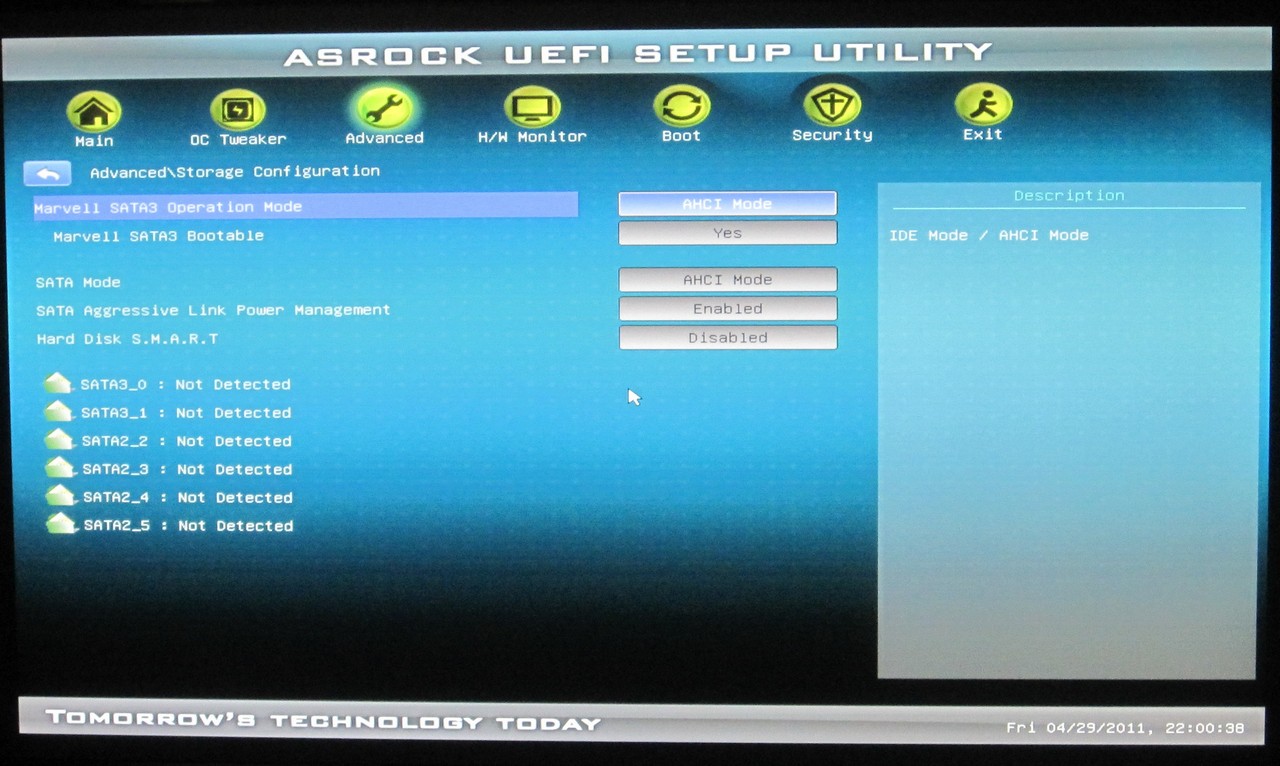
In the storage options, the two Marvell controllers can only be jointly turned off and on—there’s no option to select one or the other. This motherboard defaults the SATA controllers (PCH and Marvell) to IDE mode rather than AHCI, so bear this in mind if you have to press that reset CMOS button and install the OS in AHCI mode, as the board will fail to load into the OS. Also by default, the Marvell based SATA ports are not bootable—this decreases boot time by 5-10 seconds as these do not need to be pre-initialized before the boot sequence. If you want to boot from the Marvell SATA 6 Gbps ports rather than the PCH SATA 6 Gbps ports, expect a longer boot time.

The fan settings are accessible from the H/W Monitor menu—both CPU fans have one control, and the chassis fans are controlled independently. There is no option to control the PWR fan header, however.


ASRock P67 Extreme6: Overclocking
To start with the overclocking, the Auto OC options in the UEFI were tested. This option seems to change the multiplier and the power limit options only—the voltage of the CPU is left at Auto and is seemingly decided at boot time. Amazingly, all these options worked (remember, the Extreme4 didn’t like 4.8 GHz), with 4.4 GHz giving 1.336 V at load, 4.6 GHz giving 1.408 V at load and 4.8 GHz giving 1.440 V at load, peaking at 53ºC on the Corsair H50 cooling. This indicates good tuning and capability on behalf of ASRock.
Setting everything back to default and manually selecting the 48x multiplier resulted in a ‘Machine Check Error’ on booting. Changing the voltage from Auto to 1.42V fixed made the machine boot, giving 1.440V on load. At 49x multiplier, the board did not boot, and I wasn’t prepared to up the voltage any further. Changing the power options to 150 W / 130 W for short/long times also didn’t let the board boot into the OS.
Going back to 48x and playing with the BCLK was a rather fruitless exercise. This chip can do 105 MHz BCLK, as seen on H67, but the ASRock had trouble with 101.5 MHz. 100.5 MHz did boot into OS though. Even at 47x, above 100.5 MHz did not boot.
Ultimately, the 4.8 GHz Auto OC option here seems the best way to go. The board actually defaults the BCLK to 99.8 MHz rather than 100.0 MHz, meaning that 48x multiplier gives 4790.4 MHz in the OS on both single and multi-threaded load.
Using the AXTU software in Windows for overclocking didn’t do much—manually setting the multiplier in the software required a reboot to work, but changing the BCLK didn’t do anything. It’s a shame they don’t offer the Auto OC options given in the UEFI in this software.
For the 4.8 GHz OC results using the 3D Movement benchmark,
- In single threaded mode, for a 29.7% OC (from 3700 MHz to 4800 MHz), a 33.5% increase in the score was observed (110.60 to 147.70).
- In multi threaded mode, for a 41.2% OC (from 3300 MHz to 4400 MHz), a 40.9% increase in the score was observed (345.25 to 486.5).
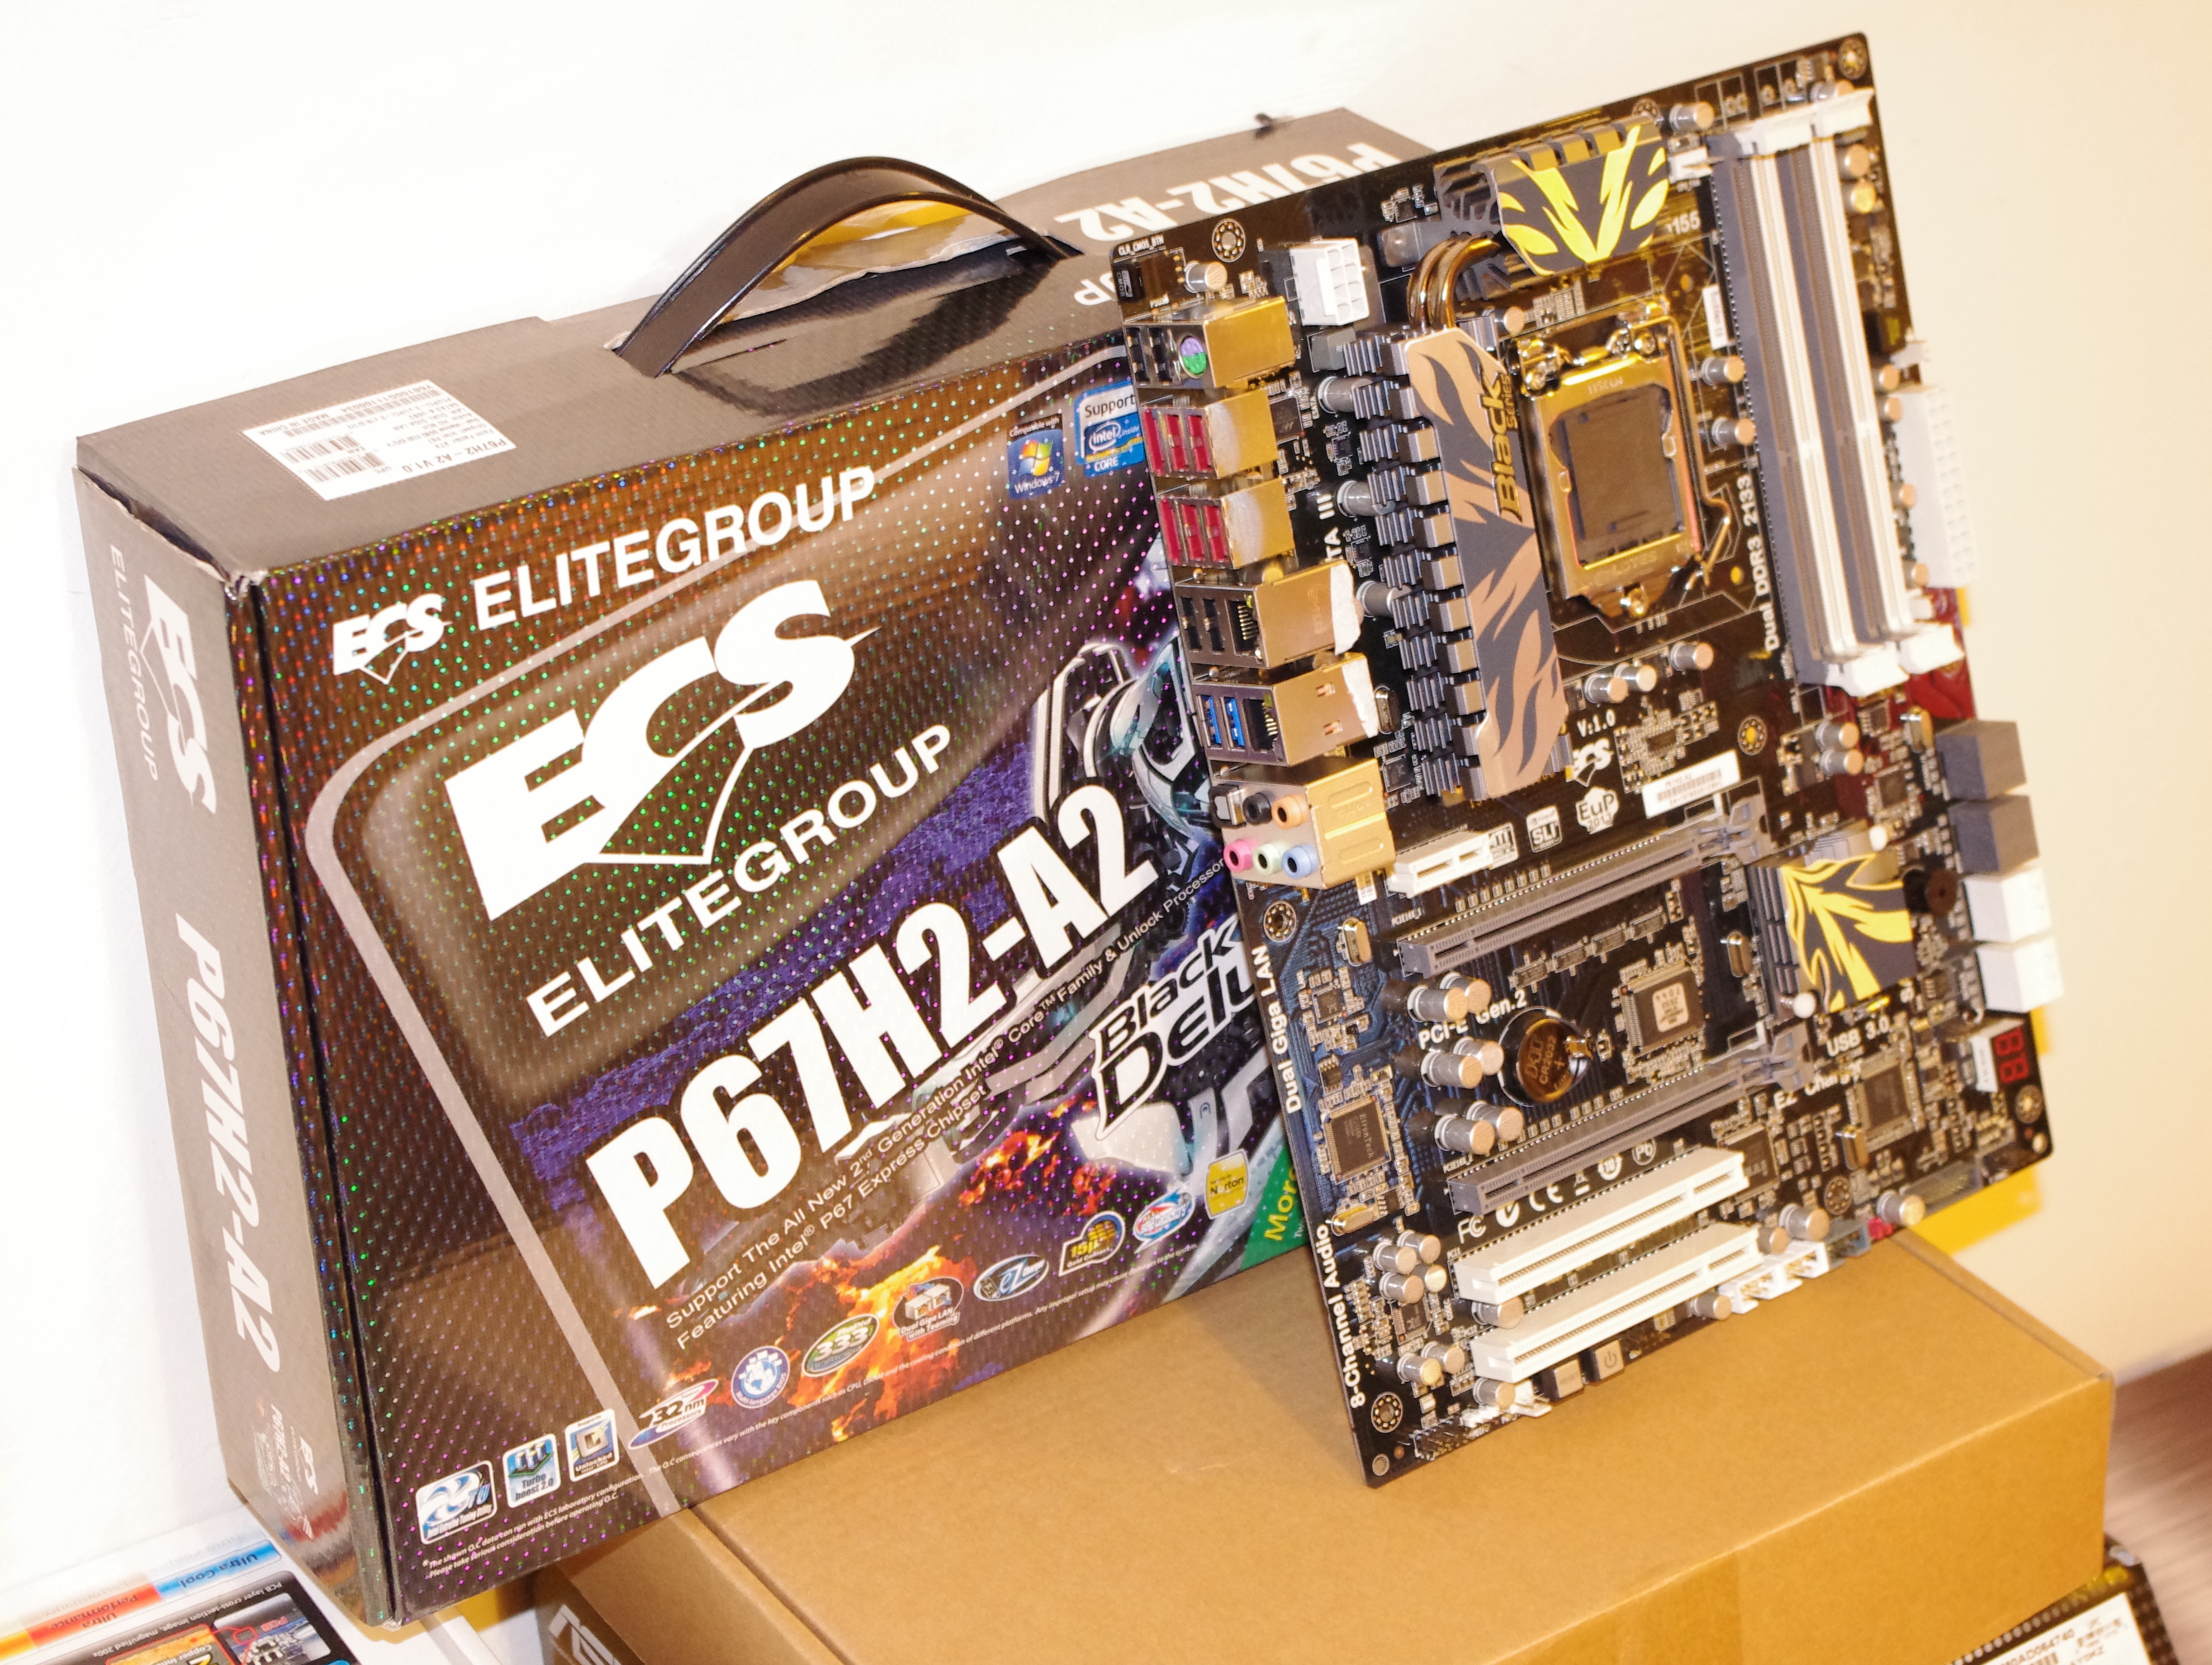
ECS P67H2-A2: Overview
I hope my review of the ECS P67H2-A2 doesn’t sound tainted—I had serious issues with a failing power supply while running tests, causing reboots about until I got in a temporary replacement. With this in mind, the P67H2-A2 reminds me a lot of the ECS H67H2-M I reviewed in the H67 roundup back in March—a relatively simple package that does its job. It’s not the fastest board in terms of benchmarks, but it offers a few bells and whistles, such as 8 SATA ports (plus another two eSATA), SATA 6 Gbps RAID, and dual gigabit Ethernet ports which some consumers may require in their product. The BIOS needs a lot of polish (this is one of the understatements of the century) as it is very limited in terms of OC and memory timings, but features such as the fan controls work very well. Is the ECS P67H2-A2 ‘Black Deluxe’ motherboard worth the asking price?
ECS P67H2-A2: Visual Inspection
The ECS Black boards offer a very nice, very special black white and grey livery which looks refined and polished—there’s no denying that. If we start around the CPU socket, the 8+2 phase PWMs are hidden underneath a very thick and somewhat tall (1”-1.25”) heatsink which comes in two parts connected via a heatpipe. This can get fairly hot during an overclock at full-load. The socket area is fairly clean and empty, with only a few capacitors to be seen—these pins stick out the bottom of the board, and are right in the path of my Corsair H50 CPU cooler bracket. If the bracket was more rigid and a lot of force is applied, this could cause some issues with these capacitors from underneath.

There are four fan headers on the board—one above the CPU socket, two near the 24-pin ATX power connector, and one at the bottom of the board. This would mean some form of fan extension would be needed if I were to use two fans on the H50 CPU cooler (the pump requires one as well). As you’ll see later, two of these are programmable from the OS, but all are programmable from the BIOS.
The SATA ports are colored such that the white ports are SATA 3 Gbps coming from one PCH host controller, two of the grey ports are SATA 6 Gbps coming from another PCH host controller, and the two grey ports at the top of the board are SATA 6 Gbps, supplied by a Marvell 9128 controller. Underneath this is a sideways 2-digit Debug LED, always useful for probing boot errors, followed by an array of headers for extra SATA ports, a USB 3.0 header, and Power/Reset buttons (remember the ASUS and Gigabyte $190 boards did not have Power/Reset buttons on the board).

In terms of PCI/PCIe, ECS have decided to split the main full-size PCIe slots and not put a PCIe x1 in the middle—instead, we have the motherboard battery. ECS are taking the view that people running this board will have a discrete dual-slot PCIe graphics card, making any port underneath it unusable. Also, by not going down the full-size PCIe x4 slot at the bottom (instead, we have two legacy PCI slots), all the headers at the bottom are available. This is a very nice configuration, with the PCIe 1x at the top, for any dual-GPU setup.
The back I/O panel starts with a Clear CMOS button. I’m always a big fan of these on the back panel if not on the board itself (as a button, rather than a jumper setting), so I’m glad to see it here. The legacy PS2 port also makes an appearance, along with a myriad of 8 USB 2.0 and 2 USB 3.0 ports. Dual eSATA 6 Gbps ports are also present, as well as dual gigabit Ethernet. Noticeably absent is a Firewire port, and a coaxial S/PDIF out connector, but the optical S/PDIF is here, along with standard HD audio inputs/outputs.

ECS P67H2-A2: Board Features
| ECS P67H2-A2 | |
| Market Segment | Performance |
| CPU Interface | LGA 1155 |
| CPU Support | i3/i5/i7 Sandy Bridge |
| Chipset | P67 |
| Base Clock Frequency | 100 MHz Only |
| DDR3 Memory Speed | 1333 MHz by default, 1067-2133 MHz supported |
| Core Voltage | Default, +10 mV to +630 mV in 10 mV intervals |
| CPU Clock Multiplier | Dependent on CPU |
| DRAM Voltage |
Default -300 mV to -50 mV in 50 mV intervals +10 mV to +630 mV in 10 mV intervals |
| DRAM Command Rate | Auto, 1T or 2T |
| Memory Slots |
Four 240-pin DDR3 DIMM slots in dual-channel Regular unbuffered DDR3 memory Up to 32GB total supported |
| Expansion Slots |
2 x PCI Express 2.0 x16 slots (x16 or x8/x8) 1 x PCI Express 2.0 x1 slot 2 x PCI slots Supports ATI Crossfire Supports NVIDIA SLI |
| Onboard SATA/RAID |
2 x SATA 6.0 Gb/s ports (gray) supporting RAID 0/1/5/10 4 x SATA 3.0 Gb/s ports (blue) supporting RAID 0/1/5/10 2 x SATA 6.0 Gb/s ports (gray) from Marvell 9128 supporting RAID 0/1/5/10 2 x eSATA 6.0 Gb/s ports from Marvell 9128 |
| Onboard |
4 x SATA 3Gb/s connectors 4 x SATA 6Gb/s connectors 4 x Fan Headers (1x4-pin, 3x3-pin) 3 x USB 2.0 headers support additional 6 USB 2.0 Ports 1 x USB 3.0 header supports additional 2 USB 3.0 Ports 1 x Power on button 1 x Reset button 1 x Front panel switch/LED header 1 x Onboard Buzzer 1 x Front panel audio header 1 x Debug LED Display 1 x SPDIF out header 1 x Serial port header |
| Onboard LAN | Dual Realtek RTL8111E Gigabit Fast Ethernet Controllers with Teaming |
| Onboard Audio | Realtek® ALC892 8-Channel HD Audio |
| Power Connectors |
24-pin EATX Power connector 8-pin EATX 12V Power connector |
| Fan Headers |
1 x CPU Fan (4-pin) 1 x CASE Fan (3-pin) 1 x PWN Fan (3-pin) 1 x SYS Fan (3-pin) |
| IO Panel |
1 x PS/2 keyboard & PS/2 mouse connectors 2 x RJ45 LAN connectors 1 x Audio port (Line-in, Line-out, Mic-in) 1 x Optical S/PDIF Out connector 1 x Clear_CMOS button 2 x USB 3.0 ports compatible to both USB 3.0/2.0 devices (blue) 2 x eSATA 6.0Gb/s ports 8 x USB 2.0 ports |
| BIOS Version | 2011/03/03 |
| Warranty Period | 1 Year + option for 1 Year extension |
ECS P67H2-A2: In The Box
- 8 SATA Connectors with locking
- USB 3.0 3.5” Front Panel with rear bracket option
- 3 Port SLI connector
- I/O Shield
- 4 Plastic USB protectors
I have a strong feeling that a USB front panel will become the de facto addition for motherboards in the future—a lot of Cougar Point consumer offerings are starting to provide one. Supplying 8 SATA connectors also earns ECS some plus points.
ECS P67H2-A2: Software
A lot of the software available for the ECS P67H2-A2 is the same as what we saw with the ECS H67H2-M with a couple of exceptions—the overclocking utility eOC, and a power saving utility eGS.
eOC
In terms of what we’ve seen from other OS overclocking utilities from other manufacturers, eOC is pretty low down on the ladder to begin with—that’s even before you realize that it’s an old hash from the socket 775 software and that to get it to work requires some effort!
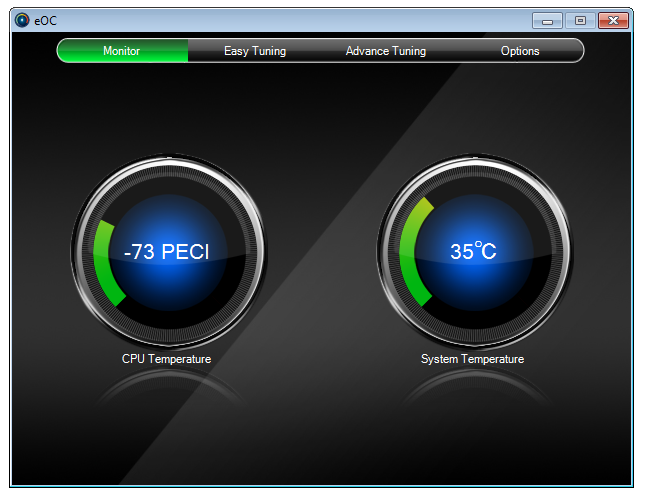
The main page is just a simple temperature monitor for the CPU and System temperatures. What surprises me here is that the CPU temperature is measured in terms of PECI, or the number of degrees before the CPU is throttled due to thermal limitations, rather than an absolute value. I wouldn’t trust it with a barge pole to be honest, and I’d use free temperature monitor software.
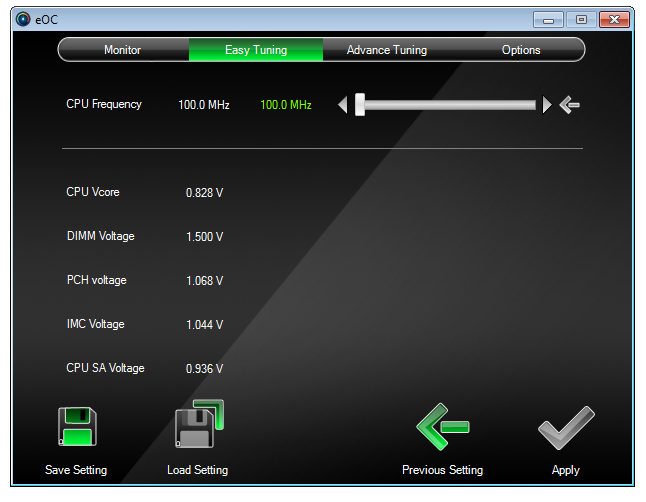
The Easy Tuning tab offers voltages and a CPU Frequency slider, allowing you to adjust BCLK. This slider is the throwback from socket 775 days, when BUS frequencies could reach several hundred MHz—as such, it offers between 100 MHz and 800 MHz (!) in 1 MHz intervals. A Sandy Bridge processor in reality can manage a few MHz due to its integrated clock generator subsystem, but not several hundred! When I initially played with this option, it wouldn’t work—regardless of how this is set, clicking "Apply" would attempt to apply the new clock frequency, and fail. Even when set and the OS is restarted, it would stick at 100 MHz. After contacting ECS, it turns out you need to apply two obscure BIOS options—both ‘ICC Set Clock Enables’ and ‘Send ICC Lock Registers’, and then the eOC software will apply a BCLK, as long as the machine stays stable. As we’re limited to per MHz values, it’s pretty coarsely grained. Also, any change here directly changes the values in BIOS.
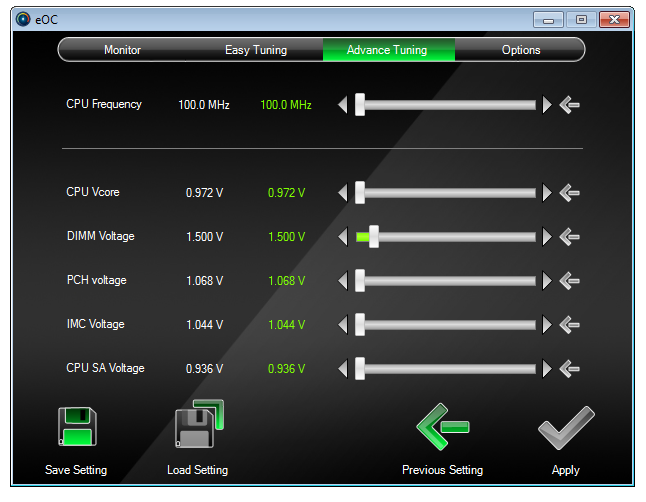
The Advance Tuning menu gives you reigns over the voltages on offer. Amazingly, these settings work. Maybe I shouldn’t be amazed—if they’re on offer, they should work anyway, because this is what we pay for. The issue here is with the CPU voltage—on idle, the CPU will flicker between various low state voltages, and this slider value will flicker too. So if you want to select 1.2 V, you need to make sure what state the CPU is in at the time and apply it at the right moment. If a high voltage is selected at a low CPU state, you could end up with a potentially damaging high voltage in a full CPU load scenario.
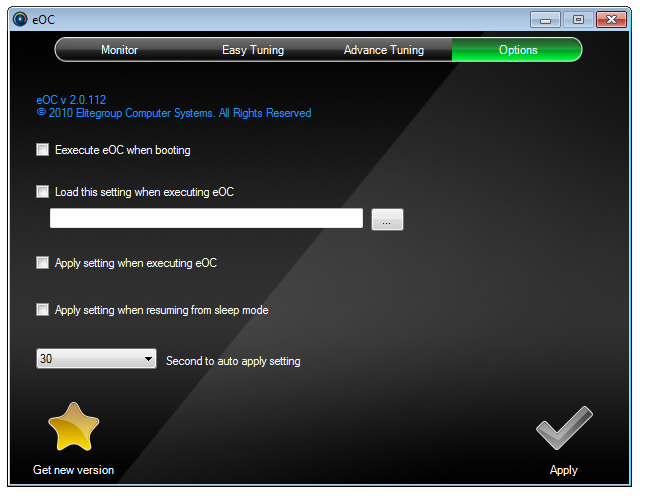
The Options menu, apart from the spelling mistake, doesn’t really do much, apart from enabling a saved eOC to enable itself at bootup.
eGS
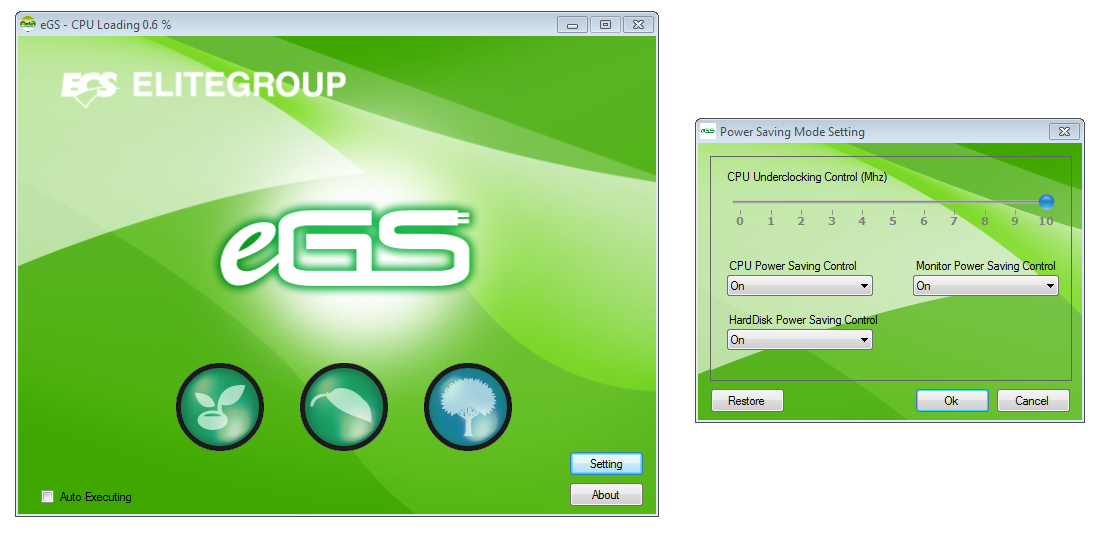
The eGS software is automatically set to ‘auto’ mode, but gives options of ‘Normal’ or ‘Power Saving’ mode. When we selected Power Saving mode, at idle the CPU voltage was reduced to below 0.75V, but at full load there was no difference in voltage between Normal and Power Saving. The background turned a nice red, however.
eBLU
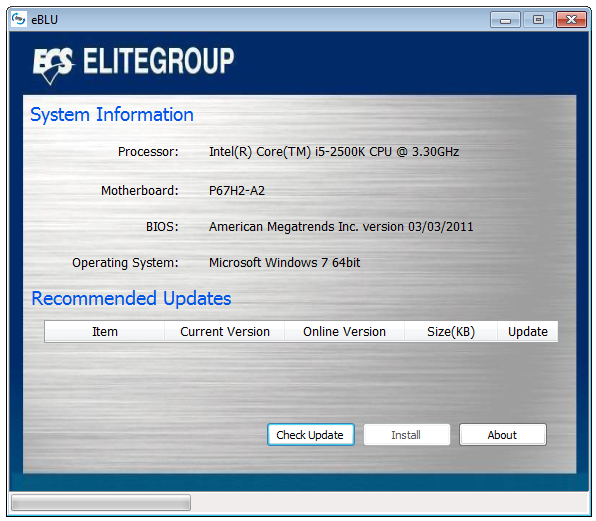
The BIOS live update utility works rather well, automatically detecting if a newer BIOS is available and performing the update.
eDLU
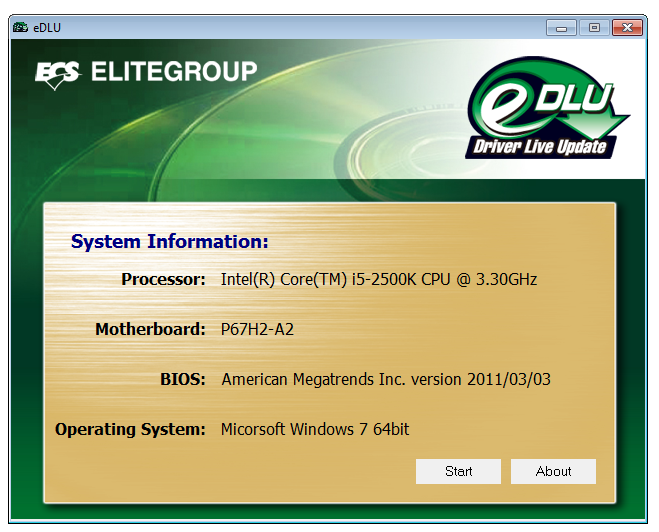
The driver update tool is disappointing—pressing Start just takes you to the webpage relevant to your motherboard and operating system. Here, we’d want a list of drivers currently installed, their versions, an option to automatically search and apply new driver updates at the flick of a button. This is ultimately a cheap way out to say that this tool is supplied.
eSF
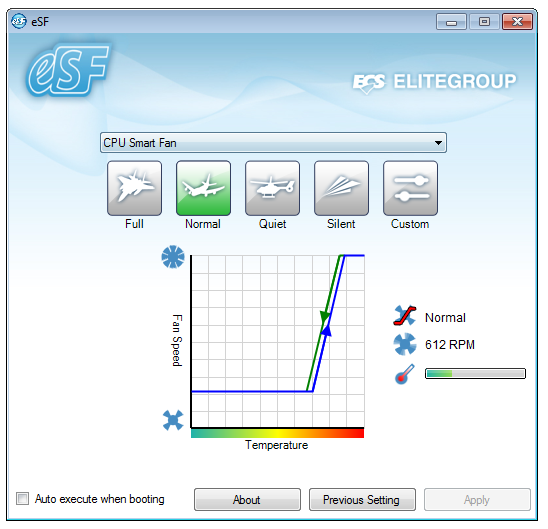
Arguably one of the highlights of this motherboard is its fan control. In the OS, the eSF software allows the user to change the CPU and SYS fan speeds and temperature controls. This works very well on the predefined settings, and even better on the custom setting.
eJiffy
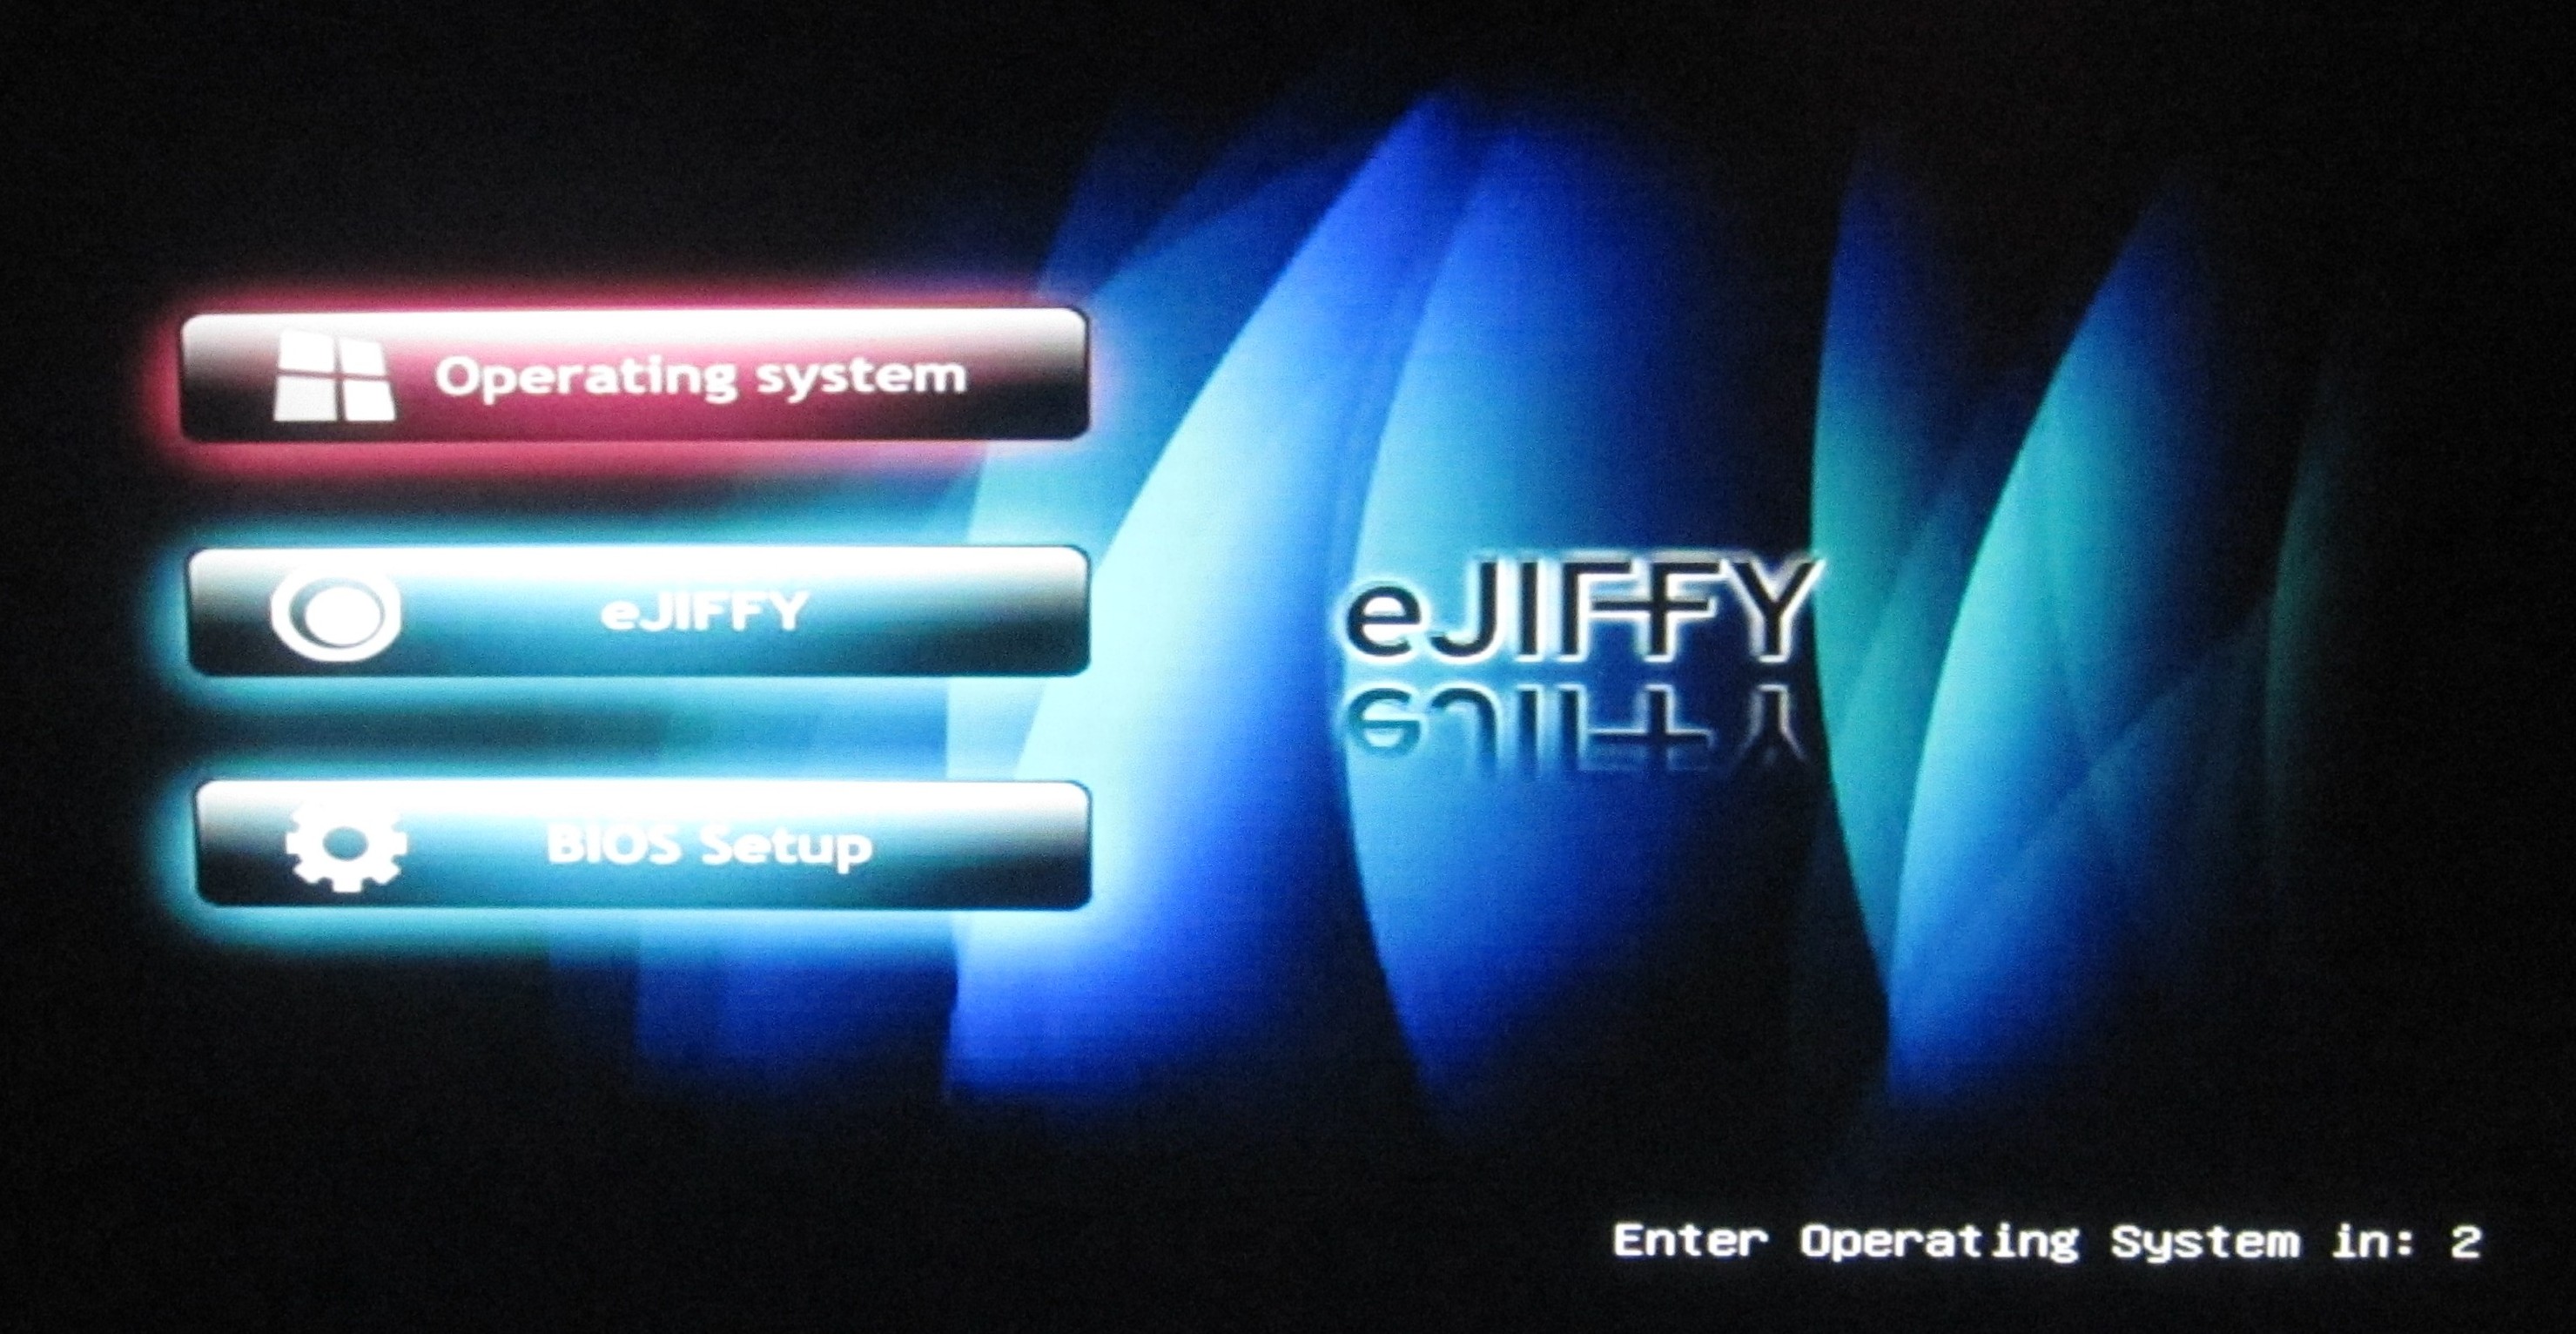
The eJiffy software is a quick-boot technology which loads the user into a simple Linux interface through which they can access the web. Loading into eJiffy is very quick compared to an SSD and Windows combination, and gives a simple Mozilla type web browser, suitable for when a user wants nothing more than to browse. We covered eJiffy in more detail in our H67 ECS review as it is a pretty neat addition and we rather like it—read here for more details.
ECS P67H2-A2: BIOS
In an era when the top motherboard manufacturers are jumping on the graphical UEFI bandwagon, there are certain manufacturers left behind with old BIOS systems which never received any polish in the first place. ECS have taken a step forward of sorts with the 04/08 BIOS, compared to the H67 version we looked at previously, as they have now enabled mouse support. But the mouse pointer is black against a dark blue background, and when going through the menus the selected option is green, where the text is yellow—it made me strain my eyes to read what was shown, and could be an issue if you are partially colorblind. Apparently, the color scheme and mouse support are the only differences between the 03/03 and 04/08 BIOS versions, thus I preferred the 03/03 BIOS which is the old color scheme.
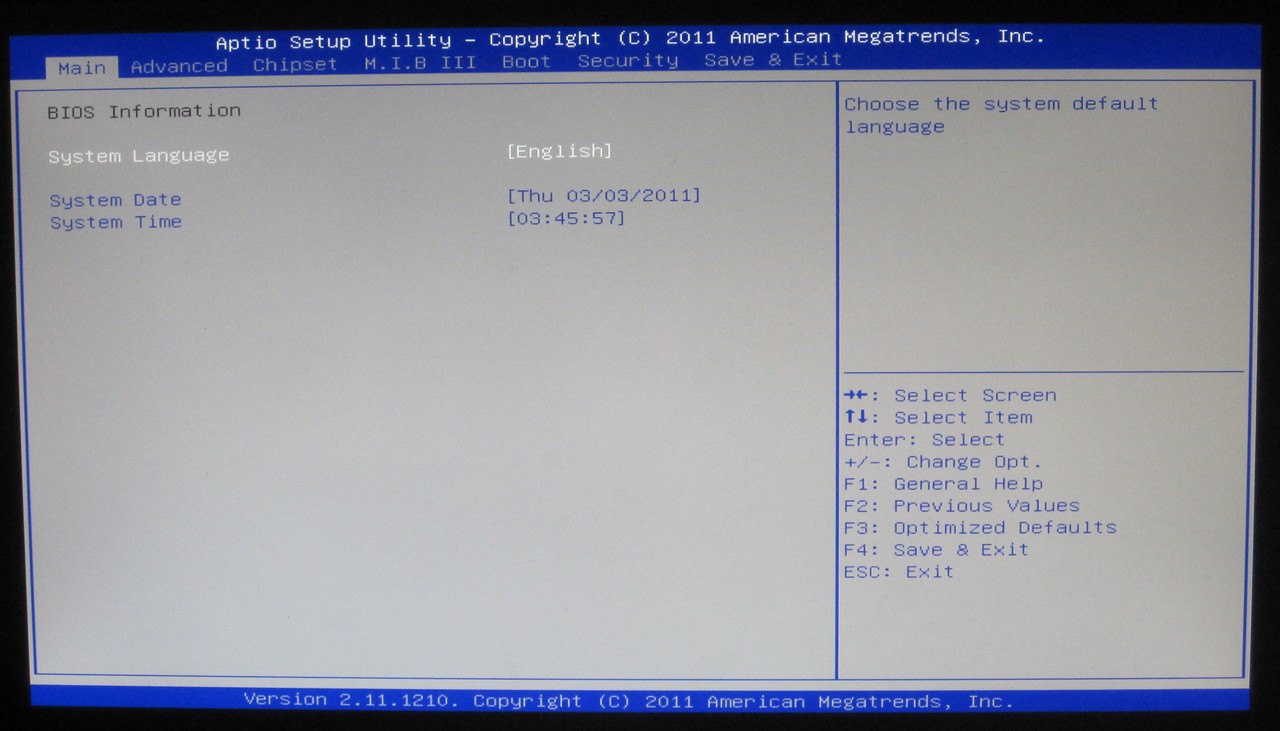
03/03 BIOS
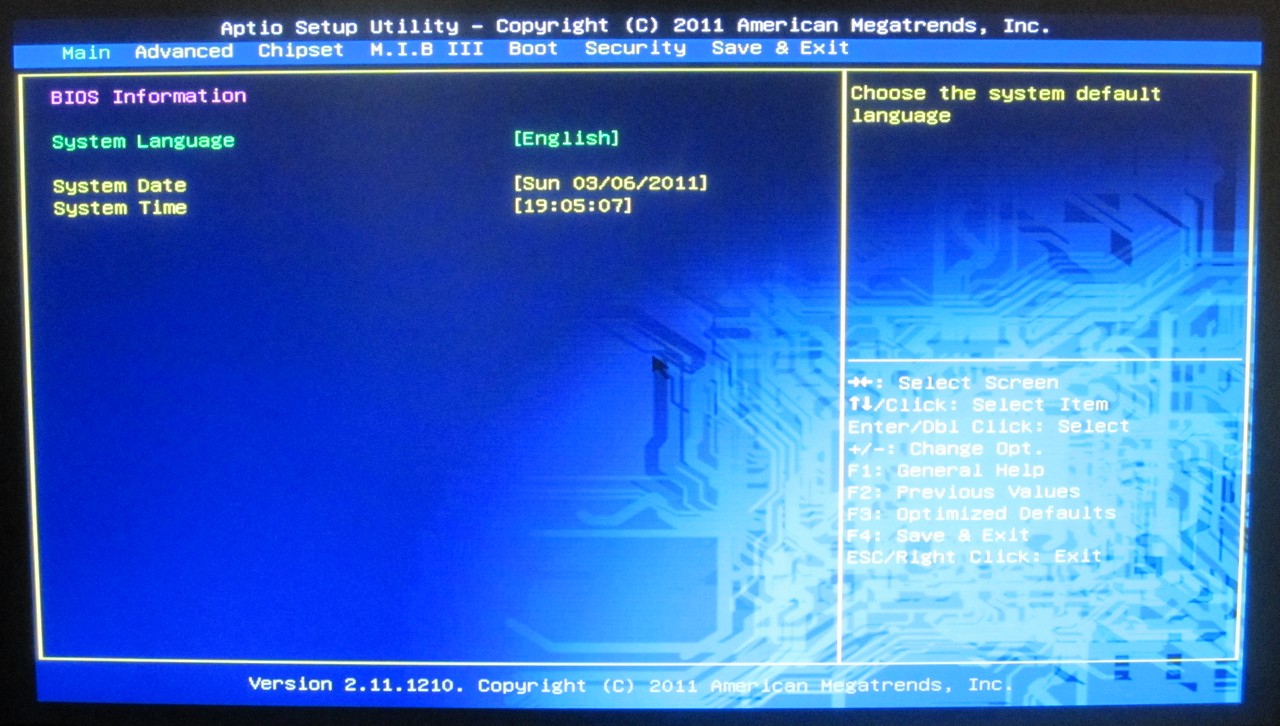
04/08 BIOS
Options are lacking—even on the front page, we’d expect some detail about the CPU or the system at hand. There’s not even an indication of what motherboard we have, or what version of the BIOS we’re using. We have to go deeper.
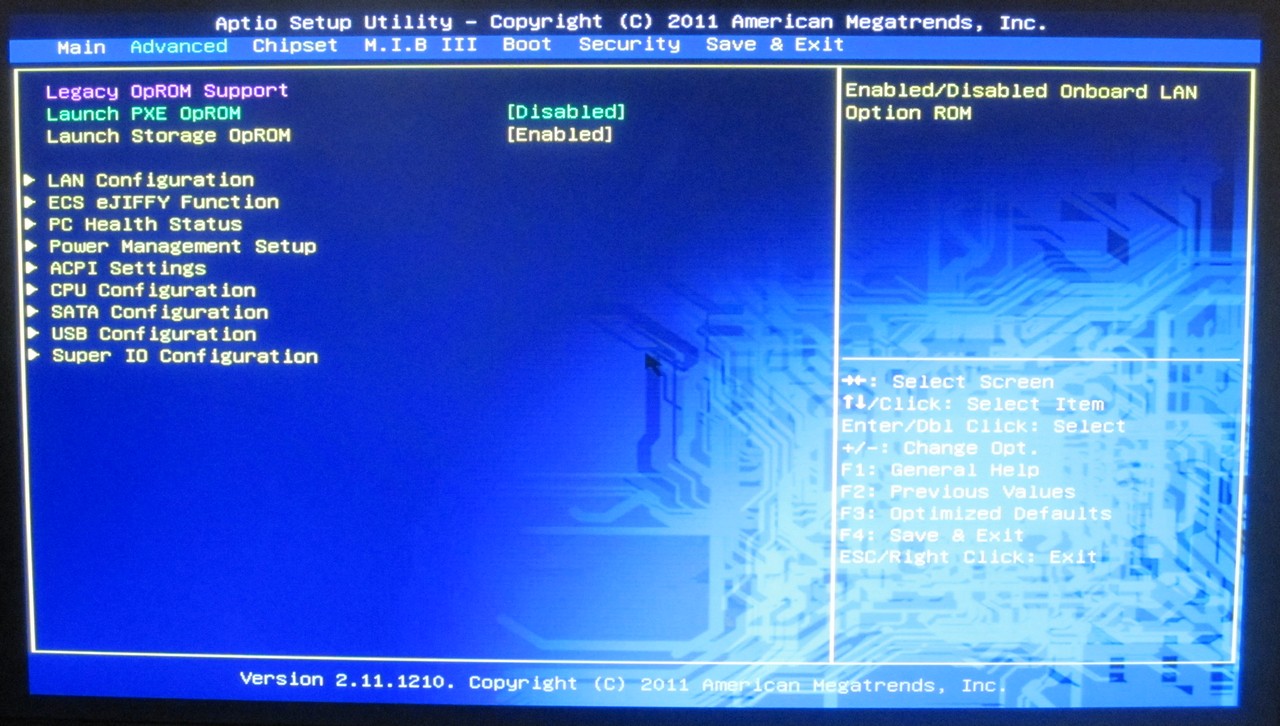
The Advanced menu gives a series of sub menus relating to PCH options, as well as a PC Health menu. This actually contains values of temperature and voltage, which we could have had on the main page, but it also has a menu option into the adjustable fan settings.
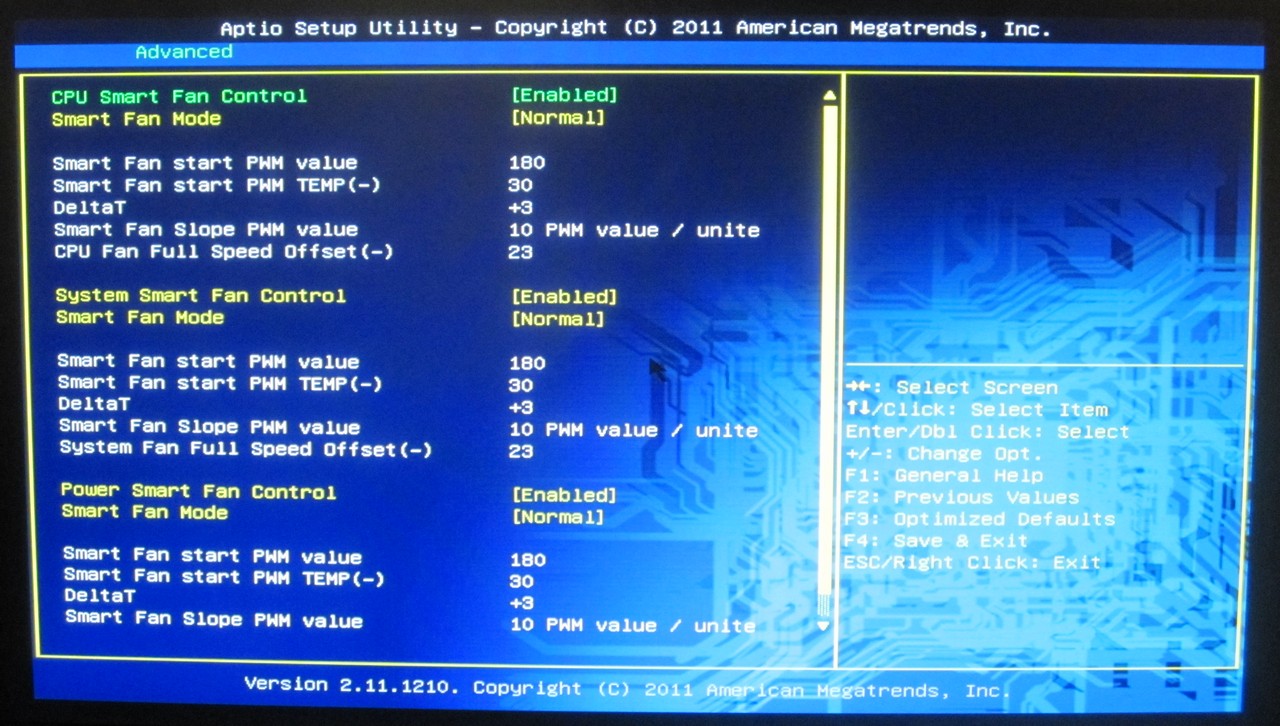
These we like—many options for each fan header, fully adjustable. But the fact that it is buried in the PC Health sub-menu baffles me—having it with the other PCH options makes ultimately more sense.

The MIB III tab brings up various options for voltage change, and even tells us which processor we have! The voltage options are not absolute values, but offsets—I’m much more in the absolute value camp, as the offset selected here applies the offset to all the CPU states available. It’s also an immediate change—as soon as you select an offset, it is written to registers applied. There is a distinct problem with this, because if you boot into the BIOS with a previous offset already applied (say, +150 mV) and then go to change that offset, the BIOS will apply a double offset. So if you go down to +140 mV, the BIOS will apply a total +290 mV immediately, which if the component cannot handle, will cause damage. If you reboot the system, only the new offset is applied, however it is a pretty serious flaw to be shipping to consumers.
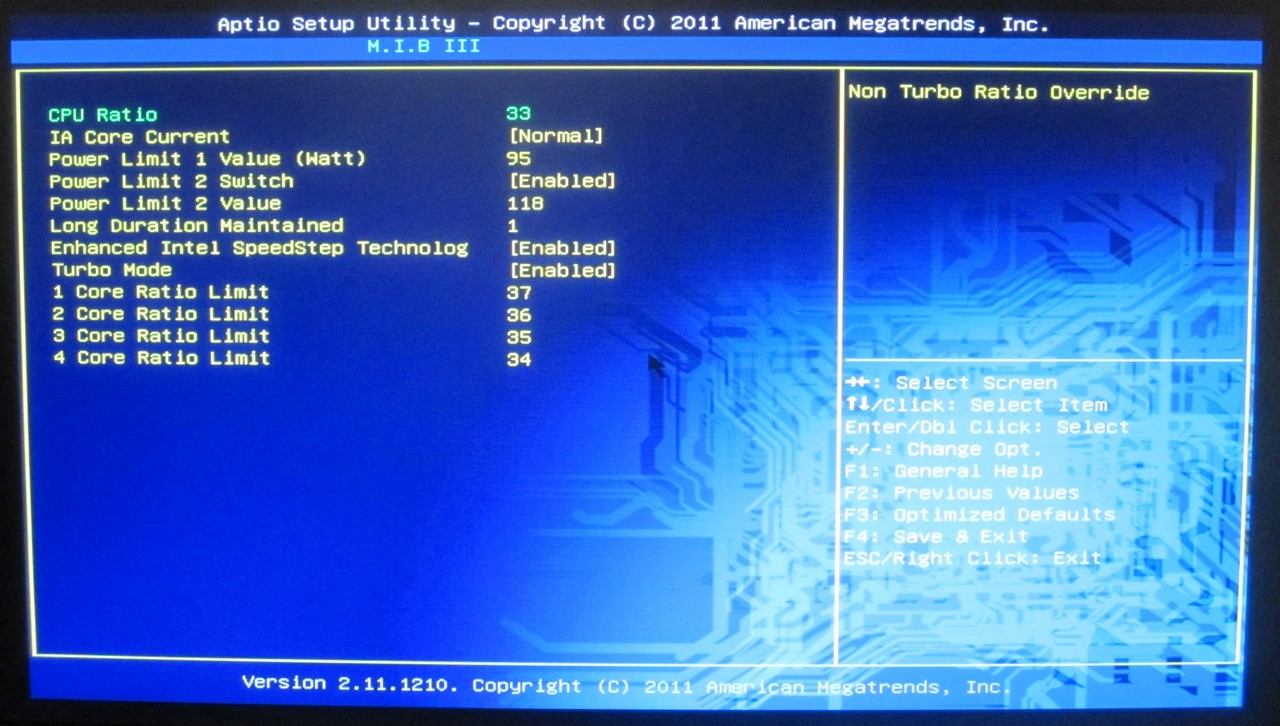
In the CPU overclocking menu, we have the option to adjust the CPU multiplier, but not the BCLK. The BCLK option is tucked away deep in a different menu, via:
-
BIOS—> MIB III
-
MIB III -> Integrated Clock Chip Configuration
- ICC Configuration -> Change ICC Enable to Enabled
-
ICC Configuration -> ICC Overclocking
-
ICC Overclocking -> DIV-2S
- DIV-2S -> New Frequency
-
ICC Overclocking -> DIV-2S
-
MIB III -> Integrated Clock Chip Configuration

This is quite frustrating if you’re playing on the BCLK limit. In the ICC Configuration menu, you need to enable ‘ICC Set Clock Enables’ and ‘Send ICC Lock Registers’ in order to change the BCLK using the eOC software in Windows, but you can only change the BCLK by 1.0 MHz chunks.
With the memory, only a few options are available to the user, in terms of memory multiplier (1067 MHz to 2133 MHz) and CL-tRCD-tRP-tRAS. Typically we see other memory options available if the user wants to change them, but ECS have decided that too many options is obviously a bad thing.
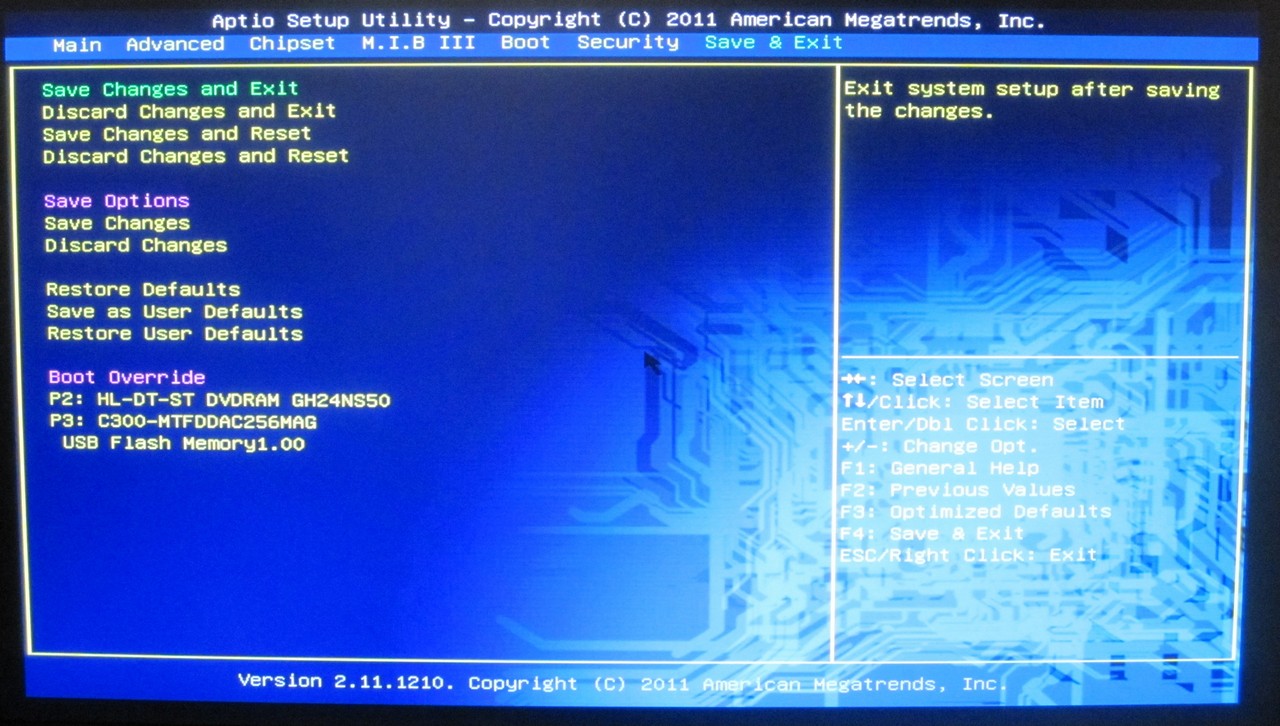
I’ll end the BIOS talk by mentioning a feature I like—the boot override. If you want to boot from DVD or USB, as long as the BIOS detects it (depending on your IDE/AHCI settings in the SATA sub menu), it’s a simple selection to boot from that device once. This way, we don’t have to change our boot order, and then change it back when we’re finished.


ECS P67H2-A2: Overclocking
There are no auto-OC options. You’re forced to navigate through several menus to get to the CPU multiplier options—here I upped the multiplier to 40, left the voltage on Auto, and rebooted into Windows. This worked without a hitch and on full load, the processor reached 1.252 V.
At 42x multiplier, 1.284 V was seen in the OS at full load. At 44x multiplier, the OS failed to load in correctly and kept restarting. We changed the voltage to a +100 mV offset, which then booted into Windows at 4400 MHz and gave 1.392 V at full load.
At 46x multiplier, the OS booted fine, but a quick look at CPU-Z showed the board giving 4400 MHz at full load. In single-threaded scenario, we saw 4600 MHz as expected. A quick look at the temperatures didn’t show anything above 60ºC, so it wasn’t thermal throttling, so I went back into the BIOS and turned off turbo mode. To my surprise, back in the OS, despite the BIOS saying a 46x multiplier, only 3300 MHz was shown, meaning no overclock had been applied.
I turned turbo back on, and started upping the voltages, but this did not change the fact that at full load, the CPU would go back down to 4400 MHz. Even upping the power limits to 150W made no difference. So we upped the CPU multiplier to 48x, and this gave 4800 MHz under single threaded load, and 4400 MHz at full load. At 49x, the board would not boot, and as full load was > 1.42 V, we didn’t push any further.
When attempting to raise the BCLK at the 48x multiplier, not even 100.5 MHz in the BIOS caused to boot, however at the default multiplier, we were able to push 105.0 MHz, so we’re either probably reaching the MHz limit of the CPU for the voltage, rather than a board limit.
For the OC results using the 3D Movement benchmark,
- In single threaded mode, for a 29.7% OC (from 3700 MHz to 4800 MHz), a 31.4% increase in the score was observed (112.46 to 147.83).
- In multi threaded mode, for a 33.3% OC (from 3300 MHz to 4400 MHz), a 29.4% increase in the score was observed (343.88 to 445.01).
Test Setup
| Processor |
Intel i5-2500K ES—3.3 GHz (3.7 GHz Turbo) 4 Cores, 4 Threads, 6MB L3 |
| Motherboards |
MSI P67A-GD65 ($180) ASRock P67 Extreme6 ($210) ECS P67H2-A2 ($195) |
| Cooling | Corsair H50-1 Water Cooler |
| Power Supply | Silverstone 1000W SST-ST1000-P, 80 PLUS Silver |
| Memory |
Patriot Viper Extreme DDR3-2000 9-10-9-27 2x4GB Kit, 1.65V Corsair Vengeance DDR3-1600 9-9-9-24 2x4GB Kit, 1.50V G.Skill RipjawsX DDR3-2133 9-11-9-28 4x4GB Kit, 1.65V |
| Memory Settings | DDR3-1333 9-9-9-24 1T 2x4GB |
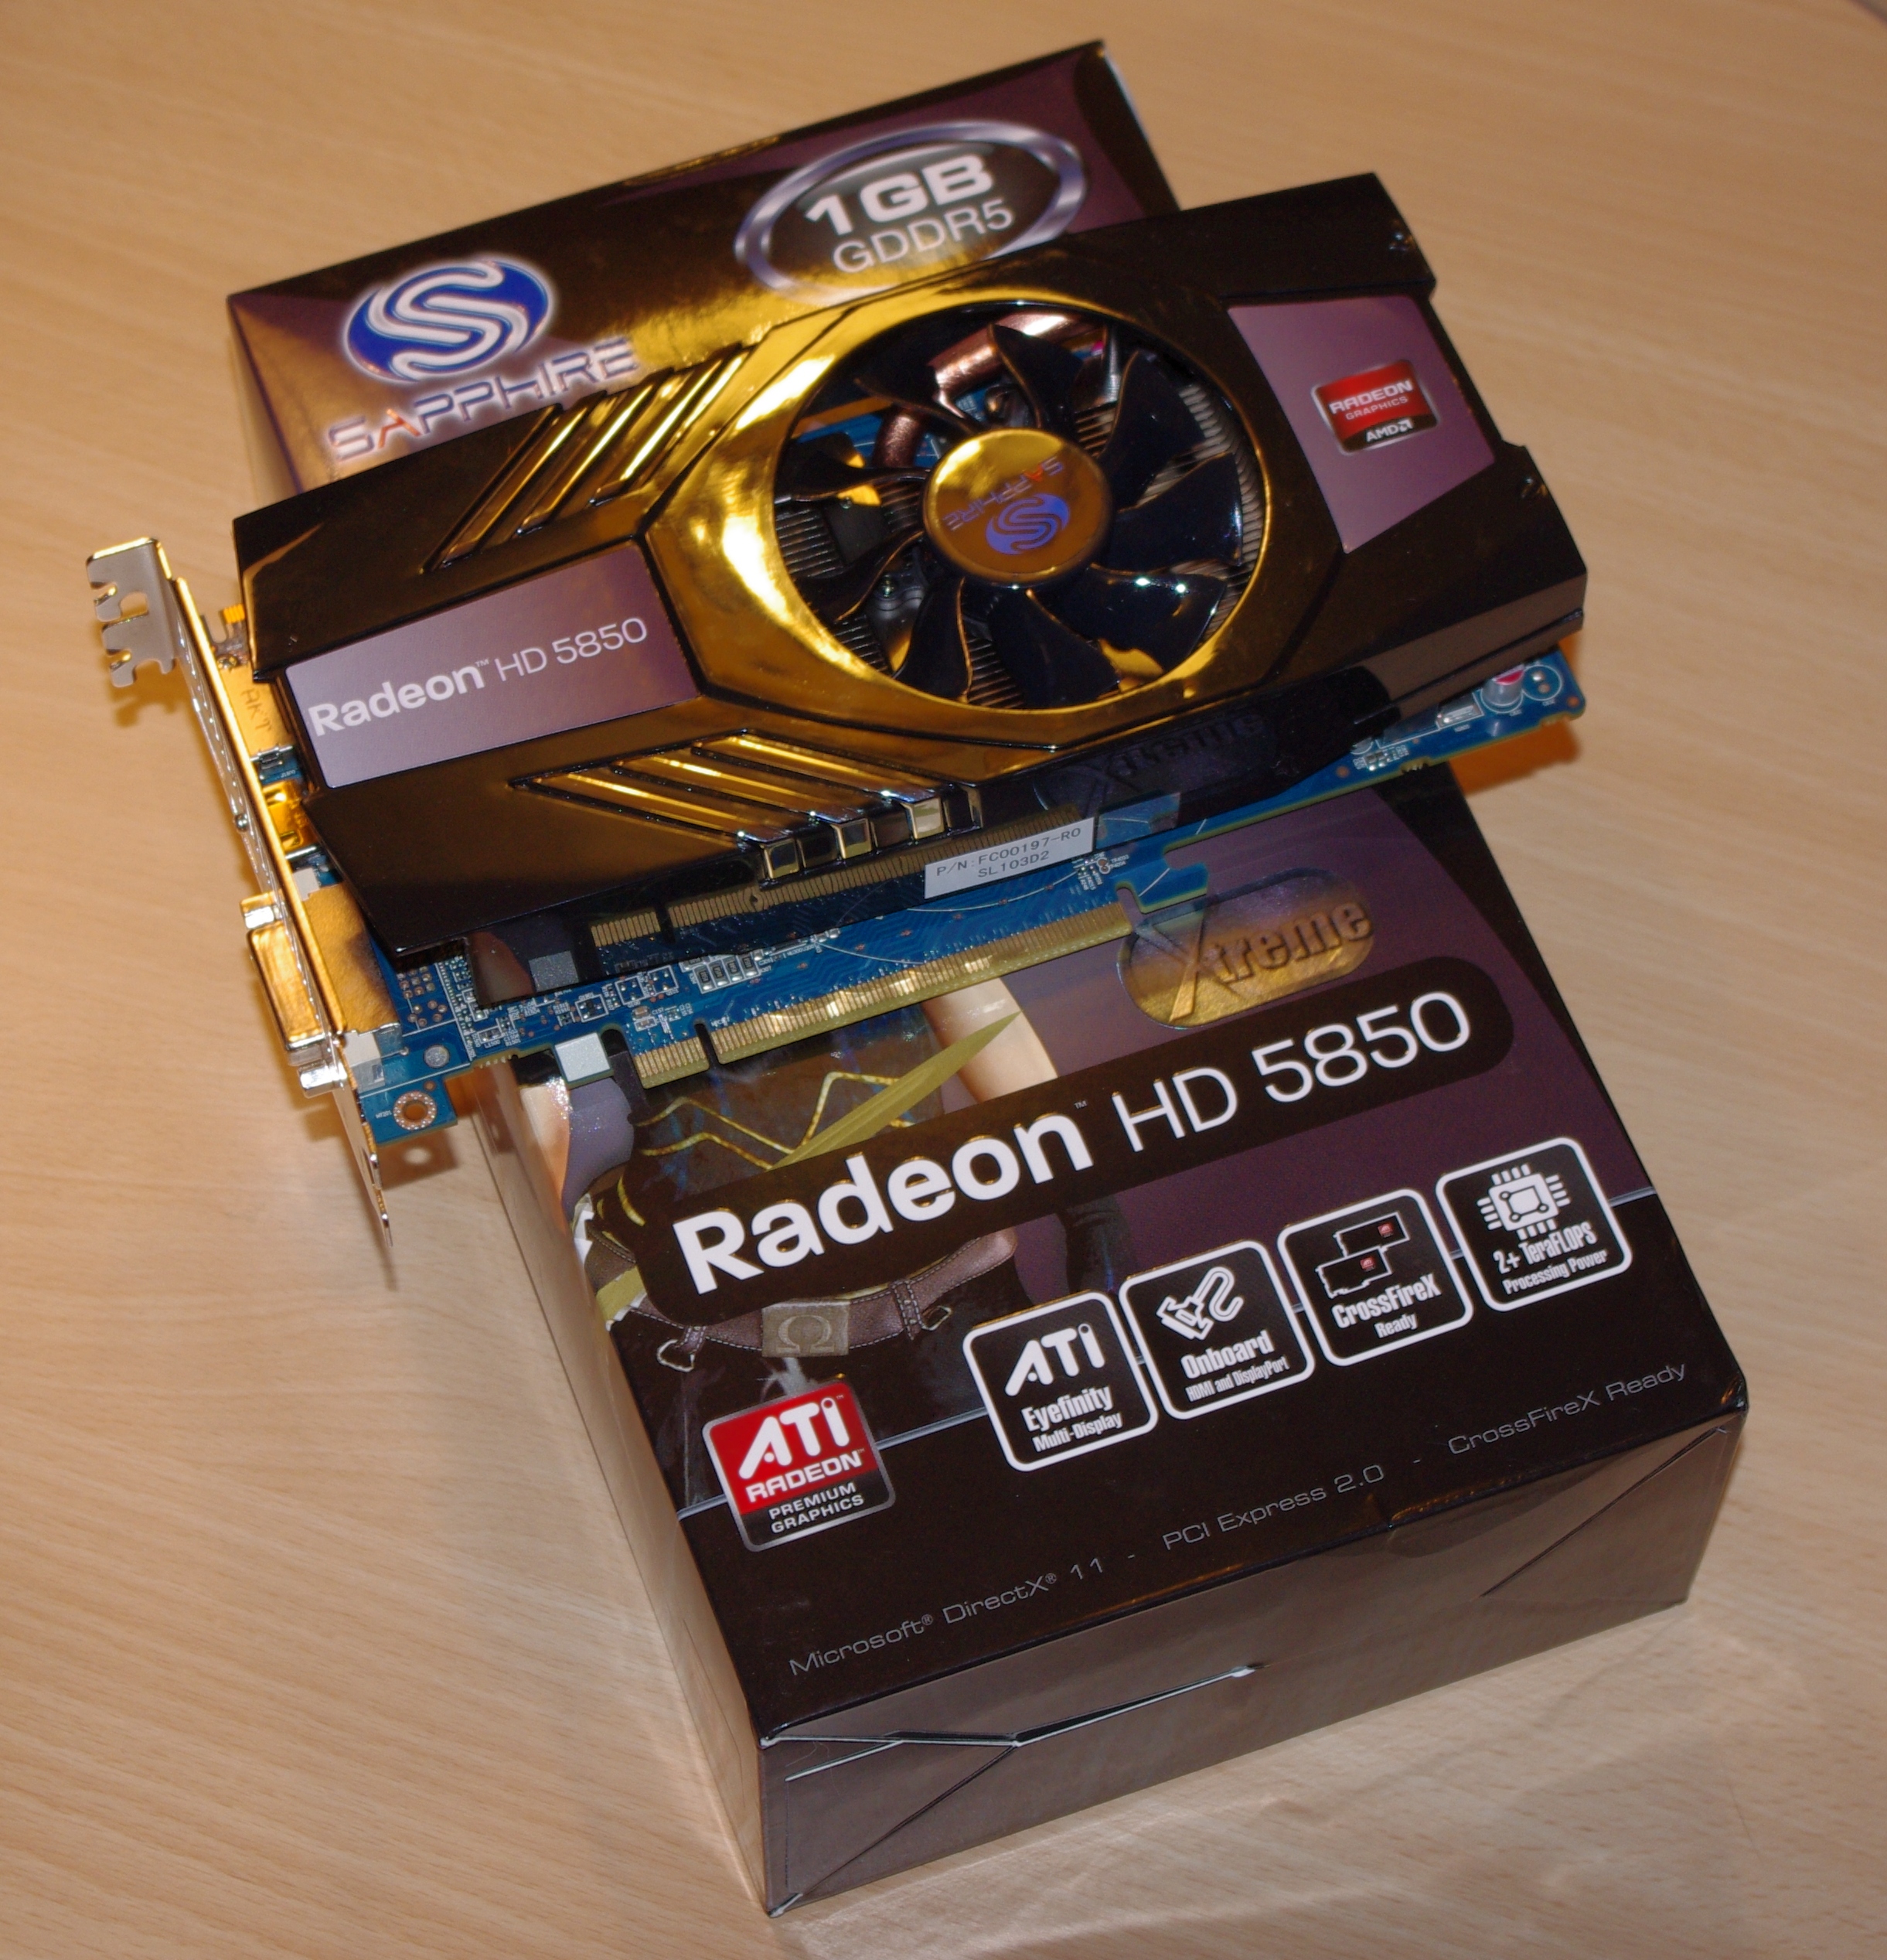
| Video Cards |
XFX HD 5850 1GB Sapphire HD 5850 1GB |
| Video Drivers | Catalyst 10.12 |
| Hard Drive | Micron RealSSD C300 256GB |
| Optical Drive | LG GH22NS50 |
| Case | Open Test Bed—CoolerMaster Lab V1.0 |
| Operating System | Windows 7 64-bit |
| SATA Testing | Micron RealSSD C300 256GB |
| USB 2/3 Testing | Patriot 64GB SuperSonic USB 3.0 |
Many thanks to Sapphire for supplying an extra 5850 1GB for our tri-GPU results:
Power Consumption
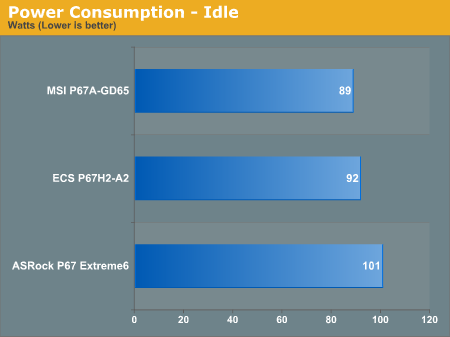
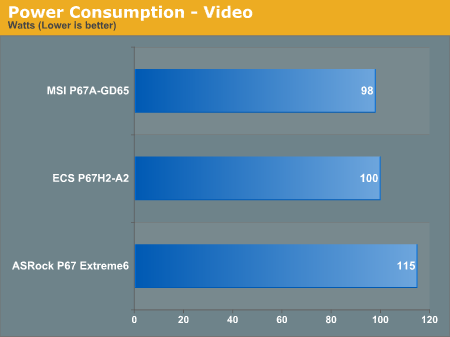
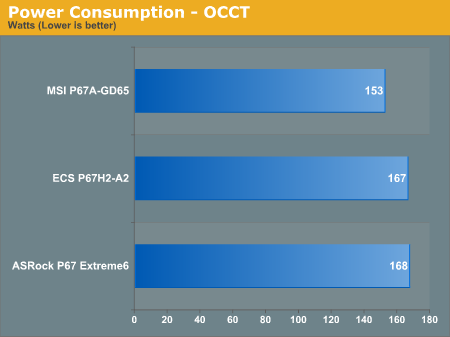
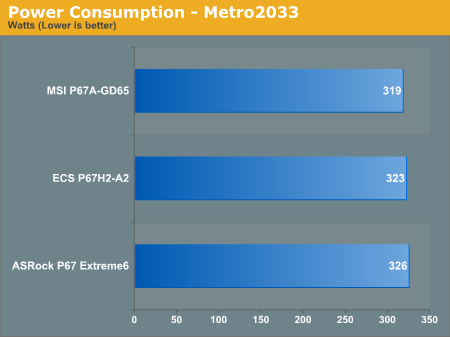
The most obvious thing here is that the ASRock board uses substantially more power—this may be because of the 16+2 phase power delivery, and inefficient phase switching. At low power usage, the ASRock has two phases enabled, compared to the MSI board which only has one active at idle. Unfortunately we cannot include the results from our other reviews, as the power supply used in those no longer works—I shall have to put the other boards into the new test bed configuration and update the power usage graphs as necessary.
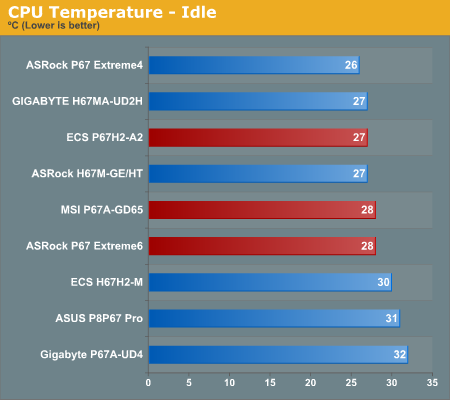
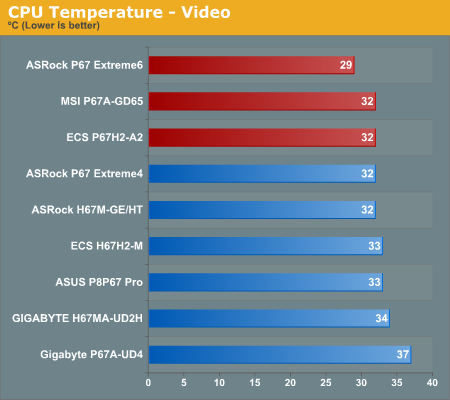
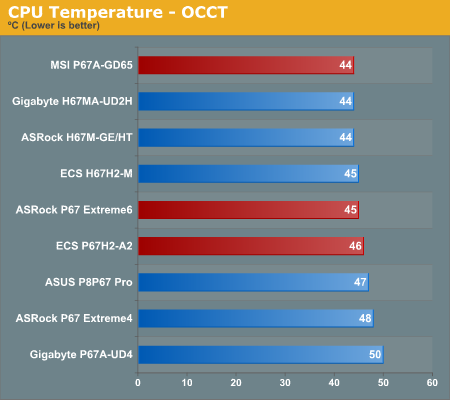
CPU Temperatures
System Benchmarks
LAN Speed Test
LAN Speed Test is a freeware program designed for testing the network connection between two PCs on a home network. The speed of the transfer is limited by the lowest common denominator on the network, so if you have gigabit Ethernet capable computers but a 100 Mbit capable router, you are limited to 100 Mbit transfer. Note that this is really a formality—if a network port is rated at 1 Gbps, then chances are that it will hit at least 90+% of this value. The main test here is CPU usage, and how much is offloaded by the controller. For this test, we use LAN Speed Test to transfer a 1000 MB file across a home network with a 100 Mbps lowest common speed to the same machine each time, in a read/write scenario. CPU usage is taken as a visual max/average from task manager.
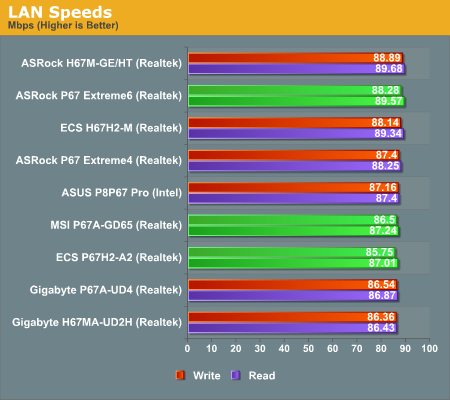
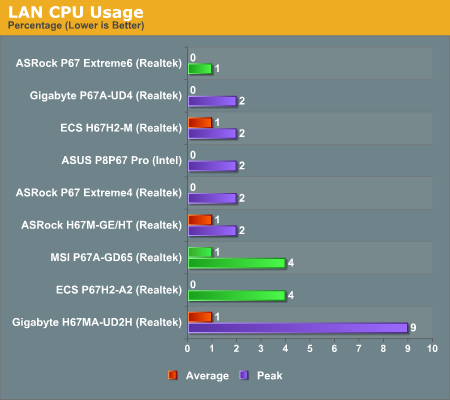
There's almost nothing between any of the boards we've tested in terms of 100 Mbps LAN speed and CPU usage—all three have an average CPU usage of 1% or less.
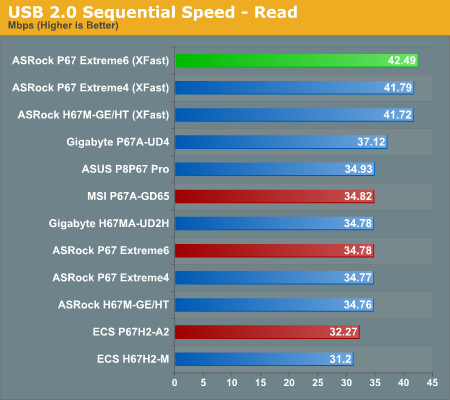
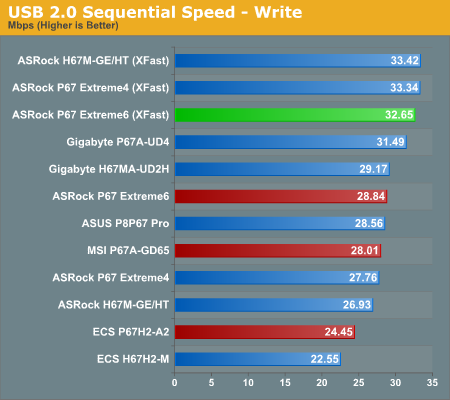
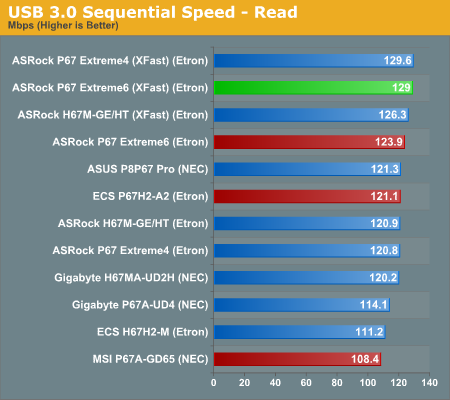
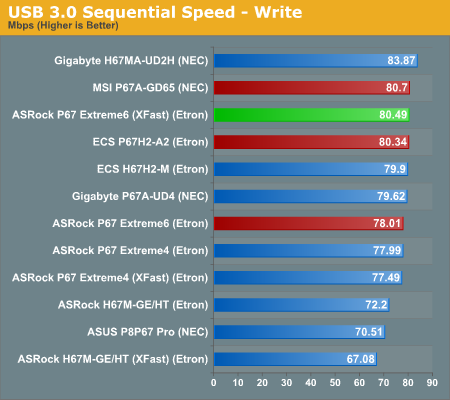
USB Speed
For this benchmark, we run CrystalDiskMark to determine the ideal sequential read and write speeds for the USB port using our 64GB Patriot SuperSpeed USB 3.0 drive. Then we transfer a set size of files from the SSD to the USB drive, and monitor the time taken to transfer. The files transferred are a 1.52 GB set of 2867 files across 320 folders—95% of these files are small typical website files, and the rest (90% of the size) are the videos used in the Sorenson Squeeze test.
USB 2.0:
USB 3.0:
Copy Speeds:
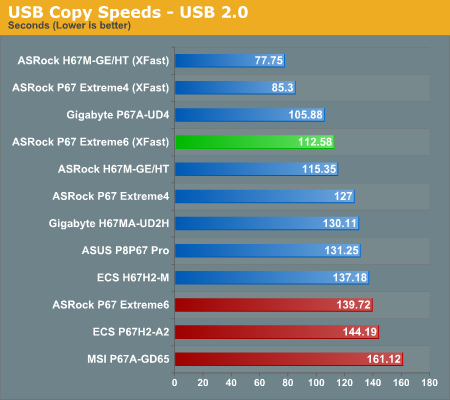

Despite having reasonably good sequential scores, when it comes down to a series of small files for the copy results, all three motherboards perform relatively poorly compared to all the other boards we've tested. The ASRock has the get out clause of XFast, which is blowing the competitors away.
SATA Testing
We also use CrystalDiskMark for SATA port testing. The operating system is installed on the Micron RealSSD C300, which is rated at 355 MB/s read and 215 MB/s write, and the sequential test is run at the 5 x 1000 MB level. This test probes the efficiency of the data delivery system between the chipset and the drive, or in the case of additional SATA ports provided by a third party controller, the efficiency between the controller, the chipset and the drive.
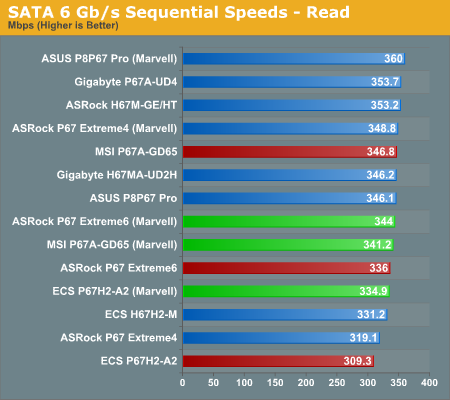

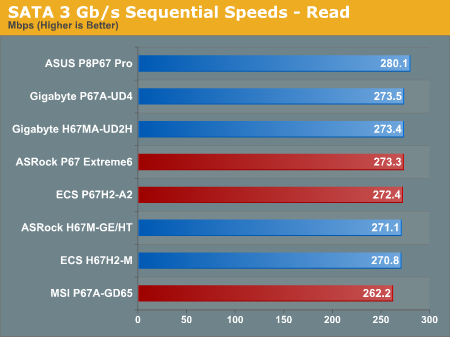
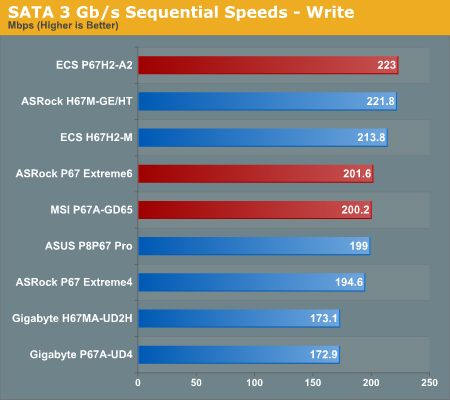
The Marvell controller has a large negative effect on the write speed of any drive in the 6 Gbps tests. The MSI performs the worst out of the three boards on the SATA 3 Gbps sequential speeds.
DPC Latency
Deferred Procedure Call latency is a way in which Windows handles interrupt servicing. In order to wait for a processor to acknowledge the request, the system will queue all interrupt requests by priority. Critical interrupts will be handled as soon as possible, whereas lesser priority requests, such as audio, will be further down the line. So if the audio device requires data, it will have to wait until the request is processed before the buffer is filled. If the device drivers of higher priority components in a system are poorly implemented, this can cause delays in request scheduling and process time, resulting in an empty audio buffer—this leads to characteristic audible pauses, pops and clicks. Having a bigger buffer and correctly implemented system drivers obviously helps in this regard. The DPC latency checker measures how much time is processing DPCs from driver invocation—the lower the value will result in better audio transfer at smaller buffer sizes. Results are measured in microseconds and taken as the peak latency while cycling through a series of short HD videos—under 500 ms usually gets the green light, but the lower the better.
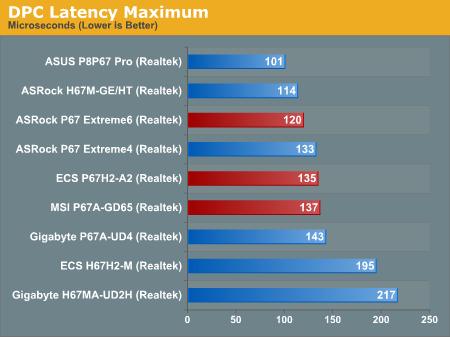
All three boards perform well in the DPC test.
Computation Benchmarks
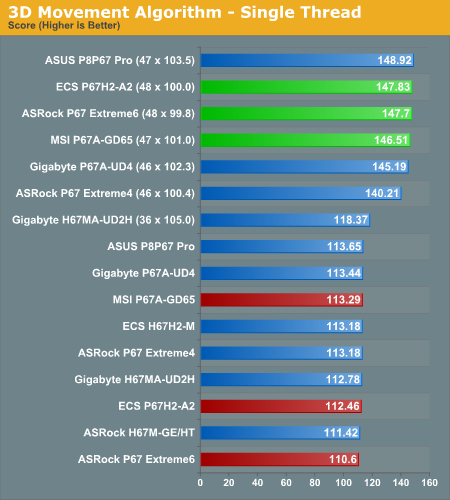
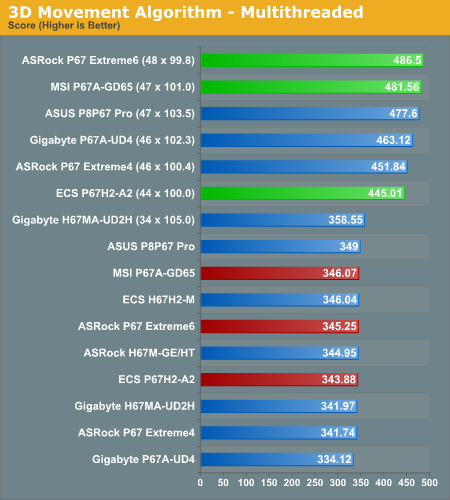
3D Movement Algorithm Test
The first benchmark ran is actually one I have written. My full time job involves computational chemistry, so this first benchmark uses various algorithms for three-dimensional simulation and movement of independent particles. The algorithms both employ uniform random number generation or normal distribution random number generation, and vary in various amounts of trigonometric operations, conditional statements, generation and rejection, fused operations, etc. The benchmark runs through six algorithms for a specified number of particles and steps, and calculates the speed of each algorithm, then sums them all for a final score. This is an example of a real world situation that a computational scientist may find themselves in, rather than a pure synthetic benchmark. The benchmark is also parallel between particles simulated, and we test the single thread performance as well as the multi-threaded performance.
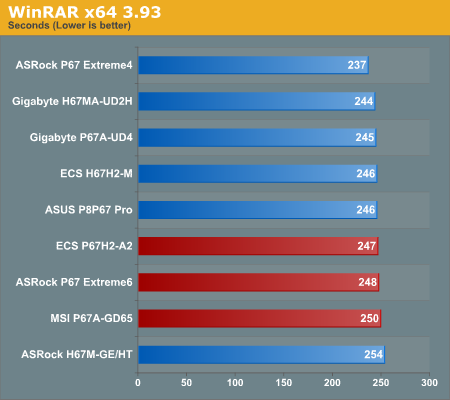
WinRAR x64 3.93
With 64-bit WinRAR, we compress the set of files used in the USB speed tests. WinRAR x64 3.93 attempts to use multithreading when possible.
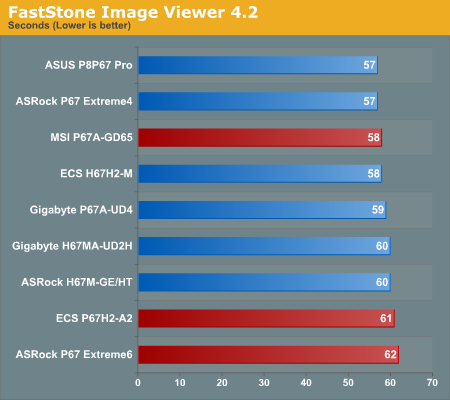
FastStone Image Viewer 4.2
FastStone Image Viewer is a free piece of software I have been using for quite a few years now. It allows quick viewing of flat images, as well as resizing, changing color depth, adding simple text or simple filters. It also has a bulk image conversion tool, which we use here. The software currently operates only in single-thread mode, which should change in later versions of the software. For this test, we convert a series of 170 files, of various resolutions, dimensions and types (of a total size of 163MB), all to the .gif format of 640x480 dimensions.
Sorenson Squeeze 6.0
Sorenson Squeeze is a professional video encoder, complete with a vast array of options. For this test, we convert 32 HD videos, each a minute long and approximately 42 MB in size, to WMV 512KBps format. Squeeze can encode multiple videos at once, one for each thread.
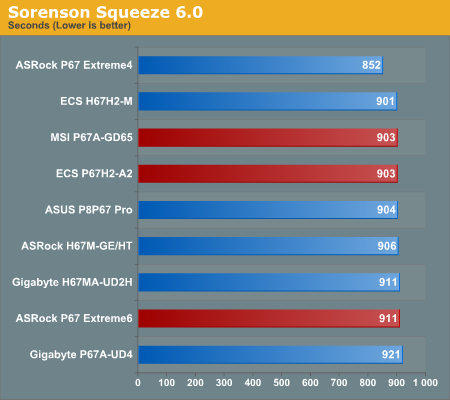
There's almost nothing between any of the boards on system benchmarks—oddly enough the ASRock P67 Extreme6 scores the lowest in the single threaded 3D Movement benchmark, but comes top with its overclocked result in the multithreaded version.
Gaming Benchmarks
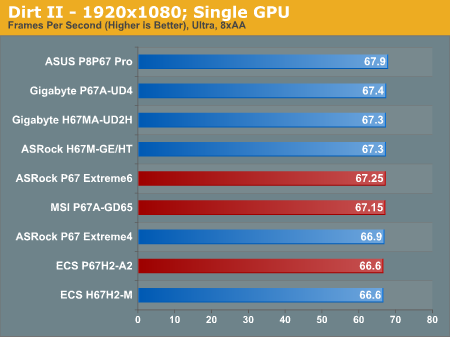
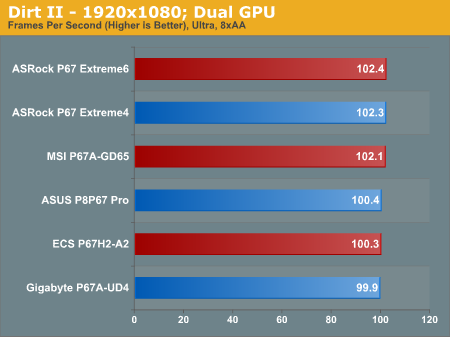
Dirt 2
Dirt 2 came to the PC in December 2009, developed by Codemasters with the EGO Engine. Resulting in favorable reviews, we use Dirt 2’s inbuilt benchmark under DirectX 11 to test the hardware. We test two different resolutions at two different quality settings using a discrete GPU, and an appropriate integrated GPU setting.
1920x1080:

1680x1050:
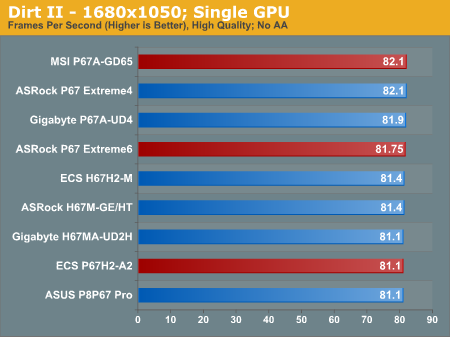
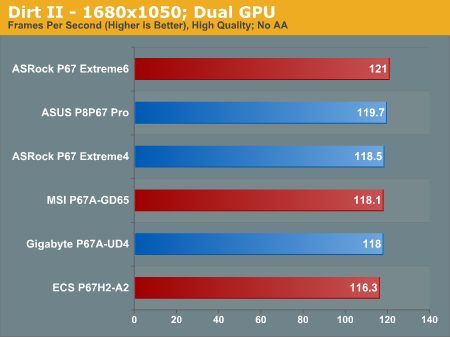
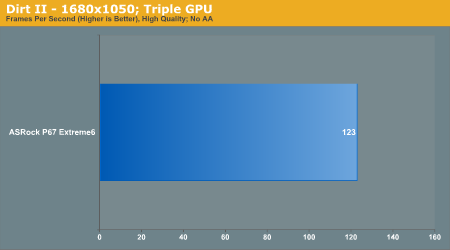
The ECS board comes bottom in all the Dirt2 benchmarks.
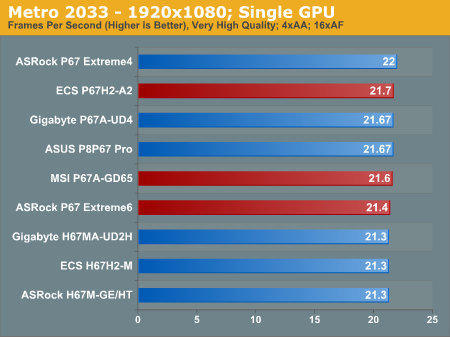
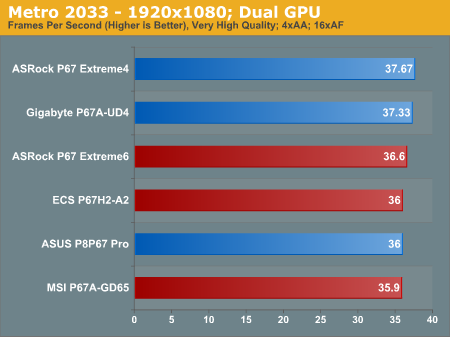
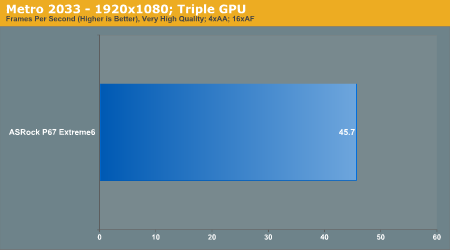
Metro 2033
Metro 2033 is the Crysis of the DirectX 11 world (or at least until Crysis 2 is released), challenging every system that tries to run it at any high-end settings. Developed by 4A Games and released in March 2010, we use the inbuilt DirectX 11 Frontline benchmark to test the hardware.
1920x1080:
1680x1050:
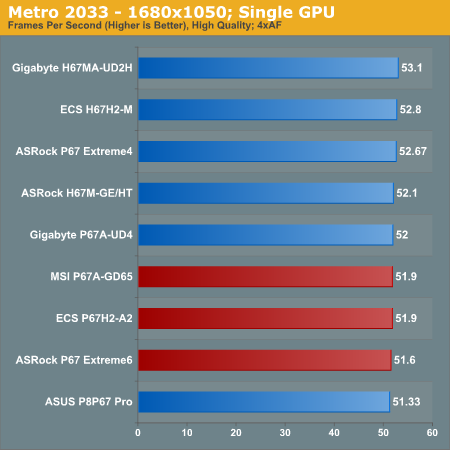
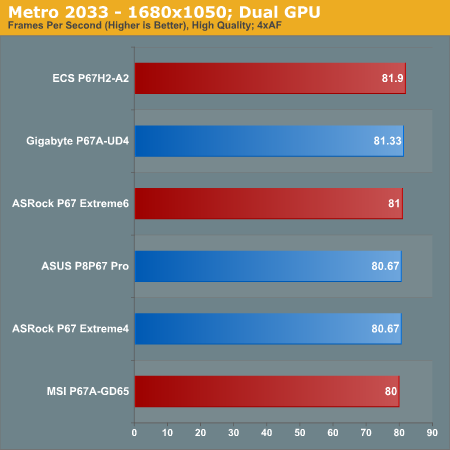
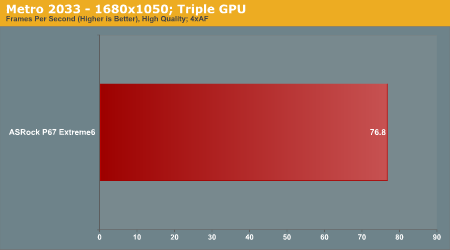
At 1680x1050, it seems that a third GPU has almost no effect on either of our benchmarks.
Final Words
Overview
How much we are willing to spend on a motherboard varies from person to person, but the majority of us like value for money and bang for buck. If there's a sale, or some rebate available—even better. But in the cold harsh reality of motherboards and motherboard bundles, the manufacturer will try to entice you in any way possible—'Military Class', 'V16' and 'Black Deluxe' are what MSI, ASRock and ECS are spouting at consumers this time round with P67 boards.
SandyBridge has leveled the playing field somewhat, especially when it comes to overclocking. Manufacturers really have to represent that the $100-$250 difference between their top and bottom boards is really worth it, by features and performance. Even in this P67 space, or in Z68-land which is just around the corner, the battle never ends. MSI, ASRock and ECS all put up a good fight:
MSI P67A-GD65
For our first MSI 6-series motherboard, the MSI P67A-GD65 does well in terms of price, features and performance—while the USB speed is slower than its rivals, we have a fully capable board which delivers a steady overclock and offers a neat UEFI to use—a lot of people will like using this board. MSI decided to put games into the UEFI—it's an odd feature which offers little merit, much like a lot of the packaged software. It's one thing to offer value for money in terms of features—it's another thing to try and shove every bell and whistle, no matter how polished into a package. There's something to be said from a product which is refined and well designed at every corner—but the minute you add in some unrefined extras, it actually lowers the viewpoint of such a product (maybe I'm talking too much like buying a super car, but I think the comparison is apt). At $180 with a K-series Sandy Bridge SKU, you can't really go wrong with a daily 4.2 GHz overclock on this MSI board—it's competing mainly with the ASRock P67 Extreme4 we reviewed back in January, which bundled more in the box and had less of the fluff. The MSI warranty in that case, at 3 years, could be the sticking point for consumers.
ASRock P67 Extreme6
I cannot fault the ASRock P67 Extreme6 for simplicity and ease of use. The only issue that bugged me a little is that the SATA controllers are set to IDE mode by default, requiring a change every time you press that Reset CMOS button, but in spite of this, you are dealing with a board that performs very well in 3D, coming top or near top in all our 3D benchmarks. On board, apart from the three PCIe slots, you’re dealing with six SATA 6 Gbps ports which is a welcome addition if you don’t use any RAID systems. Admittedly, this board is the most expensive one in our test ($210) and the warranty period can be a deal breaker as it is only a year but with an option for a year extension via the ASRock website. We’re also dealing with a board which uses more power than others that we’ve previously tested. So the ultimate question—is it worth the extra over the P67 Extreme4? More overclock, more SATA ports, more fan headers, yes please.
ECS P67H2-A2
When I look back on the ECS P67H2-A2, I see a mixed bag. On one hand, we have some really good fan control software, the eJiffy quick-boot subsystem, eSATA 6Gb/s ports, SATA 6Gb/s RAID, a full set of locking SATA connectors included, and power/reset/debug LED on the board. On the other hand, I see a relatively poor benchmark performance (even if we are talking less than 1% in most cases), a BIOS with very few options, higher power usage, poor overclocking options, and something that feels like it hasn’t been polished that well. There are issues (mainly in the BIOS) that with a little bit of testing would have been found. Is it worth the $195 I can see it on sale for—does it surpass the Gigabyte P67A-UD4 and ASUS P8P67 Pro we reviewed previously which are almost identical in price? In terms of additional kit, yes. In terms of performance and ease of use, no. The biggest suggestion I can give is that if you get this board, and don’t use the SATA 6 Gbps ports, turn off the Marvell controllers in the BIOS to save yourself about 5-10 seconds of boot time which is taken up by these controllers initializing.
Conclusion
So far in the last quarter, we've covered six P67 motherboards from $160 to $210—the ASRock P67 Extreme4, the ASUS P8P67 Pro, the Gigabyte P67A-UD4, the MSI P67A-GD65, the ASRock P67 Extreme6 and the ECS P67H2-A2. There's not that much difference between them performance wise in terms of the gaming benchmarks, the CPU intensive benchmarks—the real deal is in the USB benchmarks, the amount of extras crammed in the box with the board, such as SATA cables and USB 3.0 holders, the overclock options and the extras on the board.
From today's boards, I really like the ASRock P67 Extreme6 for its ease of use, the USB 3.0 bracket and those 10 SATA ports, six of which are SATA 6 Gbps. The Auto OC options also seemed to work better than previously seen on the P67 Extreme4. The MSI P67A-GD65 has that OC Genie button which works well, even if it does have games in the UEFI which baffle me, and a software list from here to next Sunday. The ECS has its quirks, but it has the best fan speed system and software available—you just have to know what you're doing if you want a good overclock out of it.
If you had to buy a board, today, I'd suggest you decide which features are the most important. P67 motherboards are like Ford Transit vans: there's a model, size, speed, color, engine size and stereo system for almost everyone—just as long as you know what you want out of what is on offer!


